
Stop treating your dessert foundations like an afterthought. If you are still pulverizing store-bought graham crackers and calling it a day, you are committing a culinary felony against your guests. We are here to talk about structural integrity and the sensory dominance of a master-crafted Oatmeal Cookie Crust. This is not just a delivery vehicle for cheesecake or lemon curd; it is a high-density fiber matrix engineered for maximum crunch and a deep, toasted caramel profile. When you bite into a properly executed crust, you should experience a symphony of shattered sugar lattices and the chewy resistance of steel-cut oats. We are looking for that perfect balance of Maillard reaction complexity and buttery cohesion. A weak crust collapses under the weight of its filling, but a technical masterpiece stands its ground. It provides a salty, nutty counterpoint to the sugary abyss of the topping. Prepare to audit your pantry and recalibrate your expectations. We are building a fortress of flavor, one rolled oat at a time.
THE DATA MATRIX
| Metric | Specification |
|---|---|
| Prep Time | 15 Minutes |
| Execution Time | 20 Minutes |
| Yield | 1 x 9-inch (23cm) Crust |
| Complexity (1-10) | 4 |
| Estimated Cost per Serving | $0.45 USD |
THE GATHERS
Ingredient Protocol:
- 150g / 1.5 cups Old Fashioned Rolled Oats (not instant)
- 125g / 1 cup All-Purpose Flour
- 100g / 0.5 cups Light Brown Sugar, firmly packed
- 2g / 0.5 tsp Sea Salt
- 1g / 0.25 tsp Ground Cinnamon
- 115g / 0.5 cups Unsalted Butter, melted and slightly cooled
- 5ml / 1 tsp Pure Vanilla Extract
Section A: Ingredient Quality Audit:
If your oats look dusty and shattered, your final texture will be gummy rather than crisp. Sub-par oats lack the structural hull needed to infuse the crust with a nutty bite. Fix this by sifting out the "oat flour" dust before measuring. If your brown sugar is a brick, do not try to chisel it. Use a microwave-safe bowl with a damp paper towel for twenty seconds to restore its viscous moisture. Finally, if using salted butter, eliminate the additional sea salt entirely to prevent an aggressive sodium spike that overrides the delicate vanilla notes.
THE MASTERCLASS
1. Dry Component Integration
Place your oats, flour, brown sugar, salt, and cinnamon into a large stainless steel mixing bowl. Use a digital scale for these measurements; volumetric cups are the enemies of precision. Use a whisk to break up any sugar clumps until the mixture is a homogenous, sandy grit.
Pro Tip: To elevate the flavor profile, toast the dry oats in a dry saucier over medium heat for three minutes before mixing. This initiates the Maillard reaction early, providing a deeper, toasted aroma that raw oats lack.
2. Lipid Emulsification
Stream the melted butter and vanilla extract into the center of your dry pile. Use a flexible silicone spatula to fold the fats into the grains. You are looking for a "wet sand" consistency where every oat flake is glistening but not swimming in a pool of oil.
Pro Tip: Ensure the butter is melted but not boiling. If the butter is too hot, it will melt the sugar crystals prematurely, resulting in a greasy, tough crust rather than a light, crumbly one.
3. Structural Compression
Transfer the mixture into your tart pan or springform mold. Use a bench scraper to distribute the crumbs evenly toward the edges. Use the flat bottom of a heavy measuring cup to press the mixture firmly into the base and one inch up the sides.
Pro Tip: Compression is the secret to a crust that does not shatter upon contact with a fork. Applying consistent pressure ensures the butter acts as a microscopic glue, binding the fibers into a singular, resilient plate.
4. Thermal Setting
Slide the pan into a preheated oven at 175C / 350F. Bake for 12 to 15 minutes. You are looking for the edges to turn a deep mahogany while the center remains a golden amber. The smell should be reminiscent of a high-end bakery at dawn.
Pro Tip: Use an oven thermometer to verify your heat. Even a ten-degree variance can lead to "slumping" where the sides of the crust slide down the pan before they have a chance to set.
Section B: Prep & Timing Fault-Lines:
The most common failure in this protocol is the "Thermal Shock" error. If you pour a hot filling into a hot crust, you will end up with a soggy, disintegrated mess. The crust must be allowed to cool completely on a wire rack to allow the sugars to recrystallize and the fats to stabilize. If you are in a rush, a blast chiller or a ten-minute stint in the freezer can save your timeline. Another fault-line is over-mixing; once the butter is added, move quickly. Excessive manipulation can develop the gluten in the flour, turning your crisp crust into a rubbery disc.
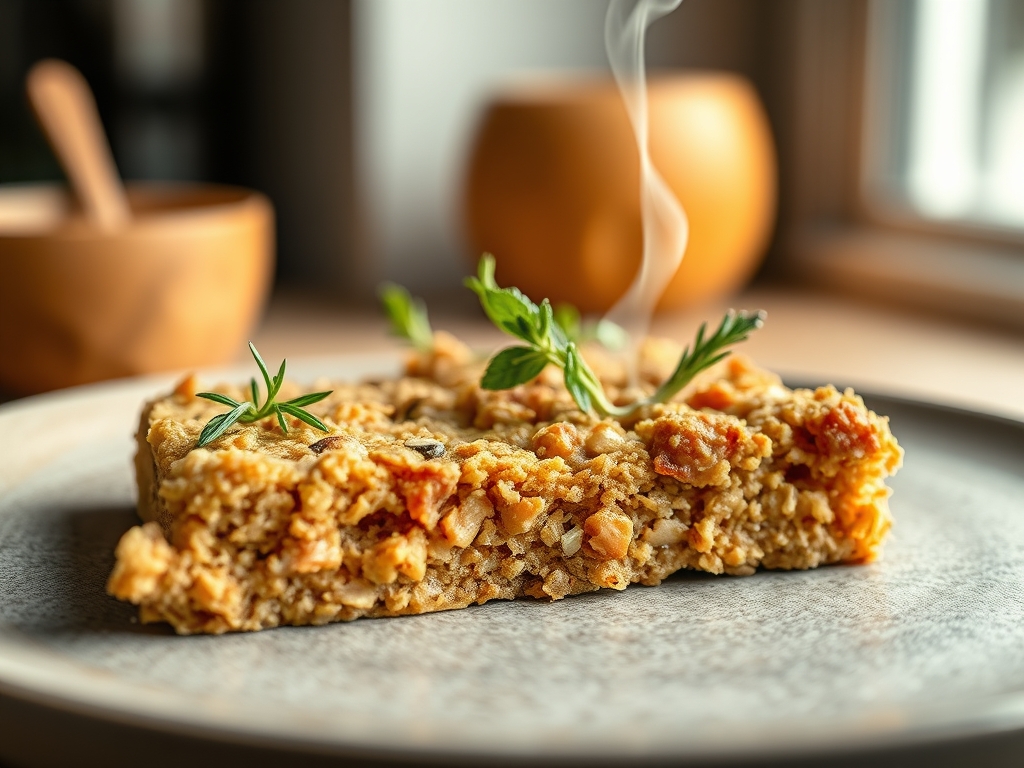
THE VISUAL SPECTRUM
Section C: Thermal & Visual Troubleshooting:
Referencing the Masterclass photo, notice the distinct "pebbled" surface of the crust. If your crust looks smooth or flat, you likely used instant oats or over-processed the mixture. If the edges are black while the center is pale, your oven has "hot spots" and requires a mid-bake rotation. A dull, matte finish indicates a lack of sugar or fat; a healthy Oatmeal Cookie Crust should have a slight sheen from the caramelized sucrose. If you see "pooling" of butter in the center, your emulsion failed because the butter was added while too hot. To fix a pale crust, a quick two-minute broil can save the aesthetics, but watch it like a hawk to avoid total carbonization.
THE DEEP DIVE
Macro Nutrition Profile:
Per serving (1/12th of crust), expect approximately 180 calories, 10g fat, 22g carbohydrates, and 2g protein. The fiber content from the oats provides a lower glycemic index impact compared to standard shortbread or graham bases.
Dietary Swaps:
For a Vegan conversion, substitute the butter with a high-quality coconut oil (solid state) or a plant-based butter block. For Gluten-Free requirements, swap the all-purpose flour for a 1-to-1 GF blend and ensure the oats are certified gluten-free. For a Keto version, use almond flour, sugar-free brown sweetener, and increase the cinnamon to mask the nuttiness.
Meal Prep & Reheating Science:
This crust is a structural tank. You can bake it up to three days in advance if kept in an airtight container at room temperature. To maintain the molecular structure when reheating a filled pie, use a low oven (150C) rather than a microwave. Microwaves vibrate water molecules, which will turn your crisp oat matrix into a soggy sponge.
THE KITCHEN TABLE
Why is my crust crumbling when I cut it?
You likely under-pressed the mixture or skipped the flour. The flour acts as the secondary binder. Ensure you use a heavy-bottomed glass to compress the crumbs into a solid sheet before the thermal setting phase.
Can I use steel-cut oats for more crunch?
Negative. Steel-cut oats are too dense and will remain painfully hard even after baking. They require hydration that this dry-bake method does not provide. Stick to Old Fashioned Rolled Oats for the optimal fiber density.
My crust is too hard to bite through. What happened?
This is a symptom of over-baking or excessive sugar. If the sugars undergo too much pyrolysis, they turn into a hard candy shell. Aim for a golden-brown hue, not a dark chocolate brown.
How do I prevent the crust from sticking to the pan?
Even with the high fat content, a light spray of neutral oil or a parchment paper disc at the base is a professional insurance policy. This ensures a clean release for every slice.

