
Stop settling for mediocre, one dimensional dough that lacks the structural integrity of a professional build. We are here to talk about Beer Crust Infrastructure; the holy grail of carbonation induced aeration that separates a soggy amateur slab from a crisp, malted masterpiece. When you introduce a carbonated, fermented liquid into a high protein flour matrix, you are not just making dinner. You are conducting a high stakes engineering project. The dissolved carbon dioxide acts as a biological leavening accelerant, while the residual sugars and proteins from the malt undergo a violent, beautiful Maillard reaction that no plain water dough can replicate. We are looking for a crust that shatters on impact but remains supple enough to hold its structural load. This is about the physics of the bubble and the chemistry of the kiln. If your current crust feels more like cardboard than a structural marvel, your audit begins now. We are optimizing for texture, flavor depth, and a crumb structure that looks like a topographical map of the heavens.
THE DATA MATRIX
| Metric | Specification |
|---|---|
| Prep Time | 20 Minutes |
| Execution Time | 45 Minutes (Excluding Fermentation) |
| Yield | 2 Large Bases (12-inch) |
| Complexity (1-10) | 7 |
| Estimated Cost per Serving | $1.45 |
THE GATHERS
Ingredient Protocol:
- 500g / 4 cups High Protein Bread Flour (12.5% protein minimum)
- 330ml / 11.2 oz Cold India Pale Ale or Stout (Carbonated)
- 10g / 2 tsp Fine Sea Salt
- 5g / 1.5 tsp Instant Dry Yeast
- 15ml / 1 tbsp Extra Virgin Olive Oil
- 5g / 1 tsp Diastatic Malt Powder (Optional for enhanced browning)
Section A: Ingredient Quality Audit:
If your flour has a low protein count, the Beer Crust Infrastructure will collapse under its own weight. Use a digital scale to ensure precision; volumetric measurements are the enemy of consistency. If your beer is flat, you lose the initial aerate phase provided by the CO2 bubbles. Always use a fresh, cold bottle. If the yeast is expired, your fermentation curve will be flat. Test your yeast in a small amount of warm water first; if it does not foam within five minutes, discard and replace. For those using "soft" tap water, the lack of minerals can lead to a slack dough. Use filtered water or add a pinch of calcium sulfate to tighten the gluten network.
THE MASTERCLASS
1. The Initial Hydration Phase
Combine your dry ingredients in a large stainless steel bowl. Slowly pour the cold beer into the center while stirring with a sturdy bench scraper. The goal is to infuse the flour with the malted liquid without knocking out all the carbonation.
Pro Tip: The cold temperature of the beer slows down initial yeast activity, allowing for a longer autolyse period which develops deeper flavor profiles and better gluten alignment.
2. The Kinetic Knead
Transfer the shaggy mass to a clean surface. Work the dough using the "slap and fold" method for 8 to 10 minutes. You are looking for the "windowpane test" where a small piece of dough can be stretched thin enough to see light through it without tearing.
Pro Tip: Using a digital scale to weigh your dough balls ensures even baking times. Mechanical energy during kneading transforms globular proteins into linear chains, creating the "rebar" of your Beer Crust Infrastructure.
3. The Controlled Fermentation
Place the dough in a lightly oiled container. Cover tightly and refrigerate for 24 to 72 hours. This cold fermentation allows enzymes to break down complex starches into simple sugars, which will later render a deep mahogany color in the oven.
Pro Tip: Cold fermentation is the secret to a viscous interior crumb. The slow gas release creates irregular, artisanal bubbles rather than a uniform, cake like texture.
4. The Thermal Shock
Preheat your oven with a baking stone or heavy steel inside to its maximum setting (usually 500F/260C). Stretch the dough by hand, avoiding the use of a rolling pin which would deflate the precious aeration you have built.
Pro Tip: A baking steel has higher thermal conductivity than a stone, transferring heat instantly to the bottom of the crust to trigger "oven spring," the final expansion of gases.
5. The Maillard Execution
Slide the dough onto the hot surface. Bake for 8 to 12 minutes until the edges are charred and the bottom is rigid. The malt sugars from the beer will cause the crust to darken faster than a standard dough; monitor closely.
Pro Tip: Use an infrared thermometer to ensure your baking surface has reached at least 475F before launching. High heat is required to render the fats and crisp the exterior instantly.
Section B: Prep & Timing Fault-Lines:
The most common failure is rushing the fermentation. If you bake the dough too early, the Beer Crust Infrastructure will be dense and taste like raw flour. Temperature control is your primary lever. If your kitchen is over 75F, your bulk fermentation will happen too fast; move the dough to a cooler spot. Another fault line is over handling. Once the dough has risen, treat it like a fragile lung. Every bubble you pop is a failure in the aeration audit.
THE VISUAL SPECTRUM
Section C: Thermal & Visual Troubleshooting:
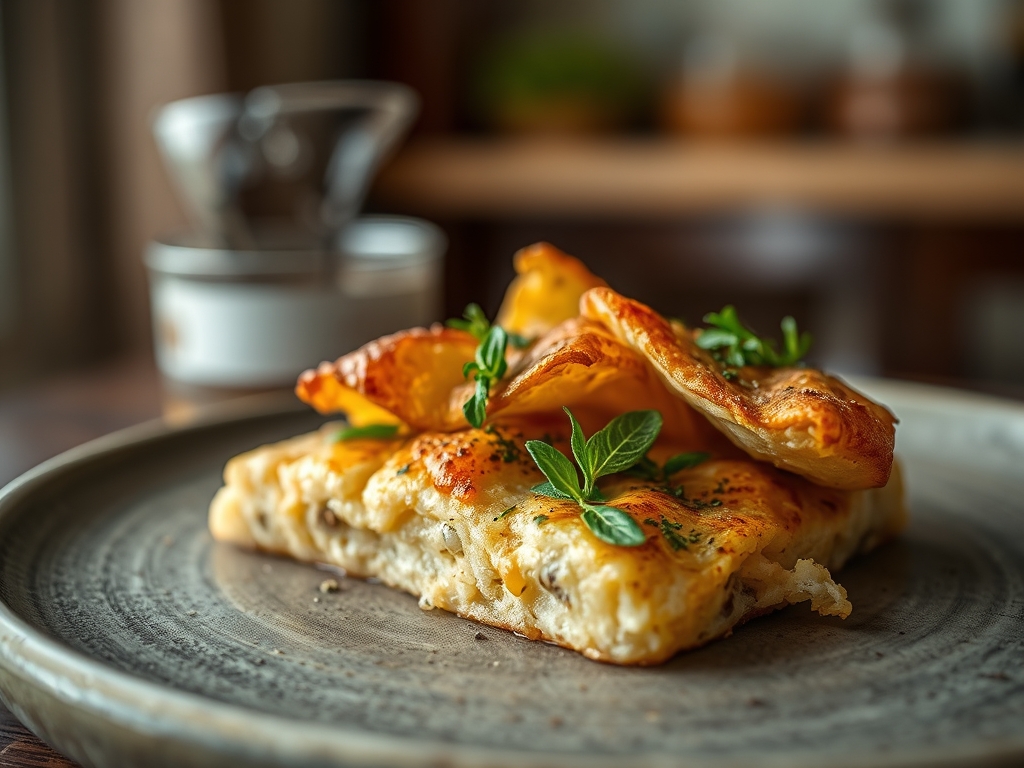
Referencing the Masterclass photo, your crust should exhibit "leopard spotting," which are small, dark charred bubbles against a golden background. If the crust is a uniform, dull tan, your oven was not hot enough or you skipped the diastatic malt. If the dough is pale and soft, it likely has too much moisture; increase the flour ratio by 5% next time. If the bottom is burnt but the top is raw, move your rack higher in the oven. A perfect audit result shows a crisp, shattered edge with a soft, airy interior that smells distinctly of toasted grain and hops.
THE DEEP DIVE
Macro Nutrition Profile
Per serving (1/4 of recipe): 480 Calories, 12g Protein, 85g Carbohydrates, 6g Fat. The inclusion of beer adds trace B vitamins and minerals like selenium and silicon, though most of the alcohol burns off during the high heat bake.
Dietary Swaps (Vegan/Keto/GF)
Vegan: Naturally vegan. Ensure your beer choice does not use isinglass (fish bladder) as a fining agent.
Keto: This infrastructure relies on gluten; a keto version requires vital wheat gluten mixed with almond flour and a non alcoholic keto beer.
GF: Use a high quality 1:1 gluten free flour blend and a gluten free sorghum based beer. Increase the xanthan gum by 0.5% to mimic the lost protein structure.
Meal Prep & Reheating Science
To maintain the molecular structure when reheating, avoid the microwave. The microwave agitates water molecules, making the bread rubbery. Instead, use a dry skillet over medium heat for 3 minutes. This re-crisps the bottom via conduction while the residual heat warms the toppings. You can also freeze the par-baked crusts for up to 3 months; simply bake from frozen at 450F to restore the original crunch.
THE KITCHEN TABLE
Why use beer instead of water?
Beer provides natural sugars and CO2 which enhance the Maillard reaction and create a superior crumb structure. The acidity in beer also strengthens the gluten network, leading to a more resilient, airy crust that holds toppings without sagging.
Can I use non-alcoholic beer?
Absolutely. You will still benefit from the malted sugars and carbonation. However, you might lose some of the complex ester notes provided by specific yeast strains found in craft ales or stouts.
My dough is too sticky to handle, what now?
Perform a series of "coil folds" every 30 minutes. This builds tension without adding excess flour. Wet your hands slightly to prevent sticking; adding more flour during the shaping phase can lead to a dry, tough final product.
What is the best beer style for this?
A hoppy IPA adds a piquant bitterness that cuts through fatty cheeses. A Stout or Porter offers chocolate and coffee notes that pair beautifully with earthy toppings like mushrooms or caramelized onions. Avoid light lagers as they lack flavor depth.

