
Listen up, architects of the edible. We are moving beyond the flaccid, uninspired doughs of the suburban delivery era. Today, we are auditing the structural integrity of the ultimate foundation: the Cornmeal Pizza Crust. This is not merely a base; it is a high-performance substrate engineered for maximum crunch and structural load-bearing capacity. Imagine a crust that does not buckle under the weight of a heavy pomodoro or a mountain of molten mozzarella. We are talking about a gritty, golden fortification that provides a tectonic snap with every bite. The cornmeal does not just add flavor; it introduces a granular complexity that disrupts the gluten network just enough to ensure a short, crisp crumb rather than a chewy, bread-like slog. When that heat hits the stone, the cornmeal parches and toasts, releasing an aroma that is earthy, sweet, and undeniably primal. Prepare to re-engineer your expectations of what a pizza chassis can achieve. This is a technical overhaul of your kitchen infrastructure.
THE DATA MATRIX
| Metric | Specification |
|---|---|
| Prep Time | 20 Minutes |
| Execution Time | 15 Minutes |
| Yield | 2 Large Crusts |
| Complexity | 4 / 10 |
| Estimated Cost per Serving | $1.15 |
THE GATHERS
Ingredient Protocol:
- 375g / 3 cups All-Purpose Flour (High-protein preferred)
- 125g / 1 cup Fine or Medium-Grind Yellow Cornmeal
- 7g / 2.25 tsp Active Dry Yeast
- 10g / 2 tsp Fine Sea Salt
- 15ml / 1 tbsp Honey or Granulated Sugar
- 250ml / 1 cup Warm Water (40C / 105F)
- 45ml / 3 tbsp Extra Virgin Olive Oil
- 5g / 1 tsp Garlic Powder (Optional for flavor infusion)
Section A: Ingredient Quality Audit:
The most common failure point in this assembly is the granulometry of the cornmeal. If you utilize a coarse "stone-ground" variety intended for slow-cooked grits, your crust will feel like it contains dental-threatening pebbles. To fix this, pulse coarse meal in a high-speed blender for ten seconds to achieve a uniform, sandy texture. Furthermore, if your yeast fails to bloom, the water temperature is likely the culprit. Anything above 45C (113F) will effectively terminate your microbial workers. Always verify with a digital probe thermometer. If the dough feels excessively viscous or sticky, your flour may have a low protein content; compensate by adding an extra 15g of flour at a time until the dough clears the sides of the mixing bowl.
THE MASTERCLASS
1. Microbial Activation and Hydration
Combine the warm water, honey, and yeast in the bowl of a stand mixer. Allow the mixture to sit for five to ten minutes until a thick, frothy foam appears on the surface. This indicates the yeast is metabolizing the sugars and producing carbon dioxide.
Pro Tip: Use a digital scale for all measurements. Volume is a liar; mass is the only truth in baking. Precise hydration ratios ensure the cornmeal can properly infuse with moisture without drowning the gluten.
2. Dry Component Integration
Whisk together the flour, cornmeal, salt, and garlic powder in a separate vessel. Once the yeast is active, add the olive oil to the liquid, then slowly incorporate the dry ingredients using a dough hook attachment on low speed.
Pro Tip: The addition of oil at this stage serves to coat the flour proteins, which limits gluten development. This results in a "short" crust that snaps rather than stretches, highlighting the gritty texture of the maize.
3. Kinetic Energy Application (Kneading)
Increase the mixer speed to medium and knead for six to eight minutes. The dough should be tacky but not sticky, pulling away cleanly from the bowl. If kneading by hand, use a bench scraper to manage the dough on a lightly floured surface until it reaches a smooth, elastic consistency.
Pro Tip: The "Windowpane Test" is your diagnostic tool here. Stretch a small piece of dough; if it becomes translucent without tearing, the protein structure is sufficiently developed to trap gas.
4. Atmospheric Fermentation
Place the dough in a lightly oiled bowl and cover with a damp cloth or plastic wrap. Allow it to rise in a warm, draft-free environment for 60 to 90 minutes, or until it has doubled in volume.
Pro Tip: For superior flavor, utilize a cold fermentation strategy. Place the dough in the refrigerator for 24 hours. This slow rise allows enzymes to break down starches into complex sugars, enhancing the Maillard reaction during the bake.
5. Structural Shaping
Punch down the dough to aerate and redistribute the yeast. Divide into two equal portions. Roll the dough out on a surface dusted with extra cornmeal to a thickness of approximately 6mm (1/4 inch).
Pro Tip: Do not use a rolling pin if you want large, airy bubbles in the crust. Instead, use your fingertips to press the dough outward from the center, preserving the gas pockets created during fermentation.
Section B: Prep & Timing Fault-Lines:
Timing is the silent killer of quality. If you over-proof the dough, the gluten structure will collapse, resulting in a dense, leaden disc. If the dough resists stretching and snaps back like a rubber band, it is under-relaxed. Cover it and wait ten minutes; this allows the gluten to "relax" its grip, making the shaping process effortless. Ensure your oven is preheated for at least 45 minutes. A cold stone or steel will result in a "soggy bottom" syndrome that no amount of cornmeal can save.
THE VISUAL SPECTRUM
Section C: Thermal & Visual Troubleshooting:
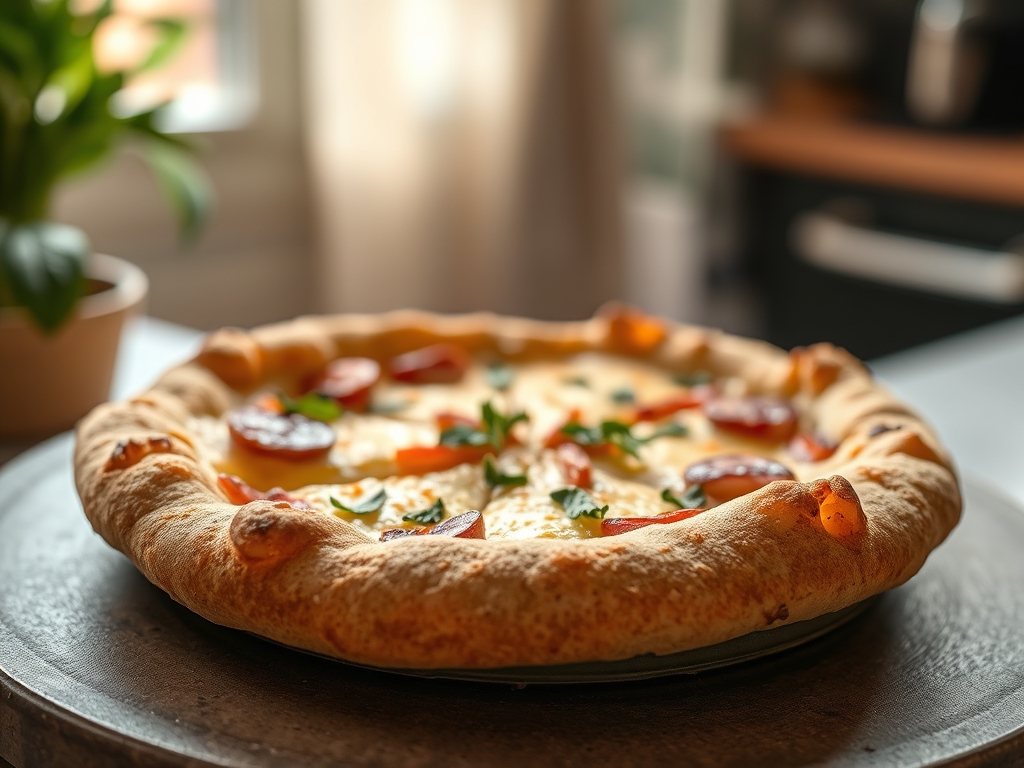
Referencing the Masterclass photo, you are looking for a "Leopard Spotting" effect on the rim. If your crust is pale and ghostly, your oven temperature is too low or your dough lacked sufficient sugar to facilitate browning. If the cornmeal appears burnt or black, it was likely too coarse and toasted unevenly. The ideal visual cue is a deep, golden-rod hue across the surface with charred, piquant blisters on the edges. If the center of the pizza is wet, you have overloaded the structural capacity with high-moisture toppings. Render the fat out of meats and drain your mozzarella before assembly to maintain the integrity of the cornmeal barrier.
THE DEEP DIVE
Macro Nutrition Profile
Each serving (approximately 1/4 of a large crust) provides roughly 280 calories, 5g of fat, 52g of carbohydrates, and 7g of protein. The inclusion of cornmeal adds a marginal increase in dietary fiber and essential minerals like magnesium and phosphorus compared to standard white flour crusts.
Dietary Swaps
- Vegan: This recipe is inherently vegan. Ensure your sugar source is bone-char free.
- Gluten-Free: Replace all-purpose flour with a high-quality 1:1 GF baking blend containing xanthan gum. Increase water by 10% to account for higher absorption.
- Keto: This is a high-carb infrastructure. For a keto alternative, swap flour for almond flour and use a higher ratio of parmesan cheese to bind the cornmeal.
Meal Prep & Reheating Science
To maintain the molecular structure when reheating, avoid the microwave. The microwave agitates water molecules, turning the crust into a rubbery mess. Instead, use a cast iron skillet over medium heat. This re-crisps the cornmeal base and maintains the internal moisture of the crumb. For long-term storage, par-bake the crust for 5 minutes, cool completely, and vacuum seal for up to three months.
THE KITCHEN TABLE
Why is my crust so tough?
You likely over-worked the dough or used flour with a protein content that was too high. Excessive kneading creates a dense gluten web. Stick to the 6-8 minute window and ensure your olive oil is integrated early to tenderize the crumb.
Can I use white cornmeal instead of yellow?
Absolutely. The difference is primarily aesthetic and slightly flavor-based. Yellow cornmeal contains more beta-carotene and offers a more robust, earthy flavor profile; white cornmeal is more subtle and will yield a paler, more traditional-looking crust.
My dough didn't rise at all. What happened?
Check your yeast expiration date or your water temperature. If the water was too hot, you killed the culture. If it was too cold, the yeast is simply dormant. Try moving the dough to a warmer spot.
How do I get that professional "crunch" on the bottom?
Use a pizza stone or a heavy baking steel. Preheat it at your oven's maximum temperature for an hour. The immediate heat transfer causes "oven spring," rapidly expanding the gas bubbles and searing the cornmeal for a shatter-crisp finish.

