
The air in a professional patisserie does not just smell like sugar; it vibrates with the frequency of a thousand tiny crystals surrendering to thermal energy. We are not merely baking a dessert today. We are constructing a structural masterpiece that serves as the bedrock for every high-end tart and cheesecake in your repertoire. Enter the Sugar Cookie Crust. This is the architectural foundation where the snap of cold butter meets the granular resistance of sucrose. When executed with precision, this crust offers a shatter-point that is both delicate and defiant. It must be sturdy enough to support a viscous lemon curd or a dense chocolate ganache, yet tender enough to melt upon contact with the palate. We are looking for that specific golden-hour hue, a result of the Maillard reaction working in perfect tandem with moisture evaporation. Forget the soggy, lackluster bases of amateur hour. We are here to audit your technique and upgrade your culinary infrastructure to a level of industrial-grade excellence.
THE DATA MATRIX
| Metric | Specification |
|---|---|
| Prep Time | 15 Minutes |
| Execution Time | 22 Minutes |
| Yield | One 9-inch (23cm) Tart or 12 Individual Tartlets |
| Complexity (1-10) | 4 |
| Estimated Cost per Serving | $0.45 USD |
THE GATHERS
Ingredient Protocol:
- 250g / 2 cups All-Purpose Flour (Unbleached)
- 115g / 1/2 cup Unsalted European-Style Butter (Cold, Cubed)
- 100g / 1/2 cup Granulated White Sugar
- 1 Large Egg Yolk (Room Temperature)
- 5ml / 1 tsp Pure Vanilla Bean Paste
- 2g / 1/4 tsp Fine Sea Salt
- 15ml / 1 tbsp Heavy Cream (Cold)
Section A: Ingredient Quality Audit:
The most common failure in the Sugar Cookie Crust protocol begins with the butter. If you are using standard grocery store butter with high water content, your crust will shrink and toughen as the water evaporates and develops excess gluten. Fix: Opt for European-style butter with at least 82 percent butterfat. If your flour feels gritty or looks gray, it has likely oxidized or absorbed ambient humidity. Always store your dry goods in airtight containers to maintain a neutral flavor profile. If your sugar has clumped, do not simply break it apart; sift it to ensure even distribution, or the resulting crust will have unsightly "sugar spotting" where larger crystals have caramelized unevenly.
THE MASTERCLASS

1. Dry Component Integration
Begin by deploying your digital scale to measure the flour, sugar, and salt into a large stainless steel mixing bowl. Use a whisk to aerate the mixture, ensuring no dense pockets of flour remain. This step is vital for a uniform crumb structure.
Pro Tip: Mechanical aeration ensures that the leavening happens through steam and air expansion rather than chemical agents, resulting in a cleaner flavor profile and a more professional "snap."
2. Lipid Dispersion
Add the cold, cubed butter to the dry matrix. Use a bench scraper or a pastry blender to cut the fat into the flour until the mixture resembles coarse sand with a few pea-sized lumps remaining. You are looking to coat the flour proteins in fat to inhibit gluten formation.
Pro Tip: Keeping the butter cold is non-negotiable. If the fat melts before it hits the oven, you lose the "short" texture that defines a world-class Sugar Cookie Crust; the result will be greasy and dense rather than crisp.
3. Emulsion and Binding
In a small saucier or ramekin, whisk the egg yolk, vanilla bean paste, and heavy cream until homogenous. Drizzle this liquid gold over the dry ingredients. Use a silicone spatula to fold the mass until it just begins to cling together.
Pro Tip: The egg yolk acts as a powerful emulsifier, bridging the gap between the fat and the flour. The lecithin in the yolk provides structural integrity without the rubbery texture associated with egg whites.
4. The Chill Protocol
Turn the dough onto a clean surface and press it into a flat disc. Wrap it tightly in plastic film and refrigerate for at least 30 minutes. This allows the flour to fully hydrate and the butter to re-solidify, preventing shrinkage during the bake.
Pro Tip: Professional pastry chefs never skip the chill. This rest period allows the gluten strands to relax, ensuring your crust doesn't pull away from the edges of the tart pan like a retreating army.
5. Thermal Execution
Preheat your convection oven to 175C / 350F. Press the dough into your chosen vessel, ensuring an even thickness across the base and up the sidewalls. Prick the bottom with a fork (docking) and bake for 18 to 22 minutes until the edges are a deep, resonant gold.
Pro Tip: Use a heavy-gauge aluminum pan for the best heat conduction. If the center puffs up, gently press it down with the back of a spoon immediately after removing it from the heat.
Section B: Prep & Timing Fault-Lines:
The most frequent "human error" is over-working the dough once the liquid is added. If you treat this like bread dough, you will end up with a hockey puck. Stop mixing the second the dough holds its shape when squeezed. Another timing trap is the "warm kitchen" syndrome. If your kitchen is over 75 degrees Fahrenheit, your butter will reach its melting point on the counter. Fix: Chill your mixing bowl and even your flour in the freezer for 10 minutes before starting the audit.
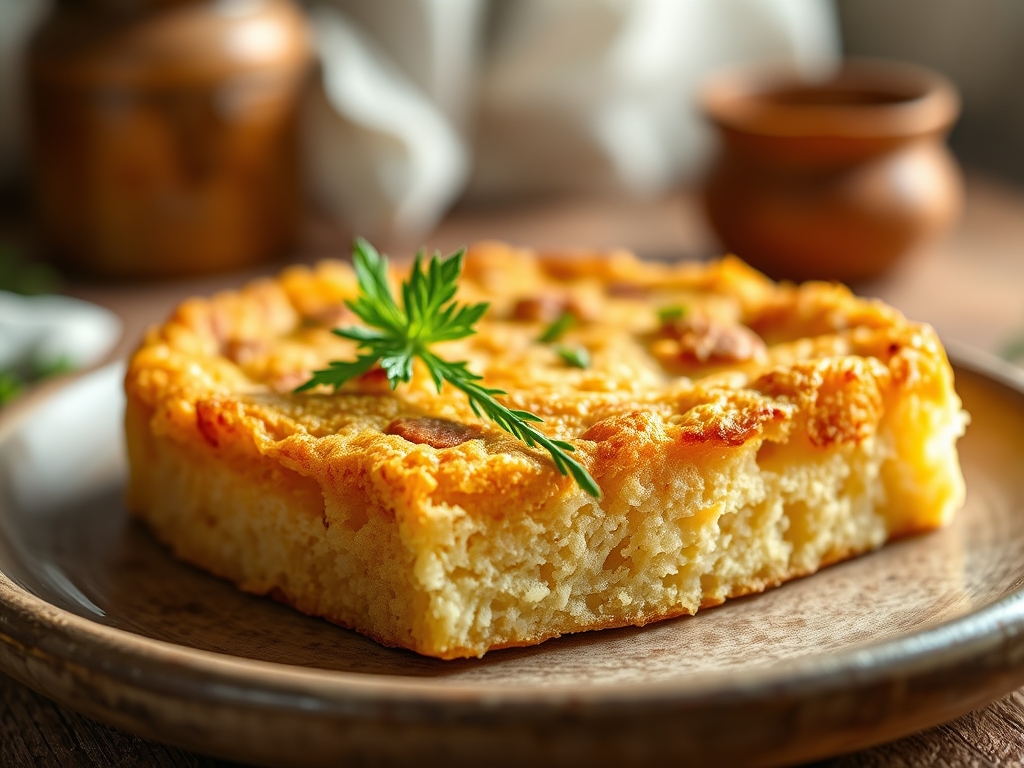
THE VISUAL SPECTRUM
Section C: Thermal & Visual Troubleshooting:
Referencing the masterclass image above, notice the uniform, matte golden finish. If your crust looks pale and "sweaty," it is underbaked; the sugars have not yet reached the stage of caramelization required for structural stability. If you see dark brown spots on the bottom but a pale top, your oven has uneven floor heat. Fix: Bake on a middle rack and use a pizza stone on the bottom rack to diffuse the intensity. If the edges are crumbling like dry earth, you likely under-measured the liquid components or over-floured your work surface. A perfect Sugar Cookie Crust should have a clean, sharp edge where it meets the pan, indicating a successful hydration-to-fat ratio.
THE DEEP DIVE
Macro Nutrition Profile:
A standard serving (1/12th of a 9-inch crust) contains approximately 180 calories, 10g of fat, 22g of carbohydrates, and 2g of protein. While it is a high-energy component, its role is structural and sensory rather than nutritional.
Dietary Swaps:
- Vegan: Replace the butter with a high-quality plant-based block (avoid tub margarines) and use 15ml of maple syrup in place of the egg yolk.
- Gluten-Free: Substitute the all-purpose flour with a 1:1 gluten-free flour blend containing xanthan gum. Increase the chilling time by 15 minutes to allow for better hydration.
- Keto: Utilize almond flour and an erythritol-based sweetener. Note that keto crusts lack the same "snap" as sucrose-based versions due to the lack of crystallization.
Meal Prep & Reheating Science:
The molecular structure of this crust is surprisingly resilient. You can "blind bake" the crust up to 48 hours in advance if stored in a low-humidity environment. To maintain the crispness of the sucrose matrix, avoid refrigerating the naked crust, as it will absorb moisture and become "bready." If reheating a filled tart, use a low oven (150C) to prevent the sugars from burning while the filling warms.
THE KITCHEN TABLE
Why is my crust shrinking down the sides of the pan?
This is usually caused by over-working the dough, which develops gluten. When the gluten heats up, it contracts like a rubber band. Ensure you let the dough rest in the fridge to relax those protein strands before baking.
Can I use granulated sugar instead of powdered sugar?
Yes. This recipe specifically calls for granulated sugar to create a more robust "snap." Powdered sugar contains cornstarch, which results in a softer, melt-in-your-mouth shortbread texture rather than a sturdy cookie-style crust.
How do I prevent the bottom from getting soggy once filled?
Brush the warm, baked crust with a thin layer of melted white chocolate or a beaten egg white and return it to the oven for 2 minutes. This creates a moisture barrier that protects the crisp infrastructure from the filling.
My crust is too hard to cut. What happened?
You likely over-baked it or used too much sugar. Excess sugar creates a hard, candy-like glass structure when cooled. Stick to the 100g measurement and pull the crust when it is golden, not dark brown.

