
Imagine the absolute devastation of a soggy bottom. You have spent hours sourcing the finest heirloom eggs and artisanal gruyere; you have hand-whisked a custard so silky it could be mistaken for liquid gold; and you have carefully folded in hand-picked herbs. Yet, the moment the blade meets the crust, it does not shatter with a triumphant snap. Instead, it yields with a pathetic, waterlogged squelch. This is the ultimate culinary failure of Quiche Base Integrity. When moisture migrates from the custard into the pastry during the bake, the structural lattice of the dough collapses into a gummy, unappetizing paste. We are here to prevent that tragedy through rigorous technical auditing and precise molecular management. We are building a fortress of gluten and lipids. We are creating a hydrophobic barrier that defies the laws of liquid pressure. Every gram of fat and every second of chilling is a tactical move in the war against humidity. This is not just baking; it is structural engineering for the palate.
THE DATA MATRIX
| Metric | Specification |
|---|---|
| Prep Time | 45 Minutes (Excluding Chilling) |
| Execution Time | 60 Minutes |
| Yield | 1 x 23cm / 9-inch Deep Dish Shell |
| Complexity (1-10) | 7 |
| Estimated Cost per Serving | $0.85 USD |
THE GATHERS
Ingredient Protocol:
- 250g / 2 cups All-Purpose Flour (11.5% Protein)
- 150g / 5.3 oz Unsalted European Butter (82% Fat)
- 5g / 1 tsp Fine Sea Salt
- 1 Large Egg Yolk (approx. 18g)
- 45ml / 3 tbsp Ice-Cold Filtered Water
- 10g / 2 tsp Egg White (for the final moisture seal)
Section A: Ingredient Quality Audit:
If your flour has a protein content below 10%, your crust will lack the tensile strength to hold a heavy custard; compensate by replacing 10% of the volume with bread flour. If your butter is "supermarket grade" with high water content, the steam released during baking will create large pockets that weaken the Quiche Base Integrity. The fix is to render out excess water or simply source high-fat European-style butter. If your salt is too coarse, it will not dissolve, creating "hot spots" that attract moisture; always use a digital scale to ensure precision and use fine grains for even distribution.
THE MASTERCLASS
1. The Lipid Encapsulation
Start by cutting your chilled butter into 1cm cubes. Use a bench scraper to work the butter into the flour until the mixture resembles coarse sand with a few pea-sized lumps remaining. You are looking to coat the flour particles in fat to prevent premature gluten development when the water is added.
Pro Tip: This process is about lipid management. By coating the flour, you limit the surface area available for water to bond with proteins, ensuring a short, tender crumb that resists liquid penetration.
2. Hydration and Binding
Whisk the egg yolk and ice water together. Create a well in the center of your dry ingredients and pour in the liquid. Use a saucier or a fork to gently toss the mixture until it just begins to clump. Do not overwork it. The dough should feel barely cohesive.
Pro Tip: Cold temperatures are non-negotiable. Keeping the butter in a solid state ensures that it will melt only once it hits the oven, creating the steam vents necessary for a flaky, aerated texture.
3. The Compression and Chill
Turn the dough onto a clean surface and perform two "frasage" movements; use the heel of your hand to smear the dough away from you. This creates long, thin layers of fat. Wrap the disc tightly in plastic and refrigerate for at least two hours.
Pro Tip: Chilling allows the gluten strands to relax and the moisture to distribute evenly through the starch. A relaxed dough will not shrink away from the sides of the tin during the bake.
4. The Blind Bake Protocol
Roll the dough to a 3mm thickness and fit it into your tart tin. Prick the base with a fork to aerate the bottom. Line with parchment and fill to the brim with ceramic baking weights or dried beans. Bake at 190C / 375F for 20 minutes.
Pro Tip: Filling the weights to the very top prevents the sides from collapsing. The weight provides the physical counter-pressure needed to maintain the vertical integrity of the crust walls.
5. The Molecular Sealant
Remove the weights and the parchment. Brush the entire interior of the hot shell with a thin layer of beaten egg white. Return the shell to the oven for 3 minutes to set the protein.
Pro Tip: This is the "Gold Standard" for Quiche Base Integrity. The egg white creates a waterproof protein film that acts as a physical barrier, preventing the viscous custard from soaking into the pastry.
Section B: Prep & Timing Fault-Lines:
The most common error is rushing the cooling phase. If you pour hot custard into a hot shell, the fats in the crust will liquefy instantly, destroying the barrier. Always allow the shell to reach room temperature before filling. If the dough feels "springy" when rolling, it has been overworked; stop immediately and return it to the fridge for 30 minutes to allow the gluten to reset.
THE VISUAL SPECTRUM
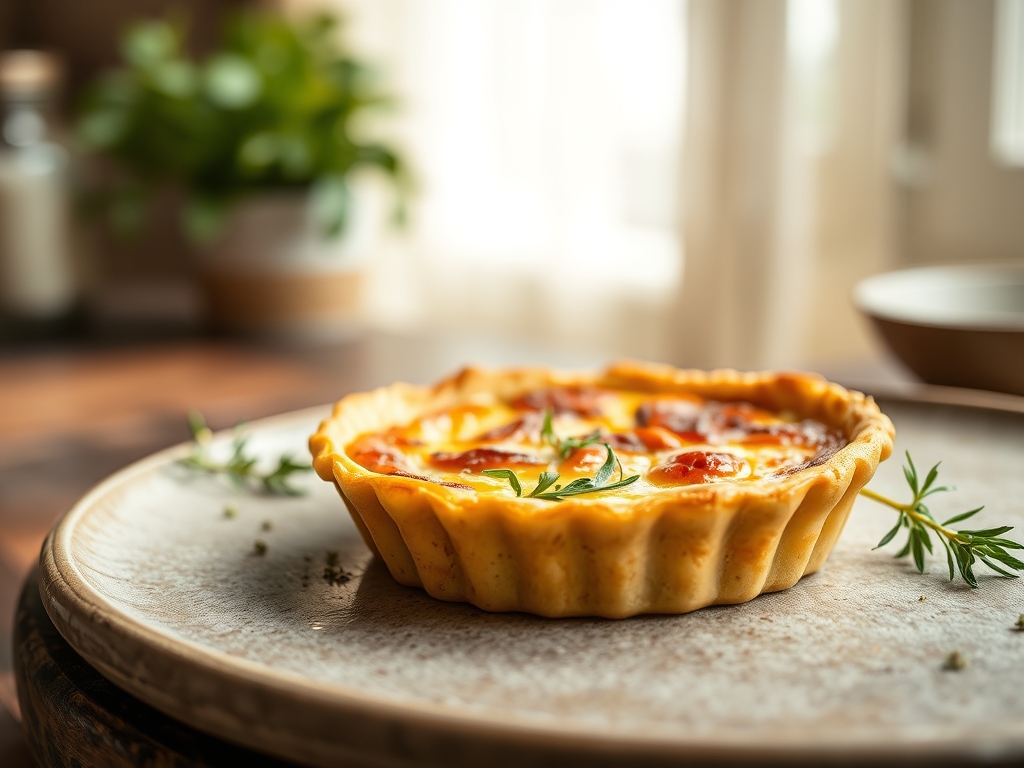
Section C: Thermal & Visual Troubleshooting:
Observe the Masterclass photo: Note the uniform golden-brown hue and the absence of "blonde" spots at the base. If your crust is pale, it lacks the Maillard reaction necessary for flavor and structural rigidity. If the edges are dark but the bottom is soft, your oven floor heat is insufficient; move the rack to the lowest position. Uneven browning usually indicates "hot spots" in your oven; use a pizza stone on the bottom rack to act as a thermal battery, ensuring a consistent heat discharge. If the crust looks "greasy," the butter melted before the starch could set; check that your oven is truly at the target temperature using an external thermometer.
THE DEEP DIVE
Macro Nutrition Profile
A single serving of this crust (one-eighth of a standard tart) contains approximately 180 calories, 12g of fat, 15g of carbohydrates, and 3g of protein. While calorie-dense, the high fat content provides the necessary satiety and structural support for the nutrient-dense custard it will eventually hold.
Dietary Swaps
- Vegan: Replace butter with a high-quality plant-based block (ensure it contains at least 78% fat) and use a "flax egg" or commercial binder for the dough. Use a thin layer of melted cocoa butter as the moisture seal.
- Keto: Substitute wheat flour with a blend of almond flour and coconut flour, using xanthan gum to provide the missing gluten-like elasticity.
- Gluten-Free: Use a 1-to-1 GF flour blend that includes rice flour and potato starch. Increase the egg content slightly to provide additional structural protein.
Meal Prep & Reheating Science
To maintain the molecular structure of the crust, never reheat quiche in a microwave. The electromagnetic waves agitate water molecules, forcing them into the crust and causing instant sogginess. Instead, use a convection oven at 150C / 300F. This gently evaporates surface moisture while keeping the fats in the crust crisp. For long-term storage, the pre-baked shell can be frozen for up to three months; bake it for five minutes directly from the freezer to "refresh" the crispness before filling.
THE KITCHEN TABLE
Why does my crust shrink down the sides?
Shrinkage is caused by under-resting the dough. When gluten is stretched during rolling, it wants to snap back like a rubber band. A long chill period allows those proteins to relax into their new shape permanently.
Can I use oil instead of butter?
Oil is liquid at room temperature and will not create the flaky layers necessary for a premium quiche. While it provides moisture, it fails to create the structural "shingle" effect that defines a high-integrity base.
What is the best way to prevent bubbles?
Aggressive docking with a fork is essential. These holes allow steam to escape from beneath the dough. If bubbles persist, your oven temperature might be too high, causing the air to expand faster than the dough can set.
How do I fix a crack in the pre-baked shell?
Make a "spackle" using a tiny bit of leftover raw dough and flour. Patch the crack while the shell is still warm and bake for two minutes. The egg-white seal will then reinforce this repair.

