
Imagine a sealed pressure vessel of molten mozzarella and piquant pepperoni held back only by a thin, golden wall of fermented dough. This is the high-stakes world of the folded pizza parcel; a culinary engineering feat where Calzone Shell Integrity is the only thing standing between a gourmet experience and a soggy, structural collapse on the plate. When you slice into that burnished crust, you expect a tactical release of aromatic steam, not a flood of watery ricotta. We are not just making dinner; we are constructing a self-contained thermal chamber designed to render fats and infuse dough with the essence of cured meats. Achieving that perfect ratio of crisp exterior to viscous interior requires more than a recipe. It requires a rigorous technical audit of your hydration levels and folding mechanics. If your crust lacks the tensile strength to contain the expanding gases of the internal bake, you have failed the mission. We are here to ensure your structural foundations are unshakable and your crumb structure is flawlessly aerated.
THE DATA MATRIX
| Metric | Specification |
|---|---|
| Prep Time | 25 Minutes |
| Execution Time | 15 Minutes |
| Yield | 4 Units |
| Complexity (1-10) | 7 |
| Estimated Cost per Serving | $4.50 |
THE GATHERS
Ingredient Protocol:
- 500g / 3.75 cups High-Protein Bread Flour (12.5% protein minimum)
- 325ml / 1.3 cups Filtered Water (heated to 38C / 100F)
- 10g / 2 tsp Fine Sea Salt
- 5g / 1.5 tsp Instant Yeast
- 15ml / 1 tbsp Extra Virgin Olive Oil
- 250g / 1 cup Whole Milk Ricotta (drained for 2 hours)
- 200g / 2 cups Low-Moisture Shredded Mozzarella
- 100g / 0.75 cup Sliced Spicy Salami or Pepperoni
- 5g / 1 tsp Dried Oregano
- 1 Large Egg (for protein-based wash)
Section A: Ingredient Quality Audit:
The primary failure point in Calzone Shell Integrity is excess moisture. If your ricotta is weeping liquid, your dough will undergo an unwanted steam-softening from the inside out. Technical Fix: Suspend your ricotta in a fine-mesh strainer over a bowl for at least two hours before assembly. If your flour has a low protein count, the gluten network will be too weak to support the internal vapor pressure. Technical Fix: Always use bread flour or "00" flour with a high gluten potential to ensure the shell can expand without rupturing. Finally, avoid using fresh buffalo mozzarella unless it has been sliced and pressed between paper towels for thirty minutes; the high water content is a structural liability.
THE MASTERCLASS
1. Hydration and Gluten Development
Combine your flour, yeast, and water in a stand mixer. Use a digital scale for precision; volume measurements are the enemies of consistency. Mix on low until a shaggy mass forms, then add salt and oil. Knead for eight minutes until the dough is smooth and elastic.
Pro Tip: This stage is about building the protein lattice. Use the windowpane test to ensure the dough can stretch thin without tearing. A strong gluten network is the foundation of shell integrity.
2. The Primary Fermentation
Place the dough in a lightly oiled bowl and cover. Allow it to aerate and double in size at room temperature. This process develops the complex organic acids that provide flavor and contribute to the Maillard reaction during the bake.
Pro Tip: Use a bench scraper to divide the dough into four equal portions. Tensioning the dough into tight rounds before the second proof ensures a uniform thickness when you finally roll it out.
3. Filling Calibration
While the dough rests, combine your drained ricotta, mozzarella, and oregano. Ensure the meats are sliced thin so they render their fats quickly without creating pockets of grease.
Pro Tip: Avoid adding watery tomato sauce inside the parcel. Serve the sauce on the side to prevent the "soggy bottom" syndrome that plagues amateur builds.
4. Structural Assembly and Sealing
Roll each dough ball into a 10-inch circle. Place the filling on one half, leaving a one-inch border. Fold the dough over and press firmly. Use a "rope-fold" or "crimping" technique to create a reinforced seam.
Pro Tip: Use a pastry brush to apply a thin layer of egg wash. This acts as a biological glue, ensuring the seam does not de-laminate under the pressure of internal steam.
5. Thermal Execution
Preheat a pizza stone or heavy baking sheet to 230C / 450F. Score two small vents in the top of each calzone with a sharp knife to allow controlled vapor release. Slide the parcels onto the hot surface.
Pro Tip: The initial thermal shock causes "oven spring," where the yeast has one last burst of activity. This creates the hollow, airy pocket essential for the traditional calzone profile.
Section B: Prep & Timing Fault-Lines:
Timing is the difference between a golden crust and a carbonized husk. If your oven is not fully preheated for at least forty-five minutes, the bottom of the shell will not set quickly enough to support the weight of the filling. This results in a "leaky" parcel. If you over-proof the dough during the second rise, the cell walls will weaken and collapse when they hit the heat. Always monitor the dough's elasticity; it should spring back slowly when poked. If it leaves a permanent indentation, it is over-proofed and requires immediate baking.
THE VISUAL SPECTRUM
Section C: Thermal & Visual Troubleshooting:
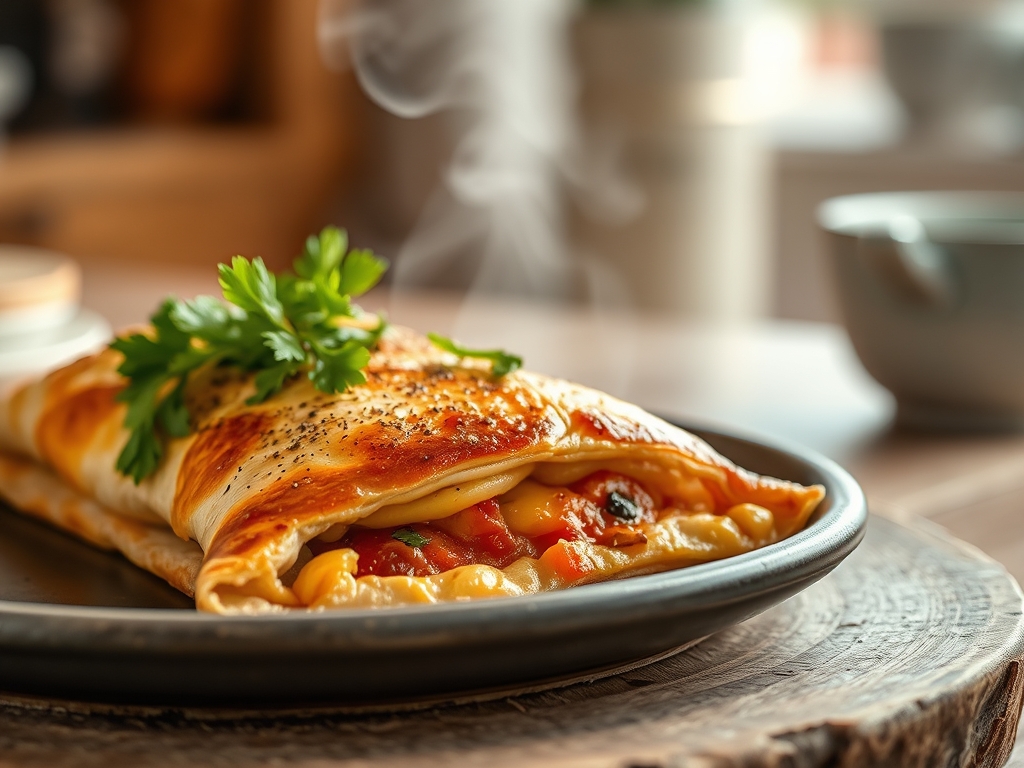
Look at the Masterclass photo above. Notice the deep, mahogany browning and the slight blistering on the surface. If your calzone looks pale and matte, your oven temperature was too low or you skipped the egg wash. A dull finish indicates a lack of caramelization. If you see a "blowout" where cheese has escaped from the side, your crimping was insufficient or you failed to vent the top. The vents are critical safety valves; without them, the internal pressure will find the weakest point in your seam and force its way out. If the bottom is charred but the top is raw, move your baking stone to a higher rack to balance the convective and conductive heat.
THE DEEP DIVE
Macro Nutrition Profile:
A standard 250g calzone provides approximately 650 calories, 32g of protein, 75g of carbohydrates, and 28g of fat. The high protein content comes from the dual-cheese matrix and the high-gluten flour.
Dietary Swaps:
For a vegan iteration, replace the ricotta with a firm tofu and nutritional yeast blend and use a plant-based mozzarella. For a gluten-free version, use a high-quality GF flour blend with added xantham gum to mimic the tensile strength of gluten, though the shell will be more brittle.
Meal Prep & Reheating Science:
To maintain molecular structure when reheating, avoid the microwave at all costs. The microwave excites water molecules, turning the crust into a rubbery mess. Instead, use an air fryer or oven at 175C / 350F. This re-crisps the exterior through dry heat while gently warming the viscous interior, preserving the shell's structural integrity.
THE KITCHEN TABLE
Why is my calzone soggy on the bottom?
This is usually caused by wet filling or a cold baking surface. Ensure your ricotta is fully drained and use a preheated pizza stone to instantly sear the bottom crust upon contact.
Can I put raw meat inside the calzone?
Absolutely not. The internal temperature will not stay high enough for long enough to safely cook raw sausage or ground beef. Always brown and render your meats before they enter the dough parcel.
How do I prevent the cheese from leaking out?
Double-crimp the edges and use an egg wash "glue." Most importantly, cut two small slits in the top of the dough to allow steam to escape, which reduces the pressure on the seams.
What is the best way to get a shiny crust?
A protein-heavy egg wash (one egg beaten with a teaspoon of water) is the gold standard. It facilitates the Maillard reaction, resulting in a glossy, golden-brown finish that looks professional.

