
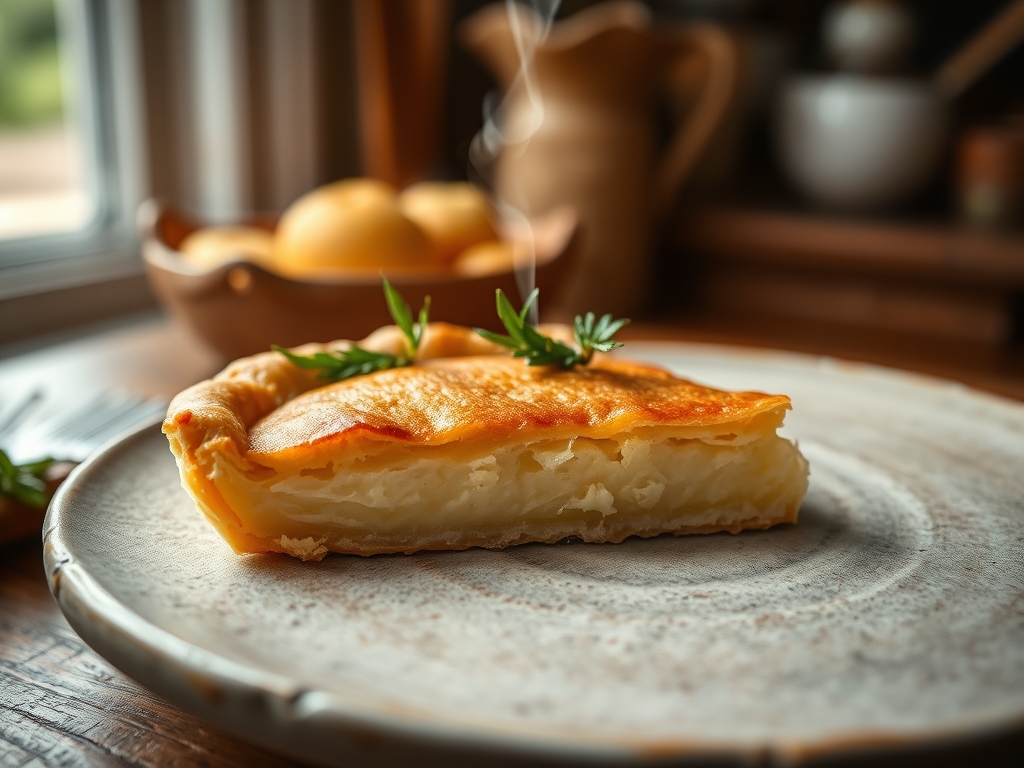
Listen to the sound of a structural failure that tastes like victory. It is the high-pitched snap of a laminated fat layer yielding to a fork; the definitive proof that you have mastered the All Butter Pie Crust. We are not interested in the soggy, structural integrity of a store-bought shortcut. We are here for the architectural marvel of the triglyceride phase shift. This is the pursuit of the perfect crumb; a golden, shattered landscape where high-fat European butter meets the hydration threshold of artisanal flour. When the heat of the oven hits those cold, encapsulated fat pockets, the water within vaporizes instantly. This creates steam pressure that lifts the flour into distinct, wafer-thin sheets. The aroma is intoxicating; a heady mix of toasted milk solids and caramelized carbohydrates. If your kitchen does not smell like a high-end Parisian boulangerie, your audit has failed. Prepare your bench scraper and calibrate your digital scale. We are moving beyond mere baking and into the realm of edible engineering where temperature control is the only law that matters.
THE DATA MATRIX
| Metric | Specification |
|---|---|
| Prep Time | 20 Minutes |
| Execution Time | 60 Minutes (plus chilling) |
| Yield | Two 9-inch Crusts |
| Complexity (1-10) | 7 |
| Estimated Cost per Serving | $0.85 |
THE GATHERS
Ingredient Protocol:
- All-Purpose Flour: 375g / 3 cups
- Unsalted European-Style Butter (82% fat): 227g / 1 cup (Chilled and cubed)
- Granulated Sugar: 15g / 1 tablespoon
- Fine Sea Salt: 6g / 1 teaspoon
- Ice-Cold Water: 120ml / 0.5 cup
- Apple Cider Vinegar: 5ml / 1 teaspoon
Section A: Ingredient Quality Audit:
The primary failure point in an All Butter Pie Crust is often the water content of the fat. Standard American butter contains higher moisture levels; this can lead to excess gluten development and a tough, bread-like texture. Technical Fix: Source European-style butter with at least 82 to 84 percent butterfat. If your flour feels gritty or lacks protein consistency, sift it twice to aerate the particles and ensure even hydration. If your water is not at the brink of freezing, the butter will begin to emulsify into the flour rather than remaining as discrete chunks. Use a metal bowl chilled in the freezer for thirty minutes prior to assembly to maintain the thermal barrier.
THE MASTERCLASS
Step-by-Step Execution:
1. Dry Component Integration
Combine your flour, sugar, and salt in a chilled stainless steel mixing bowl. Use a whisk to ensure the leavening and seasoning agents are distributed with mathematical precision. This step prevents "hot spots" of salt that can inhibit the delicate flavor profile of the butter.
Pro Tip: Use a digital scale for all measurements. Volume-based measuring with cups is notoriously inaccurate; a single packed cup of flour can weigh twenty percent more than a sifted one, leading to a dry, crumbly disaster.
2. Fat Encapsulation
Add the cubed, ice-cold butter to the dry mix. Use a pastry blender or two knives to cut the fat into the flour. You are looking for a variety of sizes; some should be the size of peas, while others should be flat like walnut halves. This creates a multi-layered "shingle" effect during the bake.
Pro Tip: A bench scraper is your best friend here. Use it to toss the butter cubes in flour so they are fully coated before you begin cutting. This prevents the butter from sticking together and ensures a viscous barrier between the gluten strands.
3. Controlled Hydration
Mix the apple cider vinegar into your ice water. Drizzle the liquid over the flour mixture one tablespoon at a time. Use a fork to gently toss the mixture. Stop the moment the dough holds together when squeezed in your palm. It should look "shaggy" and slightly under-hydrated.
Pro Tip: The acid in the vinegar acts as a gluten inhibitor. It limits the formation of long protein chains, ensuring your crust remains tender rather than elastic. Professionals often use a saucier to keep the ice water chilled on the counter without condensation affecting the flour.
4. The Frasage Technique
Turn the shaggy mass onto a cold work surface. Use the heel of your hand to smear the butter chunks into the flour in short, decisive strokes. This technique, known as frasage, creates long, thin sheets of fat that are the secret to extreme flakiness.
Pro Tip: Do not overwork the dough. Your hands transfer heat. If the dough starts to feel tacky or the butter looks shiny, stop immediately and return the entire mass to the refrigerator for fifteen minutes to reset the triglyceride structure.
5. Structural Compression and Chilling
Divide the dough into two discs and wrap them tightly in plastic wrap. Use the wrap to help compress the dough into a smooth circle. Refrigerate for a minimum of two hours, though twenty-four hours is optimal for full flour hydration.
Pro Tip: This resting period allows the gluten to relax and the moisture to distribute evenly. A rushed crust will shrink in the oven, pulling away from the edges of your pie tin and ruining the aesthetic presentation.
Section B: Prep & Timing Fault-Lines:
The most common human error is the "Warm Kitchen Syndrome." If your ambient temperature is above 72 degrees Fahrenheit, your butter is at risk of melting during the rolling phase. Technical Fix: Work in stages. Roll the dough out, then put it back in the fridge for ten minutes before crimping the edges. If you find the dough is springing back while rolling, it is a sign of over-developed gluten. Walk away. Let it rest for twenty minutes to allow the protein bonds to slacken.
THE VISUAL SPECTRUM
Section C: Thermal & Visual Troubleshooting:
Referencing the Masterclass photo, notice the deep golden hue and the visible "lift" at the edges. If your crust appears pale and matte, you likely under-baked it or failed to apply an egg wash. An egg wash facilitates the Maillard reaction, providing that piquant, toasted finish. If the crust is greasy or slumped at the bottom, the butter melted before the flour structure set. This is often caused by putting a room-temperature crust into the oven. Always "blind bake" or start your pie at a high temperature (425F) for the first fifteen minutes to "set" the architecture before lowering the heat to finish the filling.
THE DEEP DIVE
Macro Nutrition Profile:
A standard serving (1/8th of a double crust) contains approximately 320 calories, 22g of fat, 28g of carbohydrates, and 4g of protein. The high fat-to-carb ratio is what provides the satiety and the characteristic mouthfeel.
Dietary Swaps:
- Vegan: Substitute the butter with a high-quality plant-based butter block that has a high melting point. Avoid tub margarines which have too much water.
- Keto: Replace flour with a blend of almond flour and xanthan gum. Note that the "flake" will be replaced by a shortbread-like "crumb" due to the lack of gluten.
- GF: Use a 1-to-1 gluten-free flour blend containing potato starch and rice flour to mimic the structural snap of wheat.
Meal Prep & Reheating Science:
To maintain the molecular structure, freeze unbaked dough discs for up to three months. When reheating a baked pie, avoid the microwave at all costs. The microwave agitates water molecules, which turns the delicate fat layers into a soggy mess. Use a toaster oven at 300F to gently render any residual fats and re-crisp the flour layers.
THE KITCHEN TABLE
Why is my crust shrinking in the oven?
Shrinkage is caused by unrelaxed gluten or stretching the dough while fitting it into the pan. Always let the dough rest after rolling and "drop" it into the tin rather than pulling it.
Can I use a food processor for this?
Yes, but use the pulse button with extreme caution. It is very easy to over-process the butter into tiny beads, which results in a mealy crust rather than a flaky one. Manual tools offer better control.
What does the vinegar actually do?
The acid prevents the gluten proteins from bonding too tightly. It also adds a very subtle brightness to the flavor profile that cuts through the richness of the butterfat.
Should I use salted or unsalted butter?
Always use unsalted. This allows you to control the exact sodium content. Different butter brands have varying salt levels; using unsalted ensures your technical audit remains consistent every single time.

