
Imagine a world where the structural integrity of your breakfast hinges entirely on the surface tension of a hydration film. You have spent twelve hours nurturing a wild yeast culture, only to watch your expensive heirloom seeds tumble off the loaf like passengers from a sinking ship the moment the serrated blade makes contact. This is not merely a culinary failure; it is an engineering catastrophe. To achieve a legendary Whole Grain Crust, you must move beyond the amateurish "sprinkle and pray" methodology. We are building a biological mosaic where flax, millet, and sunflower seeds are chemically fused to the dough mantle. The goal is a rugged, deeply caramelized exterior that defies gravity and provides a tectonic crunch against the soft, aerated crumb within. We are talking about high-stakes bread physics where the Maillard reaction meets adhesive protein bonding. If you want a crust that commands respect at the table, you must treat your oven as a kiln and your dough as a high-performance substrate. Let us audit your process and fix the structural leaks.
THE DATA MATRIX
| Metric | Specification |
|---|---|
| Prep Time | 45 Minutes (Active) |
| Execution Time | 18 Hours (Total) |
| Yield | 2 Large Boules |
| Complexity | 7 / 10 |
| Estimated Cost per Serving | $0.85 USD |
THE GATHERS
Ingredient Protocol:
- 500g / 4 cups Bread Flour (High Protein)
- 375ml / 1.5 cups Filtered Water (90 degrees F)
- 100g / 0.5 cups Active Sourdough Starter
- 12g / 2 tsp Fine Sea Salt
- 50g / 0.3 cups Raw Sunflower Seeds
- 30g / 2 tbsp Toasted Sesame Seeds
- 20g / 1.5 tbsp Flax Seeds
- 15ml / 1 tbsp Honey (The Adhesive Catalyst)
- 50ml / 0.2 cups Boiling Water (For Seed Soaker)
Section A: Ingredient Quality Audit:
If your seeds taste dusty or "off," they have likely oxidized. Whole grains and seeds contain high oil content that turns rancid when exposed to light and heat. Always source from high-turnover bins and store in airtight containers in the freezer to preserve the lipid profile. If your flour lacks a protein content of at least 12.5 percent, your Whole Grain Crust will lack the vertical lift required to expand the seed matrix. Technical fix: Supplement weak flour with 10g of Vital Wheat Gluten to reinforce the gluten chimney. If your water is heavily chlorinated, it will inhibit yeast activity; use a charcoal filter or let the water sit uncovered for two hours to allow the chlorine to dissipate.
THE MASTERCLASS
Step 1: The Seed Hydration Protocol
Place your seed mix into a small saucier or heat-proof bowl and pour the boiling water over them. This process, known as "soaking," prevents the seeds from robbing moisture from the dough, which would lead to a dry, crumbly interior. Allow them to cool to room temperature before integration.
Pro Tip: This hydration step initiates a slight mucilaginous release from the flax seeds, creating a natural biological glue that aids in surface adhesion during the bake.
Step 2: Autolyse and Initial Mix
Combine your flour and 375ml of water in a large glass bowl. Mix until no dry flour remains and let it rest for 40 minutes. Use your digital scale for every measurement; volumetric "cups" are the enemy of consistency in high-hydration baking.
Pro Tip: The autolyse phase allows enzymes to begin breaking down starches into sugars, which will later render a deeper color during the Maillard reaction.
Step 3: Salt and Starter Integration
Dimple your active starter and salt into the dough. Use a wet hand to fold the dough over itself until fully incorporated. This is where you establish the initial tension of the gluten network.
Pro Tip: Use a bench scraper to clean the sides of the bowl; any dried dough left behind will create "shrapnel" in your final loaf texture.
Step 4: Bulk Fermentation and Folding
Perform four sets of "stretch and folds" every 30 minutes. During the final fold, gently fold in 70 percent of your hydrated seed mix. Reserve the remaining 30 percent for the exterior coating.
Pro Tip: Folding the seeds in late prevents the sharp edges of the grains from "shredding" the delicate gluten strands you have worked so hard to aerate.
Step 5: The Adhesive Application
Once the dough has doubled in size, shape it into a tight boule. Lightly mist the surface of the dough with a spray bottle or brush with a thin honey-water solution. Roll the top of the loaf directly into the reserved dry seeds spread on a flat tray.
Pro Tip: The honey solution acts as a "tack coat," ensuring the seeds stay bonded even as the loaf undergoes massive "oven spring" expansion.
Step 6: The High-Heat Thermal Blast
Preheat a Dutch oven to 500 degrees F. Score the loaf deeply with a lame and drop it into the pot. Bake covered for 20 minutes, then remove the lid and drop the temperature to 450 degrees F for another 25 minutes.
Pro Tip: The steam trapped inside the Dutch oven gelatinizes the surface starches, creating a thin, viscous film that hardens into a glass-like Whole Grain Crust.
Section B: Prep & Timing Fault-Lines:
The most common human error is rushing the bulk fermentation. If the dough has not increased in volume by at least 50 percent, the resulting loaf will be dense, and the seeds will "crowd" each other, leading to a muddy flavor profile. Temperature control is your primary lever; if your kitchen is below 70 degrees F, use your oven with the light turned on as a makeshift proofing box. Conversely, if the dough over-proofs, the protein structure collapses, and the seeds will simply sink into the dough rather than sitting proudly on the surface.
THE VISUAL SPECTRUM
Section C: Thermal & Visual Troubleshooting:
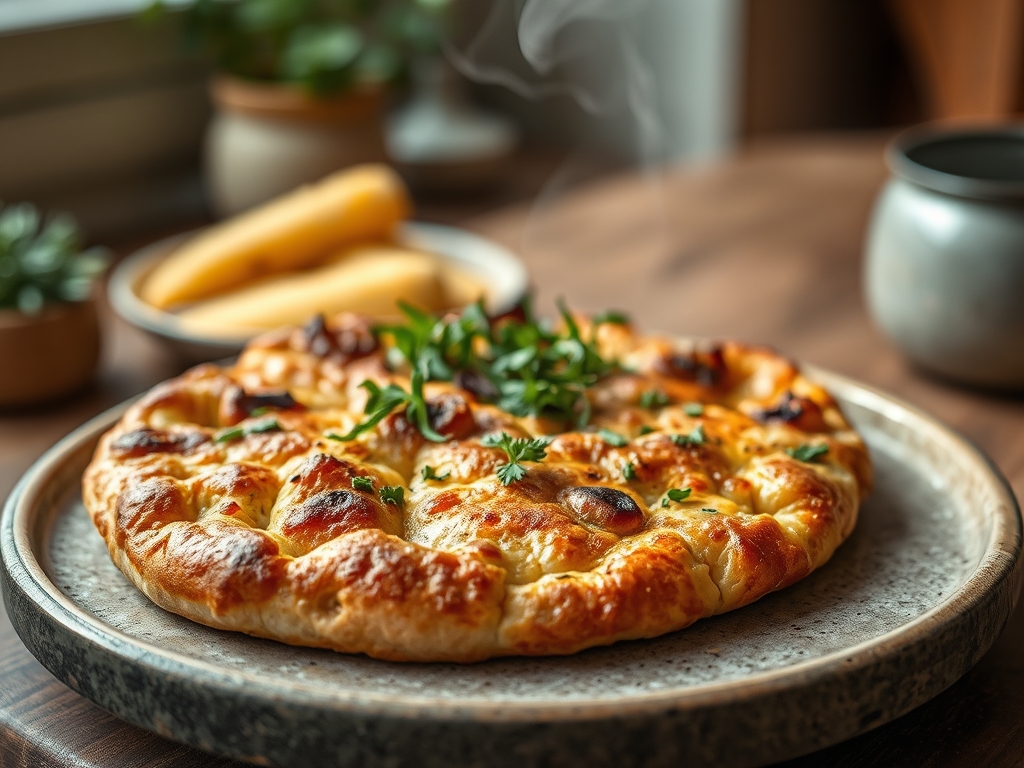
Referencing the Masterclass photo, your loaf should exhibit a "shattered glass" appearance where the scoring has opened. If your seeds look pale rather than toasted, you likely lacked enough surface sugars; a light spray of malt diastatic powder can fix this. If the seeds are falling off in sheets, your "tack coat" was too dry. Note the deep mahogany hue in the photo; this is the result of the honey in the adhesive layer caramelizing at 400 degrees F. If your crust is dull and matte, increase the initial steam duration by five minutes to ensure the starches fully gelatinize before the dry heat sets the crust.
THE DEEP DIVE
Macro Nutrition Profile:
Each slice delivers a robust 5g of protein and 4g of dietary fiber. The inclusion of flax and sunflower seeds introduces essential Omega-3 fatty acids and Vitamin E, making this more than just a carbohydrate vehicle; it is a nutrient-dense fuel source.
Dietary Swaps:
For a Vegan version, swap the honey adhesive for a maple syrup or agave solution. For a Gluten-Free variant, utilize a blend of sorghum and millet flour with xanthan gum as the structural stabilizer, though the fermentation timing will be significantly shorter.
Meal Prep & Reheating Science:
To maintain the molecular structure of the Whole Grain Crust, never store bread in the refrigerator, as this accelerates retrogradation (staling). Store at room temperature in a paper bag. To revive, mist the loaf with water and bake at 350 degrees F for 8 minutes to re-crisp the exterior without drying the crumb.
THE KITCHEN TABLE
Why do my seeds fall off after slicing?
This usually indicates a lack of surface moisture during the seed application. Ensure the dough is tacky to the touch. The honey-water "glue" is essential for creating a permanent bond that survives the mechanical stress of slicing.
Can I use toasted seeds in the dough?
Only for the exterior. Seeds inside the dough should be raw and hydrated. Pre-toasted seeds inside the loaf can become bitter and "rubbery" as they absorb moisture from the surrounding crumb during the long fermentation process.
My crust is too hard to bite through. What happened?
You likely baked it too long at a lower temperature, which "cures" the crust into leather. Use a higher initial heat to set the structure quickly, then finish at a moderate temperature to develop color without over-dehydrating the mantle.
Is the "soaker" step really necessary?
Absolutely. Dry seeds act like tiny sponges. If you do not hydrate them first, they will pull water out of the dough, localized around each seed, creating dry pockets and a crumb that disintegrates when toasted.

