
Imagine the catastrophic failure of a structural seam during a high-stakes commute. A single fracture in the golden, laminated hull leads to a total containment breach. Suddenly, a viscous stream of spiced fruit or savory gravy is no longer a culinary asset; it is a thermal liability on your favorite tie. This is the nightmare we prevent through the rigorous application of Hand Pie Integrity. We are not merely baking snacks here. We are engineering portable, self-contained gastronomic units designed for maximum durability and flavor density. To achieve this, we must respect the physics of the short-crust and the thermodynamics of the internal filling. We are looking for a shatter-effect upon the first bite, followed immediately by the structural resilience required to hold back a molten, piquant interior. It requires a cold-chain management strategy for your fats and a precise hydration ratio for your flour. If your crust lacks the tensile strength to survive a brisk walk to the park, you have failed the audit. Let us rebuild your technique from the foundation up.
THE DATA MATRIX
| Metric | Specification |
|---|---|
| Prep Time | 45 Minutes |
| Execution Time | 25 Minutes |
| Yield | 8 Units |
| Complexity (1-10) | 7 |
| Estimated Cost per Serving | $1.45 |
THE GATHERS
Ingredient Protocol:
- 500g / 4 cups All-Purpose Flour (Chilled)
- 225g / 1 cup Unsalted Butter (Frozen and grated)
- 5g / 1 tsp Fine Sea Salt
- 150ml / 0.6 cups Ice Water
- 15ml / 1 tbsp Apple Cider Vinegar
- 400g / 2 cups Seasonal Fruit or Savory Protein (Small dice)
- 100g / 0.5 cups Granulated Sugar or Savory Thickener
- 1 Large Egg (For egg wash)
- 30ml / 2 tbsp Heavy Cream
Section A: Ingredient Quality Audit:
The primary point of failure in Hand Pie Integrity often traces back to the thermal state of the lipids. If your butter is soft, it will emulsify into the flour rather than creating distinct layers. This results in a mealy, bread-like texture rather than a flaky laminate. If you detect this, stop immediately and return the mixture to the blast chiller. Another common issue is low-protein flour which lacks the gluten network necessary to prevent "slumping" during the bake. If your dough feels overly elastic or "snaps back" too aggressively, you have over-worked the proteins; allow the dough to rest for at least sixty minutes to relax the molecular bonds. Finally, ensure your filling is not overly aqueous. High water content leads to steam pressure that will blow out your seams. Use a cornstarch slurry or a reduction technique to ensure the filling is viscous and stable at room temperature.
THE MASTERCLASS
1. The Lipid Integration Phase
Begin by combining your chilled flour and salt in a large stainless steel bowl. Using a bench scraper, cut your frozen, grated butter into the dry medium. You are looking for pea-sized nodules of fat coated in flour. This creates the "voids" that will eventually trap steam and produce flakiness.
Pro Tip: Use a digital scale for your measurements rather than volume cups. Accuracy in the fat-to-flour ratio is the only way to ensure the crust can withstand the internal steam pressure without leaking.
2. Hydration and Binding
Slowly incorporate your ice water and vinegar. The acidity in the vinegar inhibits excessive gluten development, ensuring the crust remains tender. Mix until the dough just barely holds together when squeezed. It should look shaggy and slightly dry.
Pro Tip: Work on a chilled marble surface if possible. Keeping the dough below 65 degrees Fahrenheit ensures the butter remains solid, which is the cornerstone of Hand Pie Integrity.
3. The Lamination Fold
Turn the dough onto a floured surface and use your bench scraper to fold it over itself three times. This creates rudimentary layers. Wrap the dough tightly in plastic and refrigerate for at least one hour. This allows the moisture to distribute evenly through the starch granules.
Pro Tip: This resting period is non-negotiable. It prevents the dough from shrinking in the oven, a common cause of "edge-pull" and filling exposure.
4. Filling Encapsulation
Roll the dough to a thickness of 3mm. Cut into circles or rectangles. Place a chilled spoonful of your filling in the center. Brush the edges with a light coating of egg wash; this acts as your molecular adhesive. Fold and crimp the edges firmly with a fork.
Pro Tip: Use a saucier to pre-cook your filling and evaporate excess moisture. A "wet" filling is the enemy of a crisp bottom crust.
5. The Thermal Execution
Vent the top of each pie with a small sharp knife to allow steam to escape. Brush the exterior with the remaining egg wash and cream mixture. Bake at 400 degrees Fahrenheit on a preheated heavy-gauge baking sheet until the crust reaches a deep mahogany hue.
Pro Tip: The preheated baking sheet provides an immediate "thermal shock" to the bottom of the pie, setting the crust before the filling can soak in and cause a "soggy bottom" syndrome.
Section B: Prep & Timing Fault-Lines:
Timing is the silent killer of the perfect crust. If you leave the dough on the counter while prepping the filling, the butter will melt, and your lamination is forfeit. Always prep your filling first and allow it to cool completely in the refrigerator before it ever touches the dough. Heat transfer from a warm filling will instantly degrade the structural integrity of the raw pastry. Furthermore, do not rush the bake. If the oven temperature is too low, the fat will leak out before the flour can set, leaving you with a greasy, tough puck instead of a light, airy pastry.
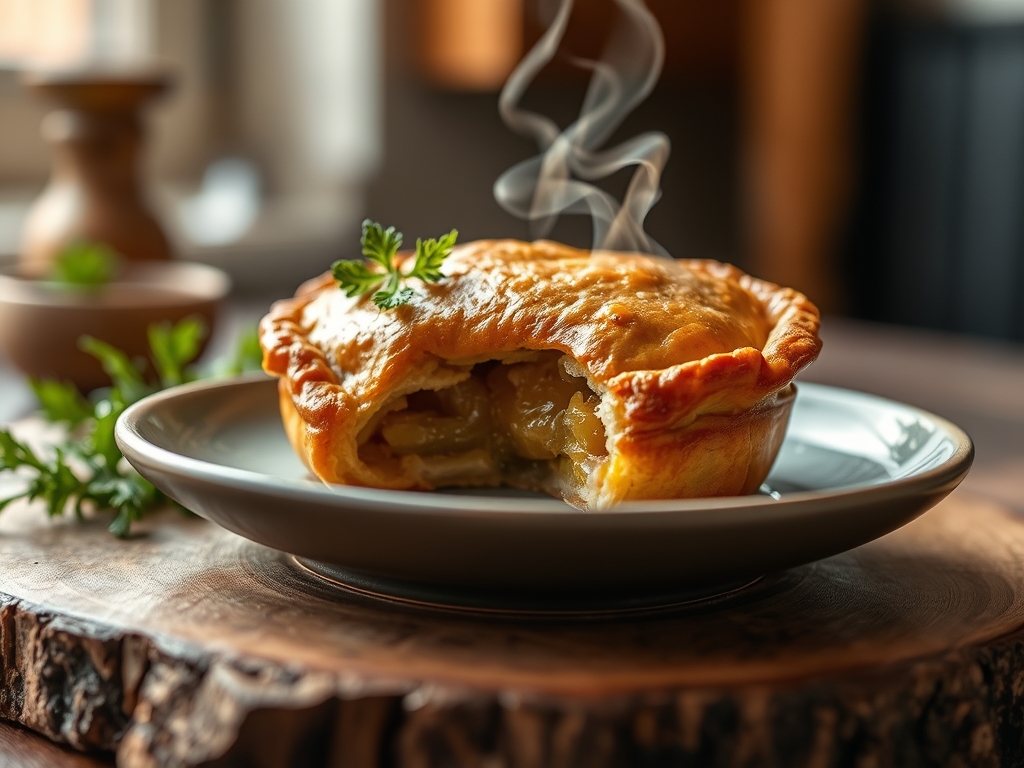
THE VISUAL SPECTRUM
Section C: Thermal & Visual Troubleshooting:
Referencing the Masterclass photo above, observe the "shatter-zones" on the crust surface. This indicates successful aeration and steam expansion. If your pies look dull and matte, you likely forgot the egg wash or your oven was too dry. A glossy, golden-brown finish is the result of the Maillard reaction being accelerated by the proteins in the egg wash. If you see "blowouts" where filling has escaped, your vents were either too small or your crimping was insufficient. Uneven browning usually indicates "hot spots" in your oven; rotating the tray halfway through the bake is the standard corrective measure. If the bottom is pale while the top is dark, move the rack to a lower position to increase conductive heat from the bottom element.
THE DEEP DIVE
Macro Nutrition Profile:
A standard 125g hand pie provides approximately 380 calories. The profile is dominated by complex carbohydrates and fats, providing sustained energy. To optimize for a "performance" snack, ensure your filling includes a lean protein source to balance the glycemic load of the pastry.
Dietary Swaps:
- Vegan: Substitute the butter with a high-quality vegan shortening (ensure it has a high melting point) and use almond milk or maple syrup for the exterior wash.
- Keto: This is difficult for Hand Pie Integrity, but a combination of almond flour, xanthan gum, and cream cheese can create a "fathead" dough that mimics the structural properties of gluten.
- Gluten-Free: Use a 1-to-1 GF flour blend that contains rice flour and potato starch. You will need to increase the hydration slightly as GF flours are more absorbent.
Meal Prep & Reheating Science:
To maintain the molecular structure, never reheat a hand pie in a microwave. This vibrates the water molecules, turning the crust into a rubbery mess. Instead, use a toaster oven at 350 degrees Fahrenheit. This re-crisps the exterior lipids and ensures the filling reaches a safe, infused temperature without compromising the crust.
THE KITCHEN TABLE
Why is my crust so tough?
You likely over-handled the dough, leading to excessive gluten development. Or, you skipped the vinegar. Next time, use a lighter touch and ensure all ingredients remain at sub-ambient temperatures throughout the process.
Can I freeze these before baking?
Absolutely. In fact, baking from frozen often improves Hand Pie Integrity by ensuring the crust stays cold while the oven sears the exterior. Add five minutes to your total bake time.
My filling always leaks out. Help!
Your filling is either too watery or you are over-filling the pies. Leave a 1cm margin around the edges and ensure your "glue" (the egg wash) is applied precisely before crimping.
What is the best way to get a shiny finish?
A "double wash" is the secret. Brush with egg wash before the pies go in, then apply a second thin layer ten minutes before they are finished. This creates a professional, lacquered appearance.

