
Imagine the structural catastrophe of a catastrophic hull breach in the middle of a dinner service. You have meticulously crafted a velvet-smooth broccoli cheddar or a piquant clam chowder; only to watch it migrate through the crumb and onto the table linens. This is the nightmare of the un-reinforced boule. We are not just making dinner; we are engineering a containment vessel. Bread Bowl Security is the ultimate metric of culinary success in the realm of comfort food. It requires a fundamental understanding of crust density and crumb hydration. When you ladle that viscous liquid into a hollowed sourdough, you are initiating a high-stakes battle between liquid saturation and gluten integrity. If your walls are too thin, the soup wins. If your crust is too soft, the structural foundation collapses under the weight of its own contents. We are here to perform a full-scale technical audit of your loaf. We will analyze the molecular resistance of the interior walls and ensure that your edible bowl remains a fortress until the very last spoonful is scraped away.
THE DATA MATRIX
| Metric | Specification |
|---|---|
| Prep Time | 25 Minutes |
| Execution Time | 45 Minutes |
| Yield | 4 Reinforced Vessels |
| Complexity (1-10) | 6 |
| Estimated Cost per Serving | $3.50 |
THE GATHERS
Ingredient Protocol:
- 4 Large Sourdough Boules (approx. 15cm / 6 inches diameter)
- 60ml / 4 tbsp Unsalted Butter, melted
- 30g / 2 tbsp All-Purpose Flour
- 5g / 1 tsp Garlic Powder
- 2g / 0.5 tsp Fine Sea Salt
- 100g / 1 cup Finely Grated Gruyere or Parmesan
- 15ml / 1 tbsp Extra Virgin Olive Oil
Section A: Ingredient Quality Audit:
The primary failure point in Bread Bowl Security is often the loaf itself. If you utilize a standard "supermarket" white loaf, the crumb is too aerated and lacks the necessary density to resist moisture. You must seek out a long-fermentation sourdough with a thick, mahogany-colored crust. If your bread feels "squishy" rather than firm, it lacks the structural protein network required for this audit. To fix a subpar loaf, you can perform a secondary dehydration bake at a low temperature to pull excess moisture from the crumb before the hollowing process begins. Additionally, ensure your cheese is freshly grated. Pre-shredded varieties are coated in potato starch or cellulose; these anti-caking agents prevent the cheese from forming a seamless, waterproof lacquer on the interior walls.
THE MASTERCLASS
Step 1: The Surgical Excavation
Using a serrated bread knife, remove the top 20 percent of the boule. Insert the knife at a 45-degree angle to create a "plug" rather than a flat lid. Reach inside and remove the soft interior crumb, leaving exactly 2 centimeters of bread attached to the crust. Use a bench scraper to clear the debris from your workstation.
Pro Tip: Leaving a consistent thickness is vital for even heat distribution. If the walls are uneven, the thinner sections will over-toast and become brittle while the thicker sections remain soft and prone to leaking. Use a digital scale to weigh the hollowed loaf; a standard 15cm boule should lose approximately 40 percent of its initial mass during excavation.
Step 2: The Lipid Barrier Synthesis
In a small saucier over low heat, melt the butter and whisk in the garlic powder and salt. Once the butter is foaming, whisk in the flour to create a thin roux. This mixture acts as a sealant. Use a silicone pastry brush to coat the entire interior of the hollowed loaf with this lipid barrier.
Pro Tip: This step utilizes the science of hydrophobicity. Fat repels water. By saturating the interior crumb with a fat-based roux, you create a chemical shield that prevents the soup from penetrating the gluten network too quickly.
Step 3: The Thermal Reinforcement
Place the coated boules on a heavy-gauge baking sheet. Dust the interior generously with the finely grated cheese. Bake at 200C / 400F for 8 to 10 minutes. The cheese must melt and then slightly harden into a golden, translucent "glaze."
Pro Tip: This is where the Maillard reaction and protein coagulation work in tandem. The cheese creates a physical waterproof liner, while the secondary bake hardens the crust to withstand the weight of the soup. Use an infrared thermometer to ensure the interior wall surface reaches at least 175F to properly set the cheese lacquer.
Step 4: The Final Inspection and Infusion
Remove the boules from the oven and let them rest for 3 minutes. The cheese liner will solidify as it cools slightly. Ladle your hot, viscous soup into the center. The soup should sit prominently within the vessel without any visible "weeping" through the crust.
Pro Tip: Never pour soup into a bread bowl that has just come out of the oven. The steam from the soup will become trapped against the hot bread, causing immediate softening. A brief cooling period allows the molecular structure of the toasted crumb to stabilize.
Section B: Prep & Timing Fault-Lines:
The most common human error is the "Early Fill." Filling the bowls more than 5 minutes before service is a recipe for structural failure. Even the best-reinforced wall has a "Saturation Clock." If your timing is off, keep the soup in a thermally regulated saucier and the bread bowls in a warming drawer. Another fault-line is temperature delta; if the soup is boiling (100C) and the bread is room temperature, the thermal shock will cause the bread to expand and crack. Aim for a soup service temperature of 75C to 80C.
THE VISUAL SPECTRUM
Section C: Thermal & Visual Troubleshooting:
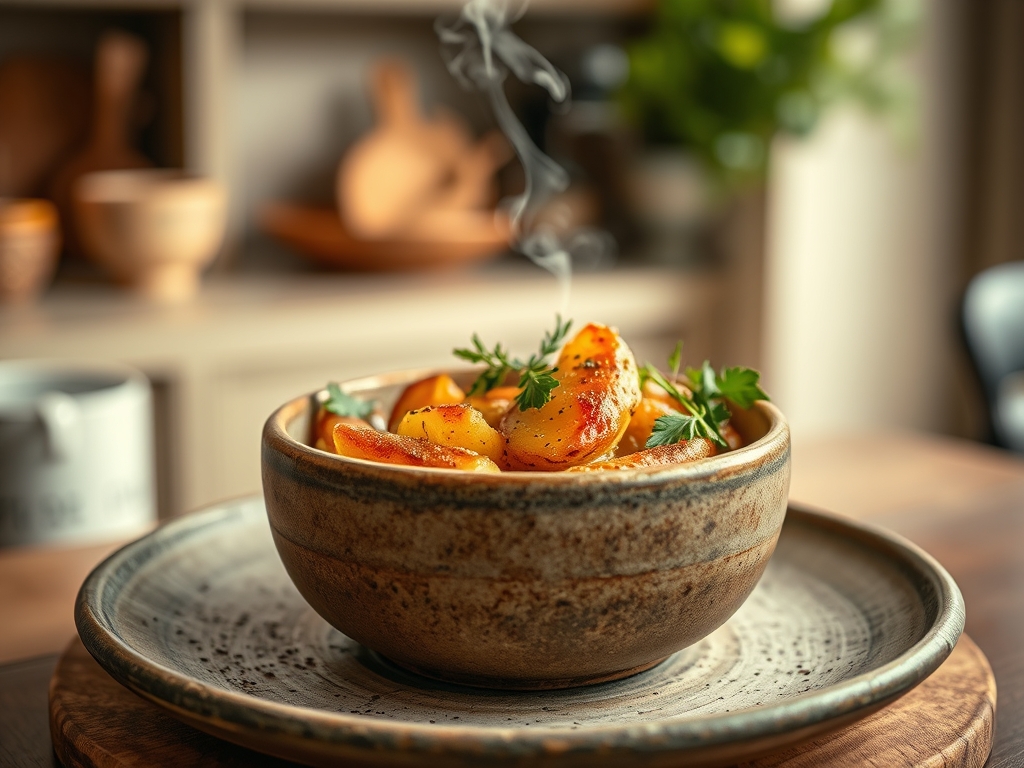
Referencing the Masterclass photo, your bread bowl should exhibit a "Dual-Tone" aesthetic. The exterior crust should be a deep, matte umber, while the interior "lip" where the cheese meets the bread should be a glossy, bubbling gold. If your bowl looks dull or pale, you have failed to achieve proper caramelization. This usually stems from a lack of sugar in the bread dough or an oven temperature that is too low. If the cheese is "breaking" and looks oily rather than smooth, your oven was too hot, causing the milk solids to separate from the fats. A perfect audit shows a seamless transition from the crunchy exterior to the fortified, savory interior liner.
THE DEEP DIVE
Macro Nutrition Profile:
A standard reinforced bread bowl (without soup) contains approximately 450 calories, 18g of fat, 62g of carbohydrates, and 12g of protein. The reinforcement process adds significant lipid content but is essential for the structural integrity of the meal.
Dietary Swaps:
- Vegan: Replace butter with a high-quality vegan block butter and use a nutritional yeast and cashew-based "parmesan" for the interior seal.
- Keto: This is a high-carb vessel by definition; however, "low-carb" keto boules made from almond flour and psyllium husk can be used, though they require a double coating of egg wash to achieve the same moisture resistance.
- Gluten-Free: GF bread is notoriously porous. To secure a GF bread bowl, you must apply a thicker "slurry" of GF flour and oil before the cheese-toasting phase.
Meal Prep & Reheating Science:
To maintain molecular structure, never store a filled bread bowl. Store the reinforced, toasted bowls in an airtight container at room temperature for up to 24 hours. To reheat, place them in a 350F oven for 5 minutes to re-crisp the crust before adding hot soup. Microwave usage is strictly forbidden as it agitates water molecules and turns the structural gluten into a rubbery, dampened mess.
THE KITCHEN TABLE
How do I prevent the bottom from falling out?
Ensure you do not scrape too much crumb from the base. Leave a 2.5cm "foundation" at the bottom. The cheese-lacquer step is most critical here; ensure a thick layer of cheese settles in the base "well" to create a waterproof floor.
Can I use any soup?
Thicker, cream-based soups work best. High-acid, thin broths (like clear onion soup) will penetrate the barrier faster. If using a thin broth, increase the thickness of your roux-butter coating during the reinforcement stage to add extra protection.
Why did my bread bowl get chewy?
Chewiness is caused by steam. If you put the "lid" back on the bowl immediately after filling, the trapped moisture softens the crust. Leave the lid slightly offset to allow steam to escape, preserving the crunch of the exterior.
What is the best bread for this?
A high-protein sourdough or a "Pain de Campagne" is the industry standard. These breads have a tight crumb structure and a sturdy crust that acts as a natural exoskeleton, making your Bread Bowl Security audit much easier to pass.

