
The smell of scorching sourdough and rendered pork fat is not merely a dinner bell; it is a sonic boom of culinary engineering. When you engage a Panini Crust Press, you are not just making a sandwich. You are initiating a high-pressure thermal event designed to fuse disparate textures into a singular, monolithic crunch. We are moving past the soggy, lackluster results of a standard frying pan. This is about the physics of conductive heat transfer. By applying vertical force simultaneously with high-intensity heat, we force moisture out of the bread's exterior cells while trapping steam within the crumb. This creates a structural paradox: a glass-like outer shell that shatters upon impact, protecting a soft, pillowy interior that has been infused with the piquant oils of melting provolone and cured meats. Every millimeter of surface area is held in a lethal grip of heat, ensuring that the Maillard reaction is uniform, deep, and unapologetically bold. Welcome to the infrastructure of the perfect sear.
THE DATA MATRIX
| Metric | Specification |
|---|---|
| Prep Time | 20 Minutes |
| Execution Time | 8 Minutes |
| Yield | 2 Servings |
| Complexity | 4 / 10 |
| Estimated Cost per Serving | $6.50 USD |
THE GATHERS
Ingredient Protocol:
- 4 Thick Slices Sourdough Bread (2cm / 0.8in thickness)
- 120g / 4.2oz Thinly Sliced Prosciutto di Parma
- 80g / 2.8oz Aged Sharp Provolone
- 60ml / 1/4 cup Basil Pesto (High-Viscosity)
- 30g / 2 tbsp Unsalted Butter (Room Temperature)
- 15ml / 1 tbsp Extra Virgin Olive Oil
- 5g / 1 tsp Flaky Sea Salt
Section A: Ingredient Quality Audit:
If your bread feels overly dense or "doughy" out of the bag, it likely has too much residual moisture. This will lead to a gummy interior despite a charred exterior. To fix this, place the slices on a wire rack for 30 minutes to dehydrate slightly before assembly. If your pesto is too thin or oily, it will leach into the bread and prevent a proper crisp. Emulsify the pesto with a teaspoon of parmesan cheese or breadcrumbs to increase its viscous properties before spreading. For sub-par cheese that refuses to melt evenly, grate it finely using a microplane rather than using thick slices; this increases the surface area for faster thermal conduction.
THE MASTERCLASS
1. Architectural Assembly and Weight Calibration
Lay your sourdough slices on a clean workstation. Use a digital scale to ensure each sandwich contains exactly 40g of cheese and 60g of meat. This precision ensures that the heat from the Panini Crust Press penetrates the center at a predictable rate. Spread the pesto to within 5mm of the crust edge; this creates a "dry zone" that prevents the sauce from boiling over and scorching on the press plates.
Pro Tip: Use a bench scraper to square up the edges of your meat and cheese. This prevents "overhang," which can burn and create bitter carbon notes before the bread is fully toasted.
2. Surface Lipid Application
Do not melt your butter in a pan. Instead, use a flexible spatula to apply a thin, translucent layer of room-temperature butter directly to the exterior of the bread. Drizzle the olive oil over the butter and use the back of a spoon to integrate them. This lipid blend provides the flavor of butter with the higher smoke point of olive oil, allowing for a longer dwell time under pressure.
Pro Tip: Weighing your fats on a digital scale prevents an oily crust. A precise 15g of fat per sandwich is the "Goldilocks zone" for achieving a golden-brown hue without saturation.
3. The Compression Sequence
Preheat your Panini Crust Press to 190 degrees Celsius (375 degrees Fahrenheit). Place the sandwiches onto the lower plate and lower the top lid with firm, steady pressure. Do not slam the press; you want to compress the crumb without crushing the air pockets entirely. Lock the press if a latch is available to maintain constant gravitational force.
Pro Tip: Professional chefs use a saucier to keep a warm balsamic reduction nearby. The radiant heat from the press can be used to keep your finishing sauces at the perfect viscosity while the sandwich sears.
4. Thermal Equilibrium and Extraction
Monitor the edges of the bread. Once the cheese begins to render its fats and a golden-brown crust forms, reduce the pressure slightly for the final 60 seconds. This allows any trapped steam to escape, ensuring the crust stays rigid once removed from the heat source. Use a metal spatula to lift the sandwich; it should feel light and sound hollow when tapped.
Pro Tip: Use an infrared thermometer to check the plate temperature between batches. If the temperature drops below 175 degrees Celsius, wait 90 seconds for the thermal mass to recover before the next "drop."
Section B: Prep & Timing Fault-Lines:
The most common failure in sandwich infrastructure is the "Cold Core" syndrome. This occurs when ingredients are taken directly from a 4-degree Celsius refrigerator and placed onto the press. The exterior burns before the interior reaches the 65-degree Celsius mark required for cheese elasticity. Always temper your proteins and cheeses at room temperature for 15 minutes prior to assembly. If you find the bread browning too fast, insert a small piece of parchment paper between the press and the bread to act as a thermal buffer.
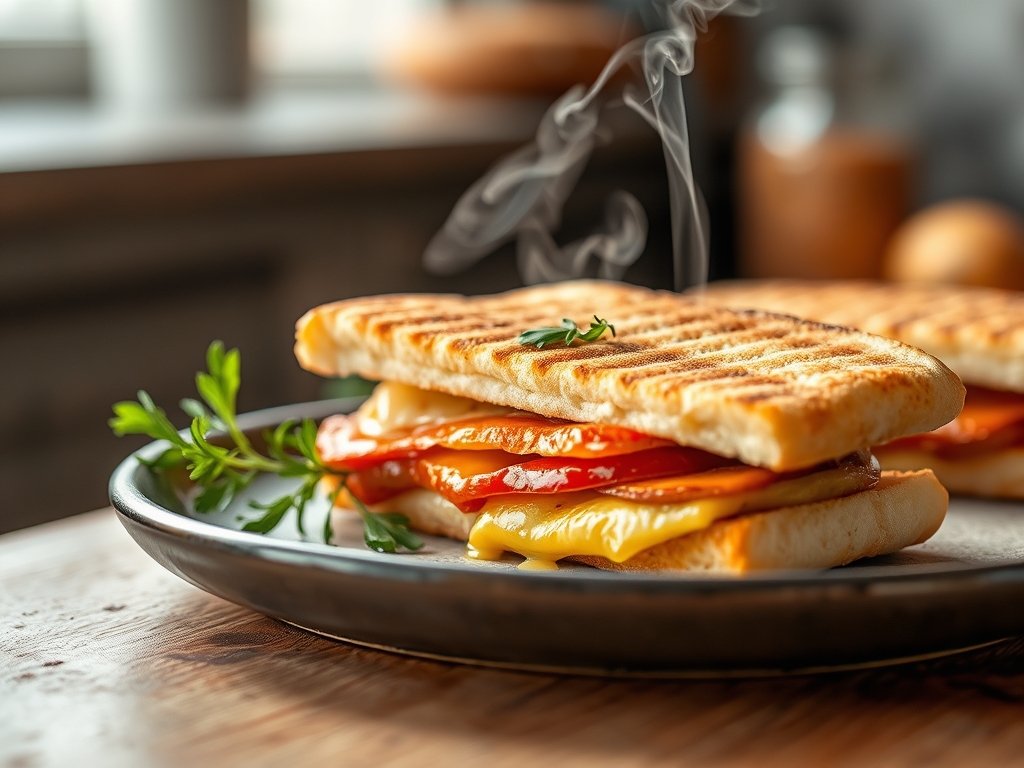
THE VISUAL SPECTRUM
Section C: Thermal & Visual Troubleshooting:
Referencing the Masterclass photo, your crust should exhibit "Leopard Spotting," which are small, dark concentrated bursts of Maillard reaction surrounded by a deep amber field. If your sandwich looks pale and monochromatic, your press pressure was likely too low, preventing full contact with the heating element. If the crust appears dull or matte, you lacked sufficient lipids; a quick brush of olive oil post-press can restore the sheen, though it won't fix the crunch. If the cheese has not "laced" (formed crispy protrusions at the edges), increase the internal temperature by extending the dwell time by 45 seconds at a lower heat setting.
THE DEEP DIVE
Macro Nutrition Profile:
A standard build using the protocol above yields approximately 680 calories. This breaks down into 32g of Protein, 48g of Carbohydrates, and 42g of Fats. The high fat content is a byproduct of the essential lipids required for the crust's structural integrity.
Dietary Swaps:
- Vegan: Replace butter with a coconut oil-based spread and use a cashew-based "mozzarella" which has a similar melting point.
- Keto: Utilize a high-protein almond flour bread. Be aware that nut-based breads burn 20% faster; reduce press temperature to 160 degrees Celsius.
- GF: Gluten-free bread is often porous. Double the butter application to "seal" the pores before pressing to prevent the sandwich from becoming a sponge for steam.
Meal Prep & Reheating Science:
To maintain the molecular structure of a pressed sandwich for later consumption, you must flash-chill it on a wire rack to prevent "sweating." To reheat, avoid the microwave at all costs as it agitates water molecules and destroys the crust's crystalline structure. Instead, use a toaster oven at 200 degrees Celsius for 4 minutes to re-crisp the exterior lipids.
THE KITCHEN TABLE
Why is my sourdough sticking to the Panini Crust Press?
This usually indicates a "sugar crash" where honey or sugar in the bread carmelizes and glues itself to the plate. Ensure your press is seasoned or use a light coating of high-smoke-point oil spray before the first sandwich.
Can I use pre-grated cheese for better melt?
Negative. Pre-grated cheese is coated in potato starch or cellulose to prevent clumping. This starch creates a gritty texture and interferes with the "cheese pull" physics. Always grate fresh from a high-quality block for maximum viscosity.
How do I prevent the pesto from making the bread soggy?
The "Fat Barrier" technique is essential. Apply a thin layer of cheese or a light coating of butter to the inside of the bread slices before adding the pesto. This prevents the moisture in the sauce from migrating into the crumb.
What is the best way to clean the press after use?
While the plates are still warm (but not hot), place a damp paper towel between them and close the lid. The residual heat creates a steam-cleaning effect that loosens carbonized proteins, making them easy to wipe away.

