
Picture the scene: a high-stakes appetizer service where the margin for error is measured in microns. You pull a golden baton from the fryer, expecting a crisp snap, but instead, you witness a catastrophic structural failure. The cheese has breached its perimeter. It is a blow-out; a dairy landslide that leaves you with an empty husk of breading and a puddle of wasted profit on the plate. This is the nightmare of the amateur cook, but for the culinary engineer, it is a problem of structural integrity. To build a superior Mozzarella Stick Shell, we must treat the kitchen like a laboratory. We are not just breading cheese; we are constructing a multi-layered containment vessel capable of resisting internal thermal expansion while achieving a perfect Maillard reaction on the exterior. We need a shell that is viscous enough to cling, yet rigid enough to withstand the violent bubbling of molten fats. It is time to stop guessing and start auditing your infrastructure.
THE DATA MATRIX
| Metric | Specification |
|---|---|
| Prep Time | 45 Minutes (plus 2 hours freezing) |
| Execution Time | 15 Minutes |
| Yield | 24 Units |
| Complexity (1-10) | 7 |
| Estimated Cost per Serving | $0.85 USD |
THE GATHERS
Ingredient Protocol:
- 450g / 1 lb Low-Moisture Part-Skim Mozzarella (Cut into 3-inch batons)
- 125g / 1 cup All-Purpose Flour (High protein preferred)
- 300g / 3 cups Panko Breadcrumbs (Processed to a fine grit)
- 3 Large Eggs (Room temperature to aerate properly)
- 60ml / 1/4 cup Whole Milk
- 10g / 2 tsp Garlic Powder
- 10g / 2 tsp Dried Oregano (Rubbed to infuse oils)
- 5g / 1 tsp Smoked Paprika (For piquant undertones)
- 15g / 1 tbsp Kosher Salt
- 2L / 2 Quarts High-Smoke Point Vegetable Oil
Section A: Ingredient Quality Audit:
If your cheese is "weeping" before it even hits the flour, you have a moisture content crisis. Fresh mozzarella is the enemy of the Mozzarella Stick Shell; its high water activity leads to steam pockets that explode during frying. Use low-moisture blocks only. If your breadcrumbs are too large, they create "valleys" in the topography where oil can penetrate. The fix: Pulse your panko in a food processor for five seconds to create a tighter, more uniform mesh. If the egg wash is sliding off, your eggs are too cold or not sufficiently whisked. Use a digital scale to ensure your dry-to-wet ratios are precise; consistency is the bedrock of infrastructure.
THE MASTERCLASS
Step 1: The Primary Adhesion Layer
Dredge the chilled cheese batons in the seasoned flour. Shake off every milligram of excess. We are looking for a molecular dusting, not a heavy coat. This layer acts as the primer, allowing the protein in the egg to bond with the surface of the cheese.
Pro Tip: Use a bench scraper to keep your workstation organized and ensure the flour remains aerated. If the flour clumps, it creates a thermal insulator that prevents the cheese from melting evenly.
Step 2: The First Hydration Cycle
Submerge the floured baton into the egg and milk mixture. Ensure 100 percent coverage. This is the "glue" phase. The lipids in the milk help render a smoother texture in the final bite, preventing the shell from becoming brittle.
Pro Tip: Use a saucier or a deep, narrow vessel for the egg wash rather than a shallow bowl. This minimizes air exposure and ensures the baton is fully submerged without manual flipping, which can damage the flour seal.
Step 3: The Structural Base Coat
Drop the wet baton into the fine-grit panko. Press firmly. You are not just coating; you are laminating. The goal is to eliminate all air gaps. This first layer of breading provides the initial barrier against the cheese's internal pressure.
Pro Tip: Check the weight of your coated sticks on a digital scale. Uniformity in mass ensures that every unit in the fryer basket reaches the target internal temperature at the exact same second.
Step 4: The Double-Reinforcement Protocol
Repeat the egg wash and panko steps. This second coat is the "fail-safe." It fills the microscopic pores left in the first layer, creating a redundant seal. This is what defines a professional Mozzarella Stick Shell.
Pro Tip: After the second coating, place the sticks on a wire rack. This allows air to circulate around the entire radius, preventing a "soggy bottom" and ensuring the coating sets symmetrically.
Step 5: The Cryogenic Set
Freeze the double-coated sticks for at least two hours. This is non-negotiable. Freezing ensures the exterior shell hardens and browns before the internal cheese reaches its point of total liquefaction.
Pro Tip: Use an infrared thermometer to verify the surface temperature of the sticks before frying. They should be at least -10 degrees Celsius to ensure the thermal lag necessary for a perfect crunch.
Section B: Prep & Timing Fault-Lines:
The most common human error is "The Crowd." Overloading the fryer drops the oil temperature instantly, leading to oil absorption rather than searing. If your oil temp falls below 175 degrees Celsius, the shell will infuse with grease rather than crisping. Another timing error is the "Early Pull." If the sticks are removed too soon, the core remains a solid block. Use a timer; precision is your only defense against mediocrity.
THE VISUAL SPECTRUM
Section C: Thermal & Visual Troubleshooting:
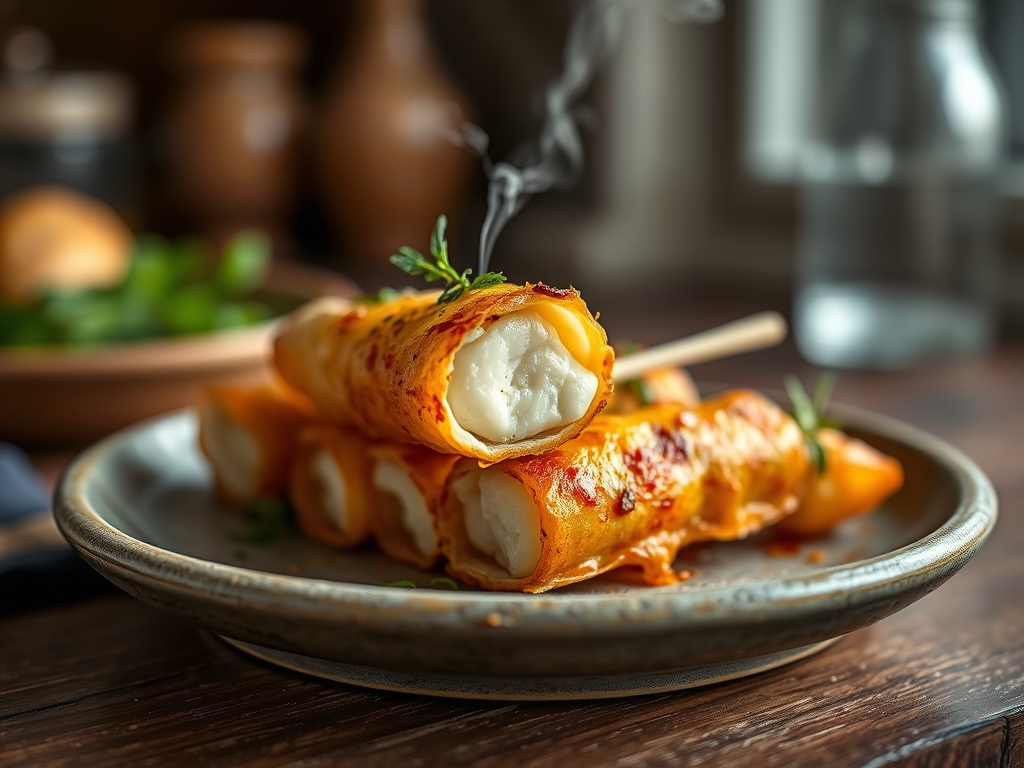
Examine the Masterclass photo. Notice the "Golden Hour" hue; this is the result of even heat distribution. If your sticks have dark spots, your oil contains "fines" (burnt crumbs) that need to be filtered. If the shell looks dull and matte, you likely skipped the salt in the breading or used old oil that has lost its surfactant qualities. A "blow-out" (cheese leaking through the side) indicates a breach in Step 4 or a "hot spot" in your frying vessel. If the texture is gritty rather than crunchy, your panko grit was too coarse. The ideal visual cue is a slight swelling of the shell without any visible white leakage.
THE DEEP DIVE
Macro Nutrition Profile:
A standard serving (3 sticks) provides approximately 450 calories, 28g of fat, 35g of carbohydrates, and 18g of protein. The high fat content provides the necessary mouthfeel, while the protein-rich shell ensures structural stability.
Dietary Swaps:
- Vegan: Substitute mozzarella with a cashew-based firm "cheese" and use an aquafaba (chickpea water) wash instead of eggs. Use nutritional yeast in the breading to infuse a piquant, cheesy flavor.
- Keto: Replace flour with coconut flour and panko with crushed pork rinds. This creates a high-fat, zero-carb Mozzarella Stick Shell that browns beautifully.
- Gluten-Free: Use a blend of rice flour and crushed gluten-free crackers. Ensure the crackers are processed to a fine meal to maintain the seal.
Meal Prep & Reheating Science:
To maintain the molecular structure when reheating, avoid the microwave at all costs. The microwave excites water molecules, turning the shell into a soggy mess. Instead, use an air fryer or convection oven at 200 degrees Celsius for 4 minutes. This flash-heats the exterior, crisping the fats while gently softening the core without causing a structural breach.
THE KITCHEN TABLE
Why does my cheese always leak out?
This is a failure of the reinforcement layer. You likely only breaded once or didn't freeze the sticks long enough. The double-coat creates a redundant barrier that holds even when the cheese turns into a viscous liquid.
Can I use fresh mozzarella for this?
Negative. Fresh mozzarella has too much water. As that water turns to steam, it expands and blasts through your breading like a pressure cooker. Stick to low-moisture blocks for a reliable Mozzarella Stick Shell.
What is the best oil for frying?
Peanut oil or Grapeseed oil. You need a high smoke point and a neutral flavor profile. Avoid extra virgin olive oil; it will smoke and break down before the shell can properly render its crunch.
How do I get that piquant flavor?
The secret is in the "rub." Rub your dried herbs between your palms before adding them to the breading. This breaks the cell walls and releases the essential oils, ensuring a deep, aromatic flavor in every bite.

