
Listen closely because your dinner is currently a structural liability. We have all been there; you lift a golden, craggy piece of poultry only for the entire exterior to slide off like a cheap suit in a rainstorm. This is the ultimate betrayal of the Fried Chicken Crust. When we talk about elite frying, we are not just talking about flavor; we are talking about engineering. We are discussing the molecular bond between the protein substrate and the starch matrix. To achieve that shatteringly crisp, "glass-shards-in-the-best-way" texture, you must understand the infrastructure of adhesion. It requires a meticulous balance of moisture management and protein denaturation. We are going to build a crust that does not just sit on the meat but becomes part of its cellular identity. Forget everything you know about casual breading. We are entering the realm of culinary architecture where the goal is a high-decibel crunch and a crumb that refuses to quit. Prepare for an audit of your current frying protocols because we are about to upgrade your kitchen into a high-performance laboratory.
THE DATA MATRIX
| Metric | Specification |
|---|---|
| Prep Time | 45 Minutes (Active) |
| Execution Time | 15 Minutes per Batch |
| Yield | 4-6 Servings |
| Complexity | 7/10 |
| Estimated Cost per Serving | $3.50 – $4.50 |
THE GATHERS
Ingredient Protocol:
- 1.4 kg / 3 lbs Bone-in, skin-on chicken thighs and drumsticks
- 500 ml / 2 cups Whole buttermilk
- 15 ml / 1 tbsp Hot sauce (vinegar-based)
- 500 g / 4 cups All-purpose flour
- 120 g / 1 cup Cornstarch (the structural stabilizer)
- 15 g / 1 tbsp Kosher salt
- 10 g / 2 tsp Smoked paprika
- 5 g / 1 tsp Garlic powder
- 5 g / 1 tsp Onion powder
- 2.5 g / 0.5 tsp Cayenne pepper
- 2 Liters / 2.1 Quarts Neutral frying oil (Peanut or Grapeseed)
Section A: Ingredient Quality Audit:
If your buttermilk is too thin, it will not carry enough flour to the bird. Look for a viscous consistency that coats a spoon. If you only have low-fat milk, whisk in 30g of full-fat Greek yogurt to increase the protein density. Regarding your flour, ensure it is fresh. Stale flour absorbs ambient moisture and will lead to a gummy, leaden Fried Chicken Crust. If your spices look dull or lack a piquant aroma, they are oxidized; toss them and grind fresh. Finally, ensure your oil has a high smoke point. Using extra virgin olive oil here is a catastrophic waste of resources and a fire hazard.
THE MASTERCLASS
Step 1: The Acidic Brine and Protein Denaturation
Submerge your chicken in the buttermilk and hot sauce mixture. This is not just for flavor. The lactic acid in the buttermilk works to render the proteins more tender while the salt penetrates the deep tissue. Use a digital scale to ensure your salt-to-liquid ratio is exactly 1.5 percent by weight.
Pro Tip: This stage is about capillary action. Let the chicken sit for at least four hours. The buttermilk acts as a biological glue, creating a tacky surface that the flour will eventually latch onto with terrifying strength.
Step 2: Aerating the Dry Matrix
In a large stainless steel bowl, whisk together the flour, cornstarch, and spices. Use a whisk to aerate the mixture, ensuring there are no clumps of starch. The cornstarch is vital because it interferes with gluten development, preventing the crust from becoming tough or bread-like.
Pro Tip: Use a bench scraper to move the flour around and ensure the spices are evenly distributed. A patchy spice mix results in "hot spots" and "bland spots," which is an amateur move we do not tolerate.
Step 3: The "Crumb" Initiation
Take 45ml of the buttermilk brine and drizzle it into your dry flour mixture. Use your fingers to rub the liquid into the flour until small, pebble-sized clumps form. This is the secret to the craggy, topographic map of a Fried Chicken Crust you see in professional kitchens.
Pro Tip: These "shags" of dough increase the surface area of the chicken. More surface area equals more space for the Maillard reaction to occur, resulting in a superior crunch.
Step 4: The Double Dredge Protocol
Remove a piece of chicken from the brine, let the excess drip off, and bury it in the flour. Press down firmly with the palm of your hand to anchor the flour. Shake off the excess, dip it back into the buttermilk for one second, and then return it to the flour for a second coating.
Pro Tip: Work with one "wet hand" and one "dry hand" to avoid breading your own fingers. This keeps your workstation clean and ensures the coating stays on the poultry where it belongs.
Step 5: The Resting Phase (Critical Infrastructure)
Place the dredged chicken on a wire cooling rack set over a sheet pan. Do not fry immediately. Let it rest for 15 to 20 minutes. This allows the flour to hydrate and the starches to form a cohesive, viscous paste that bonds to the skin.
Pro Tip: If you skip this, the steam generated during frying will blow the crust right off the meat. This rest period is the "curing" time for your culinary cement.
Step 6: Thermal Execution
Heat your oil in a heavy-bottomed saucier or cast iron dutch oven to 175C (350F). Use a probe thermometer to monitor the temperature constantly. Drop the chicken in away from you to avoid splashes. Do not overcrowd the pot; this causes the temperature to plummet, leading to oil-soaked, greasy crusts.
Pro Tip: The oil temperature will drop when you add the chicken. Aim to maintain a steady 160C (325F) throughout the cooking process. High-quality heat management is the difference between golden perfection and scorched failure.
Section B: Prep & Timing Fault-Lines:
The most common human error is impatience. If you fry the chicken straight from the refrigerator, the exterior will burn before the interior reaches a safe 74C (165F). Allow the chicken to sit at room temperature for 20 minutes before dredging. Furthermore, if you do not use a wire rack for resting, the bottom of your Fried Chicken Crust will become soggy and "weep" moisture. This is a structural failure that cannot be reversed.
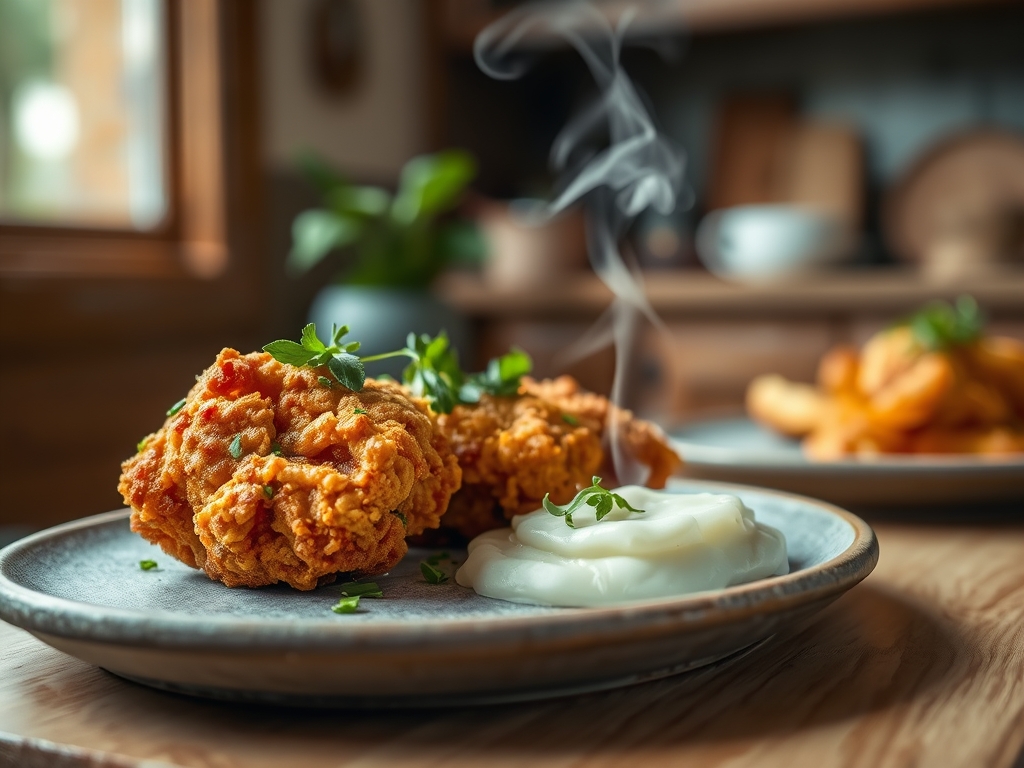
THE VISUAL SPECTRUM
Section C: Thermal & Visual Troubleshooting:
Look at the reference photo. Note the deep, mahogany hue and the "shaggy" texture. If your chicken looks pale or blonde, your oil temperature was too low or your fry time was too short. If the crust is dark brown but the meat is raw, your oil was too hot. If the crust is falling off in large sheets, you skipped the resting phase in Step 5. A perfect Fried Chicken Crust should have variegated shades of gold and amber; this indicates a complex distribution of sugars and proteins undergoing the Maillard reaction. If the crust looks "dusty," you did not press the flour firmly enough during the dredge.
THE DEEP DIVE
Macro Nutrition Profile: This is a high-calorie, high-protein, high-fat indulgence. Per serving, expect approximately 45g of protein, 35g of fat, and 40g of carbohydrates. It is fuel for a long day of manual labor or a very intense nap.
Dietary Swaps: For a Gluten-Free version, replace the all-purpose flour with a 1-to-1 GF blend and double the cornstarch. For a Keto-friendly crust, use crushed pork rinds and parmesan cheese, though the adhesion properties will differ significantly. For a Vegan "chicken," use oyster mushrooms and a soy-milk/apple cider vinegar "buttermilk" substitute.
Meal Prep & Reheating Science: To maintain the molecular integrity of the crust, never reheat in a microwave. The microwave agitates water molecules, turning the crust into a soggy sponge. Instead, use an air fryer or oven at 200C (400F) for 5 minutes. This re-crisps the fat and evaporates any surface moisture that migrated from the meat during refrigeration.
THE KITCHEN TABLE
Why does my breading always fall off?
Usually, this is due to surface moisture. If the chicken is too wet, the flour creates a steam barrier. Ensure you let the dredged chicken rest for 20 minutes to allow the "glue" to set before it hits the oil.
Can I use an air fryer for this recipe?
You can, but the results will be less "shaggy." Spray the chicken liberally with oil before air-frying at 200C. Without the submersion in oil, the flour won't infuse with fat as effectively, resulting in a drier texture.
What is the best oil for a Fried Chicken Crust?
Peanut oil is the gold standard due to its high smoke point and neutral flavor profile. Grapeseed or Canola are acceptable secondary options. Avoid butter or unrefined oils that burn at low temperatures.
How do I keep the chicken warm while frying batches?
Place a wire rack on a baking sheet in a 95C (200F) oven. This keeps the air circulating around the Fried Chicken Crust, preventing the bottom from becoming soggy while you finish the remaining pieces.

