
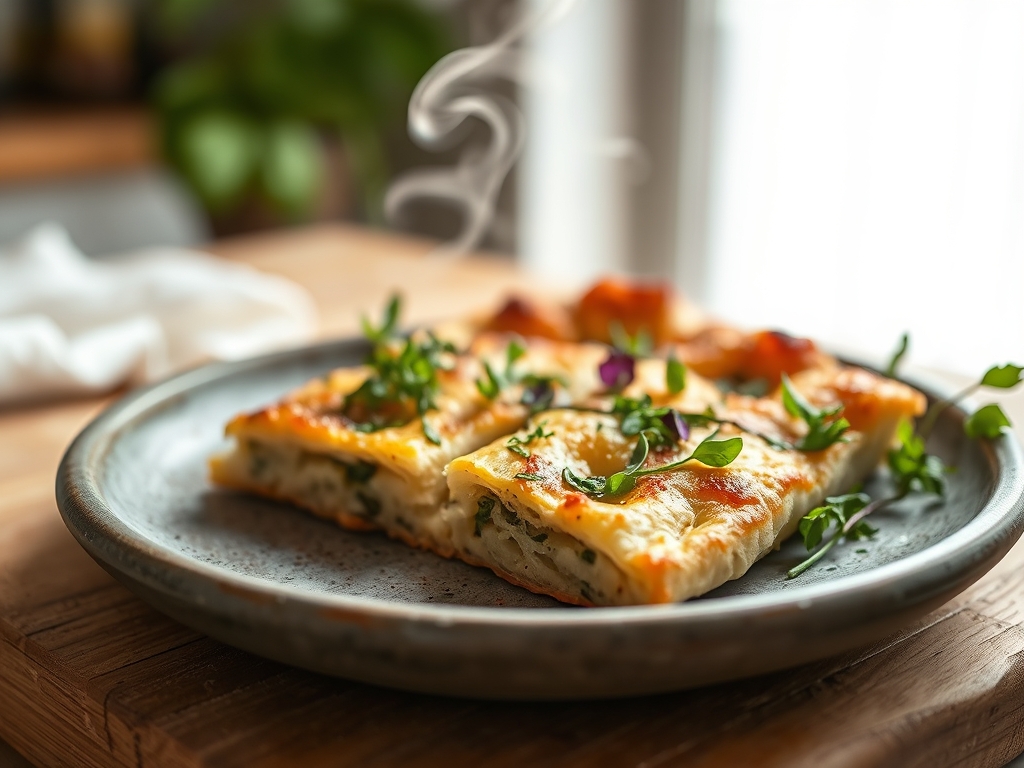
Listen to the sound of a structural failure. It is the distinct, percussive crackle of a perfectly hydrated crumb yielding to a jagged, golden exterior. We are not just baking bread; we are engineering a high-performance delivery system for aromatic lipids. The Focaccia Herb Crust is the gold standard of this discipline. It represents a delicate balance between high-hydration dough and a surface-level infusion of volatile oils. When you press your fingertips into that dough, creating the iconic dimpled topography, you are actually building a series of micro-reservoirs. These craters capture the pool of extra virgin olive oil and the suspended particles of rosemary and sea salt. Without this specific architecture, your aromatics would simply evaporate into the oven atmosphere. Instead, we are aiming for a saturation point where the herbs are fried into the surface, locking their piquant essences into the crust while the interior remains pillowy and aerated. This is a technical audit of flavor retention, and the stakes are delicious.
THE DATA MATRIX
| Metric | Specification |
|---|---|
| Prep Time | 20 Minutes (Active) |
| Execution Time | 18-24 Hours (Cold Ferment) |
| Yield | 1 Full Sheet Pan (12-15 Servings) |
| Complexity | 6 / 10 |
| Estimated Cost per Serving | $0.45 USD |
THE GATHERS
Ingredient Protocol:
- High-Protein Bread Flour: 500g / 4 cups
- Filtered Water (95F): 400ml / 1.6 cups
- Fine Sea Salt: 10g / 2 teaspoons
- Instant Yeast: 5g / 1.5 teaspoons
- Extra Virgin Olive Oil (Divided): 60ml / 0.25 cups
- Fresh Rosemary (Minced): 15g / 3 tablespoons
- Flaky Finishing Salt: 5g / 1 tablespoon
- Fresh Garlic (Microplaned): 2 cloves
Section A: Ingredient Quality Audit:
If your flour has a protein content below 12 percent, the structural integrity of your Focaccia Herb Crust will collapse. You will end up with a dense, gummy slab rather than an aerated masterpiece. To fix this, replace 50g of your flour with Vital Wheat Gluten. Another common failure point is "dead" yeast. Always bloom your yeast in a portion of the warm water for five minutes; if it does not foam, abort the mission and procure fresh supplies. Finally, avoid using pre-dried, bottled herbs. These have already lost their volatile oils. If you must use them, rehydrate them in a small amount of warm oil for ten minutes to infuse the fat before application.
THE MASTERCLASS
Step 1: The Autolyse and Initial Hydration
Combine your flour and 350ml of water in a large glass bowl. Mix until no dry streaks remain. Let this sit for 30 minutes. This allows the proteins to hydrate fully without the interference of salt or yeast.
Pro Tip: Use a digital scale for this step. Volumetric measurements are notoriously inaccurate for high-hydration doughs where a 5 percent variance can ruin the crumb.
Step 2: Yeast Integration and Bulk Fermentation
Dissolve the yeast in the remaining 50ml of water and fold it into the dough along with the fine sea salt. Use a bench scraper to perform a series of "stretch and folds" every 30 minutes for two hours.
Pro Tip: The "stretch and fold" technique builds gluten strength without the mechanical heat of a stand mixer; this preserves the delicate flavor of the wheat.
Step 3: The Cold Ferment Strategy
Transfer the dough to a greased container and refrigerate for 18 to 24 hours. This is where the magic happens. Slow fermentation allows enzymes to break down starches into simple sugars, which will eventually render a superior Maillard reaction.
Pro Tip: A cold environment slows down CO2 production, resulting in smaller, more uniform bubbles that provide better support for the heavy herb and oil topping.
Step 4: Tray Transfer and Final Proof
Generously coat a sheet pan with half of your olive oil. Gently tip the dough onto the pan. Do not force it to the corners. Let it rest at room temperature for two hours until it naturally spreads and bubbles.
Pro Tip: If the dough resists stretching, wait ten minutes. Forcing it will tear the gluten network and lead to a flat, tough crust.
Step 5: Dimpling and Herb Infusion
Whisk your minced rosemary and garlic into the remaining olive oil. Pour this mixture over the dough. Use your fingertips to press deep into the dough, touching the bottom of the pan. Sprinkle with flaky salt.
Pro Tip: Ensure your fingers are oily to prevent sticking. These dimples prevent the bread from rising like a balloon and create the "oil pools" essential for flavor retention.
Step 6: Thermal Execution
Bake at 450F (232C) for 20 to 25 minutes. The bottom should be "fried" in the oil, and the top should be a deep mahogany brown.
Pro Tip: Use an infrared thermometer to check your oven floor. If the bottom heat is insufficient, place your sheet pan directly on a preheated pizza stone to ensure a crisp base.
Section B: Prep & Timing Fault-Lines:
The most common timing error is the "rushed proof." If you bake the dough before it has doubled in height and achieved a "jiggly" consistency, the interior will be under-baked and heavy. Temperature control is also vital. If your kitchen is below 68F, your room-temperature proof might take four hours instead of two. Use a proofing box or the "pilot light" in your oven to maintain a consistent 75F environment.
THE VISUAL SPECTRUM
Section C: Thermal & Visual Troubleshooting:
Look at the Masterclass photo above. Notice the "shatter-crisp" edges and the vibrant green of the rosemary. If your herbs are turning black, you are likely placing the rack too high in the oven; move it to the center. If the crust looks dull and matte rather than glossy, you have under-applied the oil. The oil acts as a heat conductor; without enough of it, the surface dehydrates rather than fries. If you see large, uneven "blowouts" or giant bubbles, you haven't dimpled the dough deeply enough. Ensure the "oil pools" are visible before the tray enters the heat.
THE DEEP DIVE
Macro Nutrition Profile:
Per serving, this focaccia provides approximately 180 calories, 24g of carbohydrates, 4g of protein, and 8g of healthy fats (primarily monounsaturated from the olive oil). It is a high-energy carbohydrate source with a moderate glycemic load.
Dietary Swaps:
- Vegan: Naturally vegan. Ensure your sugar (if used in the yeast bloom) is bone-char free.
- Keto: Replace bread flour with a blend of almond flour, vital wheat gluten, and oat fiber. Note that the texture will be significantly denser.
- Gluten-Free: Use a high-quality 1-to-1 GF baking flour with added xanthan gum. Increase water by 10 percent as GF flours are highly absorbent.
Meal Prep & Reheating Science:
To maintain the molecular structure, never microwave focaccia. The microwave excites water molecules, which then migrate to the crust, making it soggy. Instead, reheat in a 350F oven for 5 minutes. This re-crisps the exterior lipids while gently warming the interior starches.
THE KITCHEN TABLE
Why is my focaccia bottom soggy?
You likely used a glass baking dish or didn't use enough oil. A dark metal sheet pan conducts heat faster, ensuring the bottom "fries" in the olive oil rather than steaming in its own moisture.
Can I use dried herbs instead of fresh?
Yes, but you must infuse them in warm oil first. Dried herbs are hydrophobic; without an oil soak, they will remain "woody" and may burn in the high-intensity heat of the oven.
How do I get those huge bubbles?
High hydration (80 percent or more) and a long cold ferment are the keys. The cold fermentation allows the gluten to relax enough to expand significantly when the water turns to steam in the oven.
My dough is too sticky to handle!
Do not add more flour. Use wet hands or oiled hands to perform your folds. High-hydration dough is supposed to be sticky; this moisture is what creates the light, aerated crumb.

