
Forget the waxy, flavorless pucks of frozen grocery store dough. We are here to discuss the architectural marvel of the culinary world: the high melting point lipid. When you audit the structural integrity of a world-class pastry, you aren't just looking at flour; you are looking at the mechanical leverage provided by rendered pork fat. Lard is the undisputed king of the lattice. It possesses a unique crystalline structure that remains solid at room temperature yet melts with a surgical precision that creates steam pockets. This is the Lard Pie Crust Data you have been searching for. It is the difference between a crust that shatters like fine porcelain and one that slumps like wet cardboard. We are analyzing the physics of the flake. Every microscopic layer of fat acts as a thermal barrier, preventing the gluten network from bonding into a tough, monolithic block. The result is a golden, aerated masterpiece that smells of heritage and high-performance chemistry. Prepare your bench scraper; we are about to re-engineer your dessert infrastructure from the molecular level up.
THE DATA MATRIX
| Metric | Specification |
|---|---|
| Prep Time | 20 Minutes |
| Execution Time | 50 Minutes |
| Yield | 2 Standard 9-inch Crusts |
| Complexity (1-10) | 4 |
| Estimated Cost per Serving | $0.45 |
THE GATHERS
Ingredient Protocol:
- 375g / 3 cups All-purpose flour (unbleached)
- 225g / 1 cup High-quality rendered leaf lard (chilled)
- 5g / 1 tsp Fine sea salt
- 120ml / 0.5 cup Ice-cold filtered water
- 15ml / 1 tbsp Apple cider vinegar (to inhibit gluten)
Section A: Ingredient Quality Audit:
The primary failure point in most pastry audits is the lipid source. If you are using shelf-stable, hydrogenated lard from a blue tub, you are introducing trans-fats and a chemical aftertaste that no amount of sugar can mask. Render your own leaf lard or source it from a reputable butcher to ensure a clean, neutral profile. If your flour has a protein content exceeding 11 percent, your crust will be tough rather than tender. To fix this, replace 10 percent of your flour volume with cornstarch to lower the overall gluten potential. If your water is not at the literal freezing point, the lard will begin to viscous and smear into the flour rather than remaining in discrete chunks. Use a metal bowl chilled in the freezer for thirty minutes prior to assembly to maintain thermal equilibrium.
THE MASTERCLASS
Step-by-Step Execution:
1. The Dry Integration
Sift your flour and salt into a wide, chilled stainless steel bowl. Using a digital scale is non-negotiable here; volume measurements are the enemy of consistency. Whisk the dry components to aerate the mixture and ensure the salt is distributed evenly across the starch matrix.
Pro Tip: Aeration isn't just about lumps. It ensures that the lard has maximum surface area to coat, which is the foundational step in preventing over-hydration of the flour.
2. The Lipid Fractioning
Retrieve your lard from the freezer. It should be firm but not rock-hard. Cut the lard into half-inch cubes. Use a pastry blender or two knives to cut the fat into the flour until the largest pieces are the size of garden peas. Do not overwork the dough with your hands, as the thermal energy from your palms will melt the fat.
Pro Tip: Professional bakers often use a bench scraper to "chop" the fat into the flour on a cold marble slab. This keeps the fat cold and the gluten underdeveloped.
3. Hydration and Binding
Mix the apple cider vinegar into your ice water. Drizzle the liquid over the flour mixture one tablespoon at a time. Toss the mixture with a fork or a silicone spatula after each addition. Stop as soon as the dough holds together when squeezed in your fist. It should look slightly shaggy and "undone."
Pro Tip: The vinegar acts as a chemical tenderizer. It interferes with the formation of gluten bonds, ensuring that even if you accidentally over-mix, the crust remains delicate.
4. The Lamination Fold
Turn the shaggy mass onto a lightly floured surface. Use your bench scraper to fold the dough over itself three or four times. This creates "pseudo-layers" of fat and flour. Divide the dough into two discs, wrap tightly in plastic, and refrigerate for at least two hours (preferably overnight).
Pro Tip: This resting period allows the moisture to equalize throughout the dough and lets the gluten strands relax, preventing the crust from shrinking in the oven.
Section B: Prep & Timing Fault-Lines:
The most common human error is the "Rushing Reflex." If you attempt to roll out the dough immediately after mixing, the fat will be too soft and the gluten too tight. The result is a greasy, rubbery mess. Another timing error occurs during the "Blind Bake." If you do not freeze the formed crust for fifteen minutes before it hits the oven, the fat will melt and run down the sides of the tin before the flour structure has time to set. Always use a saucier or a heavy pan to weigh down your parchment paper with pie weights during the initial ten minutes of baking to prevent air bubbles.
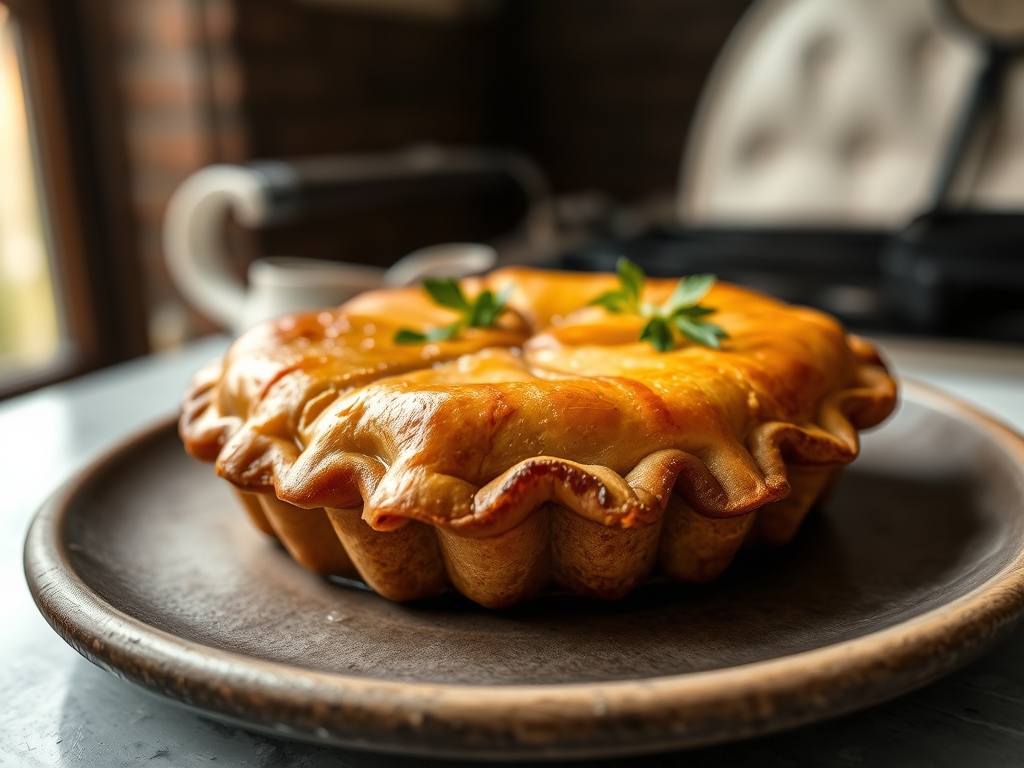
THE VISUAL SPECTRUM
Section C: Thermal & Visual Troubleshooting:
Referencing the Lard Pie Crust Data image above, notice the "blistered" surface texture. This is the visual hallmark of a high-quality lard crust. If your crust looks smooth and matte, you over-mixed the fat; the lard has emulsified with the flour rather than remaining in distinct pockets. If the edges are dark brown while the bottom is pale, your oven has uneven heat distribution. Move the rack to the lowest position to ensure the bottom gets the direct thermal energy needed to render the fat and crisp the starch. A dull, greyish color indicates old lard or oxidized flour. For a professional "sun-kissed" glow, always apply a light egg wash (one yolk plus a teaspoon of heavy cream) five minutes before the bake is complete.
THE DEEP DIVE
Macro Nutrition Profile:
A single serving of lard-based crust (approximately 1/8th of a 9-inch pie) contains roughly 280 calories. The lipid profile is surprisingly balanced; lard contains more monounsaturated fats (the "heart-healthy" kind) than butter. It is high in Oleic acid, the same fat found in olive oil.
Dietary Swaps:
- Vegan: Substitute the lard with a high-quality refined coconut oil. Ensure the coconut oil is chilled until solid. The texture will be similar, though the flavor will be slightly sweeter.
- Keto: Replace the wheat flour with a blend of almond flour and xanthan gum. Note that keto fats behave differently; you will need to add an egg to the dough to act as a structural binder.
- Gluten-Free: Use a 1-to-1 GF flour blend containing rice flour and potato starch. Increase the water by 15 percent, as GF flours are more absorbent.
Meal Prep & Reheating Science:
To maintain the molecular structure of the flakes, never reheat a lard-based pie in the microwave. Microwaves excite water molecules, which turns the fat into a liquid and makes the crust soggy. Instead, use a toaster oven at 325 degrees Fahrenheit for ten minutes. This re-crisps the starch and gently warms the lipids without causing them to "bleed" out of the pastry.
THE KITCHEN TABLE
Why is lard better than butter for flakes?
Lard has larger fat crystals and a higher melting point than butter. This means it stays solid longer in the oven, creating larger steam gaps that translate into more dramatic, visible flakes in the finished crust.
Can I use leaf lard and butter together?
Absolutely. A 50/50 split is a common professional compromise. You get the structural integrity and "shatter" of the lard combined with the piquant, dairy-rich flavor profile of high-fat European butter.
How long does the raw dough last?
The dough will maintain its integrity in the refrigerator for up to three days. For long-term storage, wrap it in a double layer of foil and freeze for up to three months. Thaw overnight in the fridge before rolling.
My dough is crumbling and won't roll out. Help!
This indicates under-hydration or the dough is too cold. Let it sit at room temperature for ten minutes. If it still crumbles, mist it lightly with a spray bottle of water and give it one quick fold.

