
Welcome to the high stakes arena of structural carbohydrate engineering. We are not just making a pie shell; we are conducting a Shortcrust Pastry Audit to ensure maximum friability and structural integrity. Forget the soggy, leaden disasters of amateur kitchens. We are hunting for that elusive, shatteringly crisp "short" texture that occurs when lipid molecules successfully coat flour proteins, effectively sabotaging the development of gluten networks. This is a battle against elasticity. Every degree of ambient heat is an enemy. Every unnecessary second of agitation is a threat to the crumbly architecture we demand. We want a golden, buttery enclosure that stands firm against a moist filling but surrenders instantly to the tooth. It requires a cold heart and a fast hand. If you are looking for bread-like resilience, go elsewhere. Here, we prioritize the delicate, the buttery, and the technically precise. Let us strip down the process to its molecular foundations and rebuild it with the cold efficiency of a culinary architect.
THE DATA MATRIX
| Metric | Specification |
|---|---|
| Prep Time | 15 Minutes |
| Execution Time | 45 Minutes (including resting) |
| Yield | 1 Large Tart (9-inch) |
| Complexity (1-10) | 4 |
| Estimated Cost per Serving | $0.45 |
THE GATHERS
Ingredient Protocol:
- 250g / 2 cups All-Purpose Flour (low protein preferred)
- 125g / 0.55 cups Unsalted Butter (chilled and cubed)
- 1g / 0.25 tsp Fine Sea Salt
- 45ml / 3 tbsp Ice-Cold Water
- 5g / 1 tsp Superfine Sugar (optional for sweet applications)
Section A: Ingredient Quality Audit:
The primary failure point in any Shortcrust Pastry Audit is the temperature of the lipid phase. If your butter is soft, it will emulsify with the flour rather than coating it; this results in a greasy, tough slab rather than a delicate crumb. If you find your butter is sweating, return it to the freezer for ten minutes immediately. Furthermore, the protein content of your flour is a critical variable. High-protein bread flour will create too many disulfide bonds, leading to a rubbery texture. If you are stuck with high-protein flour, substitute 20 percent of the volume with cornstarch to "soften" the blend and inhibit gluten formation. Finally, ensure your water is truly ice-cold. Room temperature water will melt the butter on contact, ruining the lamination before you even reach the oven.
THE MASTERCLASS
1. The Lipid Integration
Begin by sifting your dry ingredients into a large chilled bowl. Add the cubed, frozen butter. Use a bench scraper or a pastry cutter to "cut" the fat into the flour until the mixture resembles coarse breadcrumbs with a few pea-sized lumps remaining.
Pro Tip: The science here is "shortening" the gluten strands. By coating the flour particles in fat, you create a physical barrier that prevents water from hydrating the proteins. Using a digital scale ensures your fat-to-flour ratio is exactly 1:2, which is the golden ratio for crumbly stability.
2. Hydration and Binding
Sprinkle the ice water over the mixture one tablespoon at a time. Use a cold metal spoon to toss the flour until the dough just begins to clump together. It should look "shaggy" and barely cohesive. Do not overwork it into a smooth ball.
Pro Tip: Water is the catalyst for gluten. By minimizing the volume of liquid and keeping the temperature low, you limit the viscous development of protein chains. A saucier or small metal bowl kept in the fridge is the best vessel for holding your ice water to maintain thermal control.
3. The Frasage Technique
Turn the shaggy mass onto a cold work surface. Use the heel of your hand to smear the dough away from you in quick, decisive strokes. This technique, known as frasage, creates thin streaks of fat that will later render in the oven to create micro-layers of steam.
Pro Tip: This is the only time you should apply pressure. The goal is to create a homogenous distribution of fat without heating the dough with your palms. Use a bench scraper to gather the dough back into a disc, wrap it in plastic, and refrigerate for at least thirty minutes.
4. Thermal Calibration and Rolling
Once the dough has rested and the gluten has relaxed, roll it out on a lightly floured surface. Aim for a thickness of 3mm. Drape it over your tart tin and gently press it into the corners without stretching the dough.
Pro Tip: Stretching the dough creates "memory" in the gluten. When the heat hits, the dough will shrink down the sides of the tin if it was pulled during fitting. Use the weight of the dough itself to settle it into the grooves of the pan.
Section B: Prep & Timing Fault-Lines:
The most common human error is the "over-knead." If your dough feels elastic or bouncy, you have already lost the battle; you have developed a bread dough. Stop immediately and let it rest in the freezer for fifteen minutes to stop the process. Another timing error is skipping the resting phase. Without at least thirty minutes of refrigeration, the moisture will not distribute evenly through the flour, leading to "hot spots" of dry flour and "cold spots" of soggy dough. Use a kitchen timer to enforce this rest period.
THE VISUAL SPECTRUM
Section C: Thermal & Visual Troubleshooting:
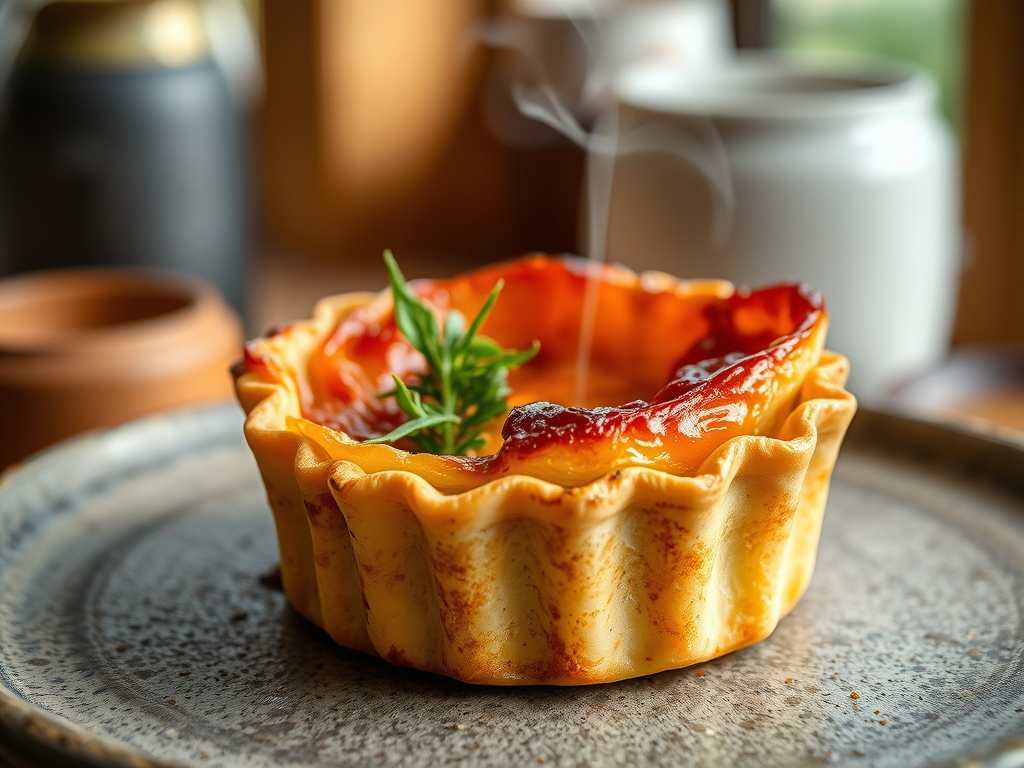
Look closely at the Masterclass photo above. Notice the pale, matte finish with slight golden "freckling" around the edges. If your crust is an even, dark brown, your oven is too hot or you have too much sugar in the dough, causing premature caramelization. If the crust looks translucent or "wet" even after baking, the fat melted before the structure set; this is often caused by a warm kitchen or warm hands during the rolling phase. If you see large bubbles rising in the center, you neglected to "dock" the dough with a fork or use pie weights. The ideal visual cue is a biscuit-like texture that appears dry to the touch but feels heavy with butter when lifted.
THE DEEP DIVE
Macro Nutrition Profile:
Shortcrust pastry is energy-dense, primarily driven by saturated fats and complex carbohydrates. A standard serving contains approximately 250 calories, 15g of fat, 25g of carbohydrates, and 3g of protein. It is a vehicle for flavor, not a primary source of micronutrients.
Dietary Swaps:
- Vegan: Replace butter with a high-quality vegetable shortening or cold coconut oil. Ensure the coconut oil is solid; if it liquefies, the structure will collapse.
- Gluten-Free: Use a blend of rice flour and almond flour. Add 1/2 teaspoon of xanthan gum to provide the "grip" that gluten usually offers.
- Keto: Utilize almond flour and cold butter, using an egg yolk as a binder to replace the structural integrity lost by removing wheat.
Meal Prep & Reheating Science:
To maintain the molecular structure, never reheat shortcrust in a microwave. Microwaves agitate water molecules, which softens the starch and turns the crust into a rubbery mess. Always use a toaster oven or conventional oven at 350F. This allows the fat to re-melt and the starches to re-crisp, maintaining the "short" texture. Raw dough can be frozen for up to three months if double-wrapped to prevent freezer burn.
THE KITCHEN TABLE
Why is my pastry shrinking in the oven?
Shrinkage is caused by overworking the dough, which develops gluten "elasticity." When heated, these protein chains contract. To prevent this, always let your dough rest in the fridge and never stretch it when lining your tin.
Can I use a food processor for this?
Yes, but use the pulse function sparingly. It is easy to over-process the fat into a paste. Pulse until the butter is the size of small peas, then finish the hydration by hand to ensure a delicate crumb.
What does "blind baking" actually do?
Blind baking sets the structure of the crust before adding moist fillings. This prevents the "soggy bottom" syndrome by creating a sealed, cooked barrier that resists moisture penetration from the interior ingredients.
Why add salt to a sweet pastry?
Salt is a flavor enhancer that cuts through the richness of the butter. Even in sweet tarts, a pinch of sea salt is required to balance the sugars and provide a more complex, professional flavor profile.

