
Listen to the sound of a structural failure. It is the sharp, crystalline snap of a crust yielding to internal pressure. We are not merely baking a loaf; we are managing a high-stakes chemical reaction within a pressurized gluten matrix. The Soda Bread Exterior is the final frontier of rustic aesthetics. It is a rugged, craggy landscape that serves as the physical record of carbon dioxide expansion. When cold buttermilk hits sodium bicarbonate, the clock starts. This is a race against the inevitable collapse of bubbles. If you hesitate, you lose the lift. If you overwork the dough, you transform a tender crumb into a rubberized disaster. We are looking for a specific topography: a jagged, golden-brown terrain that shatters upon impact. This is not the smooth, manicured surface of a brioche. This is a violent architectural event captured in flour and acid. We are here to audit the variables, calibrate the heat, and ensure that every fissure in your crust is a deliberate mark of technical excellence.
THE DATA MATRIX
| Metric | Specification |
|---|---|
| Prep Time | 10 Minutes |
| Execution Time | 45 Minutes |
| Yield | 1 Large Loaf (8 Servings) |
| Complexity | 3 / 10 |
| Estimated Cost per Serving | $0.45 |
THE GATHERS
Ingredient Protocol:
- 450g / 3.5 cups All-Purpose Flour (plus extra for dusting)
- 5g / 1 tsp Granulated Sugar
- 6g / 1 tsp Fine Sea Salt
- 6g / 1 tsp Sodium Bicarbonate (Baking Soda)
- 340ml / 1.5 cups Full-Fat Buttermilk (Cold)
- 30g / 2 tbsp Unsalted Butter (Chilled and cubed)
Section A: Ingredient Quality Audit:
The primary failure point in most rustic loaves is the chemical potency of the leavening agent. If your baking soda has been sitting in an open box for six months, it has likely absorbed ambient moisture and lost its ability to aerate the dough. Perform a "fizz test" by dropping a pinch into vinegar; if it does not react violently, discard it. Furthermore, the buttermilk must be high-viscosity. Low-fat or "milk plus lemon" substitutes often lack the protein density required to support the Soda Bread Exterior during the initial oven spring. If your buttermilk feels thin, whisk in a tablespoon of Greek yogurt to increase the structural integrity of the crumb.
THE MASTERCLASS
1. Dry Component Integration
Sift the flour, salt, sugar, and baking soda into a large stainless steel mixing bowl. Use a digital scale for this process; volumetric measurements are the enemy of consistency. Once sifted, drop in the chilled butter cubes. Use your fingertips to rub the fat into the flour until it resembles coarse sand.
Pro Tip: This process, known as "cutting in," coats the flour particles in fat, which inhibits excessive gluten development. This ensures the crumb remains tender rather than bread-like and chewy.
2. The Acidic Activation
Create a well in the center of your dry ingredients and pour in the buttermilk all at once. Use a bench scraper or a stiff spatula to fold the flour into the liquid. Do not stir in circles. Use a "cut and fold" motion to bring the dough together until it is just barely cohesive.
Pro Tip: The goal here is to minimize mechanical agitation. Every second you spend mixing is a second that carbon dioxide is escaping the dough. Work with speed and clinical precision.
3. Structural Shaping
Turn the viscous dough onto a lightly floured surface. Gently pat it into a round disc approximately 1.5 inches thick. Do not knead. If the dough sticks to your hands, use the bench scraper to tuck the edges under. Transfer the round to a parchment-lined baking sheet or a preheated cast iron skillet.
Pro Tip: A preheated skillet provides an immediate thermal shock to the bottom of the loaf, which accelerates the expansion of gases and creates a more dramatic vertical lift.
4. The Cruciform Incision
Using a sharp serrated knife or a baker's lame, cut a deep cross into the top of the dough, extending nearly to the edges. This is not decorative; it is a "stress relief" valve that dictates where the bread will expand.
Pro Tip: Traditional lore says this "lets the fairies out," but the molecular reality is that it prevents the base of the loaf from blowing out. It allows the Soda Bread Exterior to bloom outward symmetrically.
5. Thermal Execution
Slide the loaf into a preheated oven at 220C / 425F. Bake for 15 minutes, then reduce the temperature to 200C / 400F for the remaining 20 to 25 minutes. The loaf is done when the internal temperature hits 90C / 195F on a digital probe thermometer.
Pro Tip: Reducing the heat halfway through prevents the exterior from scorching while allowing the center to fully hydrate and set.
Section B: Prep & Timing Fault-Lines:
The most common human error is "over-handling." If your hands are too warm, you will render the small bits of butter before the loaf hits the oven, leading to a greasy, flat bread. Always keep your buttermilk and butter at 4C / 40F until the exact moment of integration. If your kitchen is over 24C / 75F, chill your mixing bowl in the freezer for ten minutes prior to starting the audit.
THE VISUAL SPECTRUM
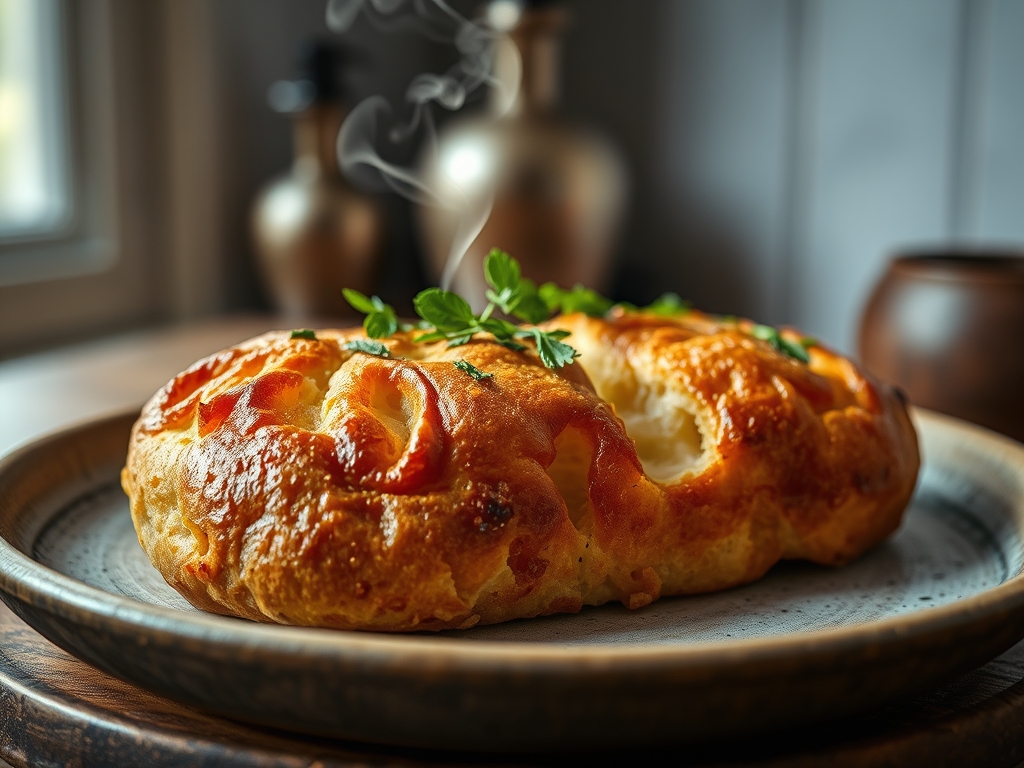
Section C: Thermal & Visual Troubleshooting:
Observe the photo provided in the Masterclass. The Soda Bread Exterior should exhibit a "shaggy" appearance with deep, irregular crevices. If your loaf looks smooth or "bald," you likely used too much liquid or overworked the dough, smoothing out the natural crags. If the color is pale and sickly, your oven calibration is likely low; check it with an independent thermometer. A perfect loaf should sound hollow when tapped on the bottom. This "thump" indicates that the moisture has successfully evaporated, leaving behind a light, aerated internal structure. If the crust feels soft or leathery, you likely skipped the high-heat initial phase, which is crucial for caramelization and the Maillard reaction.
THE DEEP DIVE
Macro Nutrition Profile
A standard slice (approx. 60g) contains roughly 160 calories, 4g of protein, 30g of carbohydrates, and 3g of fat. While it is a carbohydrate-dense food, the lack of commercial yeast and short fermentation time makes it easier for some individuals to digest compared to standard white breads.
Dietary Swaps
- Vegan: Replace buttermilk with soy milk mixed with 1 tablespoon of apple cider vinegar. Substitute butter with a high-quality vegan block butter (avoid oil-based spreads).
- Keto: This specific chemical leavening profile is difficult to replicate with nut flours, as they lack the starch required to trap gas. However, a blend of almond flour and psyllium husk can approximate the texture.
- Gluten-Free: Use a 1-to-1 gluten-free flour blend containing xanthan gum. Increase the buttermilk by 10% to account for the higher absorption rate of alternative starches.
Meal Prep & Reheating Science
Soda bread is best consumed within 4 hours of baking. To preserve the molecular structure for 24 hours, wrap it in a clean linen towel. Do not use plastic wrap, as this traps moisture and turns the crisp Soda Bread Exterior into a soggy mess. To reheat, slice and toast under a broiler to re-crystallize the starches and restore the crunch.
THE KITCHEN TABLE
Why is my soda bread so dense?
Density is usually caused by expired baking soda or over-mixing. If you develop too much gluten, the bread cannot expand, resulting in a "brick" texture. Mix until the flour just disappears and then stop immediately.
Can I add mix-ins like raisins or herbs?
Absolutely. Fold dry additions like rosemary or currants into the flour before adding the liquid. This ensures even distribution without requiring extra mixing time that would jeopardize the aeration of the dough.
Why does my crust taste like soap?
A "soapy" aftertaste indicates an imbalance between the acid (buttermilk) and the base (baking soda). If you use too much soda or your buttermilk isn't acidic enough, the unreacted soda leaves a bitter, metallic flavor profile.
Do I need a Dutch oven for this?
While a Dutch oven provides excellent steam control, it is not strictly necessary for soda bread. A simple baking sheet or cast iron skillet works perfectly, as this bread relies on rapid chemical expansion rather than steam-induced crust development.

