
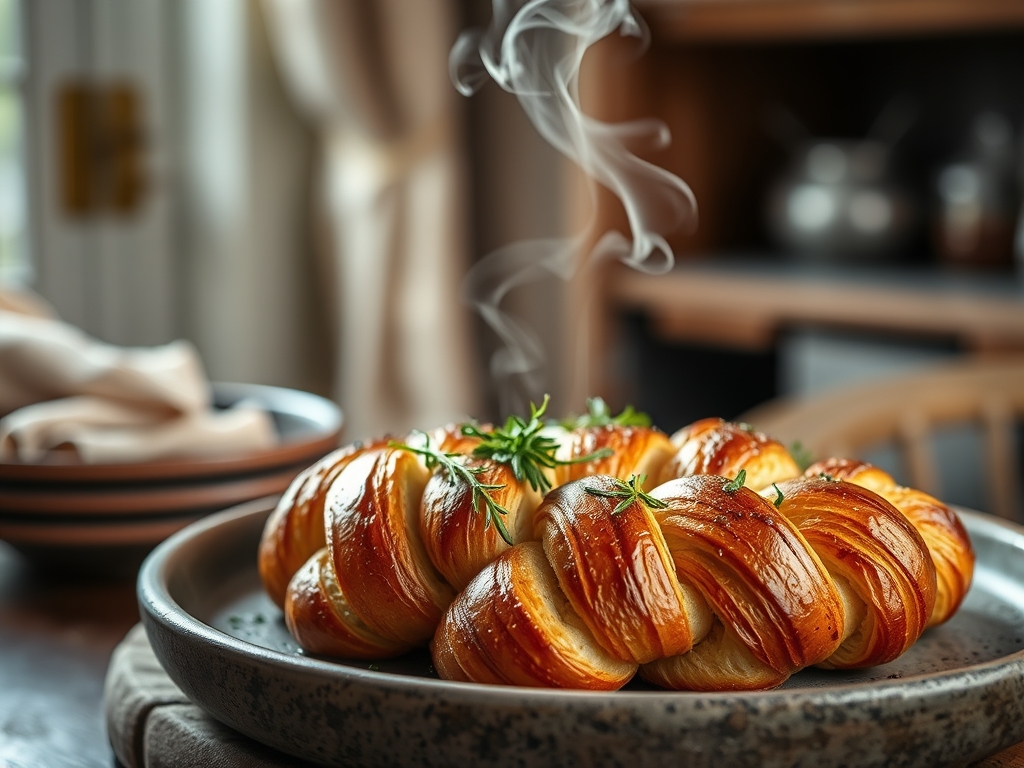
Listen up, kitchen architects. We are not just baking bread; we are engineering a structural masterpiece of golden-brown architecture. The Braided Challah Crust is the ultimate test of a baker's ability to manage tension, surface area, and protein denaturation. When you pull a perfect loaf from the oven, it should possess a mahogany sheen so reflective it practically functions as a mirror. This is the result of a precise chemical alliance between high-protein flour and a lipid-heavy egg wash. We are looking for a crumb that is pillowy yet resilient, encased in a shell that shatters slightly before yielding to a soft, rich interior. If your crust looks matte or your braids are blowing out like a structural failure in a suspension bridge, your technical audit is overdue. We are here to calibrate your process, from the hydration levels of your dough to the exact millisecond the Maillard reaction peaks. Prepare to transform raw flour and yeast into a shimmering, braided trophy of culinary infrastructure.
THE DATA MATRIX
| Metric | Specification |
|---|---|
| Prep Time | 45 Minutes (Active) |
| Execution Time | 4 Hours (Including Proofing) |
| Yield | 2 Large Loaves |
| Complexity (1-10) | 8 |
| Estimated Cost per Serving | $0.45 |
THE GATHERS
Ingredient Protocol:
- High-Protein Bread Flour: 1kg / 8 cups
- Warm Water (38C): 350ml / 1.5 cups
- Active Dry Yeast: 14g / 4 teaspoons
- Granulated Sugar: 100g / 0.5 cups
- Large Egg Yolks (Dough): 4 units / approx. 72ml
- Whole Large Eggs (Dough): 2 units / approx. 100ml
- Neutral Vegetable Oil: 120ml / 0.5 cups
- Fine Sea Salt: 18g / 1 tablespoon
- Egg Yolk (Wash): 2 units / for glazing
- Honey (Wash): 5ml / 1 teaspoon
Section A: Ingredient Quality Audit:
If your flour has a protein content below 12 percent, your Braided Challah Crust will lack the structural integrity required to hold its shape during the secondary proof. The dough will slacken and the braids will merge into a singular, amorphous blob. To fix this, add 20g of vital wheat gluten to your dry mix. If your yeast fails to aerate the water within five minutes, it is biologically inert; discard it and check the expiration date. Using cold eggs will shock the yeast and stall fermentation. Always temper your lipids and proteins to room temperature to ensure a consistent viscous texture during the initial mixing phase.
THE MASTERCLASS
1. Hydration and Initial Integration
Combine your warm water, sugar, and yeast in the bowl of a stand mixer. Let it bloom until foamy. Add the oil, whole eggs, and yolks. Use a digital scale to ensure your flour weight is exact before adding it alongside the salt. Use the dough hook on low speed until a shaggy mass forms.
Pro Tip: This stage is about controlled hydration. By using a digital scale instead of volume measurements, you prevent the "dry crumb" syndrome caused by over-packing flour.
2. The Kinetic Development Phase
Increase the mixer speed to medium. Knead the dough for 8 to 10 minutes until it clears the sides of the bowl. The dough should be tacky but not sticky. Perform a "windowpane test" by stretching a small piece of dough; it should be translucent without tearing.
Pro Tip: The mechanical energy of the mixer builds the gluten network. If the dough feels too warm, use a bench scraper to move it to a cold marble surface to finish kneading by hand.
3. Primary Fermentation
Place the dough in a lightly oiled bowl and cover with plastic wrap. Allow it to rise in a draft-free environment until doubled in volume. This usually takes 90 to 120 minutes depending on your ambient kitchen temperature.
Pro Tip: Yeast metabolism produces carbon dioxide and ethanol. This stage is where you infuse the dough with the complex esters that define a professional-grade Challah.
4. Structural Braiding
Degas the dough and divide it into equal portions using your bench scraper. Roll each portion into a smooth strand. Braid the strands tightly, tucking the ends underneath to create a seamless finish. Place on a parchment-lined baking sheet.
Pro Tip: Tension is your friend. A tight braid ensures that as the bread undergoes "oven spring," it expands upward rather than outward, maintaining the integrity of the Braided Challah Crust.
5. The Double-Glaze Protocol
Whisk your egg yolks and honey in a small saucier or bowl until perfectly smooth. Apply a thin, even layer over the braided loaf. Let the loaf proof for another 45 minutes, then apply a second layer of egg wash right before it enters the oven.
Pro Tip: The honey adds fructose, which accelerates the Maillard reaction. The double application ensures that any areas exposed during the final rise are still coated in protein for a uniform gloss.
6. Thermal Transformation
Bake at 175C (350F) for 30 to 35 minutes. The internal temperature must reach 88C (190F) on an instant-read thermometer. The exterior should be a deep, burnished bronze.
Pro Tip: If the top browns too quickly, tent it with foil. This allows the interior to render its moisture into steam without carbonizing the delicate sugars on the crust.
Section B: Prep & Timing Fault-Lines:
The most common human error is rushing the second proof. If the dough has not sufficiently expanded before hitting the heat, the internal pressure will cause the crust to rupture at the weakest points of the braid. This creates unsightly white gaps. Conversely, over-proofing leads to a collapsed structure that cannot support its own weight. Use the "finger poke" test; if the indentation fills back slowly, you are in the "Goldilocks" zone for baking.
THE VISUAL SPECTRUM
Section C: Thermal & Visual Troubleshooting:
Look at the reference image. Note the high-contrast highlights on the ridges of the braid. If your loaf is dull, your egg wash lacked sufficient lipid content; use only yolks next time. If you see "shredding" or tearing along the sides of the braids, your oven was likely too hot, or you didn't steam the oven cavity. For that professional "wet look" finish, ensure your egg wash is strained through a fine-mesh sieve to remove the chalazae, which can create unsightly white specks on the finished Braided Challah Crust.
THE DEEP DIVE
Macro Nutrition Profile:
A standard slice (approx. 50g) contains 160 calories, 5g of protein, 24g of carbohydrates, and 6g of fat. The high egg content provides significant Vitamin D and Choline compared to standard lean doughs.
Dietary Swaps:
- Vegan: Replace eggs with "flax eggs" (ground flax and water) and use maple syrup instead of honey. Note: The gloss will be significantly reduced without animal proteins.
- Gluten-Free: Use a high-quality 1:1 GF flour blend with added Xanthan gum. Expect a denser crumb.
- Keto: This is difficult for Challah, but almond flour and vital wheat gluten (if not avoiding gluten) can approximate the texture.
Meal Prep & Reheating Science:
To maintain the molecular structure, store the loaf in a paper bag for the first 24 hours, then transition to plastic. To reheat, wrap in foil and bake at 150C for 10 minutes. This re-gelatinizes the starches without drying out the crust. For long-term storage, slice and freeze; the high fat content prevents the formation of large ice crystals that cause freezer burn.
THE KITCHEN TABLE
Why is my Challah crust dull instead of shiny?
A dull crust usually results from a single, thin layer of egg wash or using whole eggs instead of just yolks. For maximum shine, use pure yolks mixed with a pinch of salt and honey, applied in two separate coats.
How do I prevent the bottom from burning?
High sugar and egg content make Challah prone to scorching. Use a heavy-duty rimmed baking sheet or double-stack two sheets to create an insulating air gap that protects the base of the loaf from direct conductive heat.
Can I make the dough in a bread machine?
Yes, use the "Dough" setting to handle the mixing and primary fermentation. However, you must remove the dough to braid and proof it manually. A machine cannot replicate the structural tension of a hand-braided loaf.
Why did my braids pull apart during baking?
This is known as "shredding." It occurs when the dough is under-proofed or the oven temperature is too high. The rapid expansion forces the braids apart before the crust has set. Ensure a full second proof.

