
The crunch is not a suggestion; it is a mandate. When you bite into a true Thin and Crispy Crust, the sound should register on a seismograph. We are not talking about the limp, bready triangles found in cardboard delivery boxes. We are discussing the pursuit of total moisture depletion. This is a culinary engineering project where the primary enemy is hydration. To achieve that glass-like shatter, we must treat the dough like a structural composite. We are manipulating gluten networks to be brittle rather than elastic. We are driving out every rogue molecule of H2O until the starches undergo a complete structural transformation. The goal is a crust so thin it defies gravity, yet so rigid it supports a payload of molten cheese and piquant sauce without a hint of "tip sag." This is the high-stakes world of low-hydration baking. If you want soft and pillowy, go buy a loaf of brioche. If you want a masterclass in thermal dynamics and structural integrity, pull up a chair. The audit begins now.
THE DATA MATRIX
| Metric | Specification |
|---|---|
| Prep Time | 20 Minutes (plus 24-hour cold ferment) |
| Execution Time | 8 Minutes |
| Yield | 4 Individual 12-inch Crusts |
| Complexity (1-10) | 7 (Precision is non-negotiable) |
| Estimated Cost per Serving | $1.15 |
THE GATHERS
Ingredient Protocol:
- 500g / 3.75 cups 00 Flour (High protein for structural rigidity)
- 240ml / 1 cup Ice Cold Water (Strict 48% hydration ratio)
- 10g / 2 tsp Fine Sea Salt
- 3g / 1 tsp Instant Dry Yeast
- 15ml / 1 tbsp Extra Virgin Olive Oil (To coat the surface and inhibit steam)
- 5g / 1 tsp Diastatic Malt Powder (Optional: for enhanced Maillard reaction)
Section A: Ingredient Quality Audit:
If your flour feels "clumpy" or damp, it has already absorbed ambient humidity. This will throw your 48% hydration ratio into a tailspin. Technical fix: Use a digital scale to weigh your flour rather than relying on volume. If your yeast is sluggish, your dough will not aerate properly, leading to a dense, tooth-shattering tile instead of a crisp wafer. Always bloom a small pinch of yeast in lukewarm water first to verify activity. If the water in your area is excessively hard, the minerals can toughen the gluten too quickly. Use filtered water to ensure a consistent, predictable chemical environment for your enzymes to work their magic.
THE MASTERCLASS
Step 1: The Dry Component Integration
Place your 00 flour, salt, and diastatic malt powder into a large stainless steel bowl. Use a whisk to aerate the mixture, ensuring the salt is distributed evenly. Even distribution prevents "salt killing" the yeast during the initial contact phase.
Pro Tip: Use a digital scale to measure to the gram. In low-hydration doughs, a variance of even 10 grams of water can be the difference between a crisp snap and a chewy disaster.
Step 2: Controlled Hydration
Slowly incorporate the ice-cold water. Unlike high-hydration artisan breads, we are not looking for a smooth, wet mass. You are aiming for a "shaggy" appearance that looks almost too dry to hold together. Use a bench scraper to fold the dry flour into the wet pockets.
Pro Tip: Keeping the water cold slows down yeast activity, allowing for a longer, more controlled fermentation. This prevents the dough from becoming overly gassy and thick.
Step 3: The Mechanical Knead
Transfer the shaggy mass to a clean surface. Knead the dough for at least 10 minutes until it becomes smooth and loses its tackiness. The dough will be stiff and require significant physical effort to manipulate. This is where the gluten bonds are forged.
Pro Tip: Use the heel of your hand to render the dough into a tight ball. A bench scraper is essential here to keep your workspace clean of any stray gluten strands that might tear the surface.
Step 4: The Cold Ferment Lockdown
Place the dough in an oiled container and refrigerate for 24 to 48 hours. This is the "flavor window." During this time, enzymes break down complex starches into simple sugars, which will later caramelize into a deep mahogany brown.
Pro Tip: Cold fermentation is a biochemical necessity. It allows the dough to relax, making it possible to roll it out to paper-thin dimensions without it snapping back like a rubber band.
Step 5: The Precision Roll-Out
Remove the dough and let it sit at room temperature for 60 minutes. Use a heavy rolling pin to flatten the dough into a translucent sheet. You should almost be able to see the grain of your wooden table through the dough.
Pro Tip: For a true Thin and Crispy Crust, use a docking tool (a spiked roller) to create tiny perforations. This prevents the dough from puffing up into large bubbles, ensuring it stays flat and uniform.
Step 6: The Thermal Shock
Slide the crust onto a preheated baking stone or steel set at 500 degrees Fahrenheit. The goal is to evaporate the remaining moisture instantly. Bake for 6 to 8 minutes until the edges are dark and the bottom is rigid.
Pro Tip: Use a pizza peel dusted with semolina flour to ensure a smooth transition to the oven. The semolina acts like tiny ball bearings, preventing the thin dough from sticking and tearing.
Section B: Prep & Timing Fault-Lines:
The most common failure is rushing the room-temperature acclimation. If the dough is too cold when you roll it, the gluten will be too tight; you will end up with a thick, uneven base. Conversely, if you let it sit out too long, the yeast will over-produce CO2, resulting in a "bready" texture that ruins the Thin and Crispy Crust profile. Timing is a narrow corridor. Use an infrared thermometer to ensure your baking surface has reached a minimum of 475 degrees Fahrenheit before the dough makes contact.
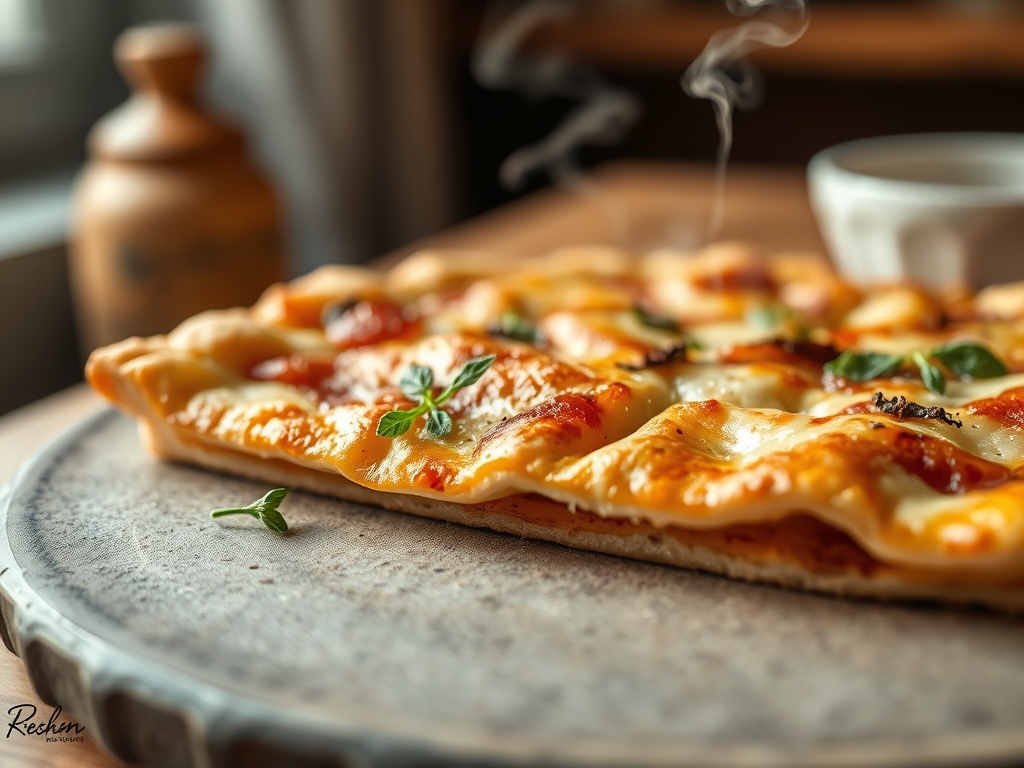
THE VISUAL SPECTRUM
Section C: Thermal & Visual Troubleshooting:
Look at the Masterclass photo. Notice the "leopard spotting" on the edges and the way the cheese has begun to infuse with the sauce without soaking into the crust. If your crust looks pale and ghostly, your oven temperature is too low or you skipped the diastatic malt. If the crust is dark but floppy, you have too much moisture in your sauce or toppings; you must render the fat out of meats like pepperoni before adding them. If you see large, uneven bubbles, you failed to use a docking tool. A perfect Thin and Crispy Crust should have a matte finish on the bottom with a slight sheen of oil on the rim.
THE DEEP DIVE
Macro Nutrition Profile:
A single serving (one quarter of a 12-inch pie) typically contains 280 calories, 52g of carbohydrates, 9g of protein, and 4g of fat. Because the crust is so thin, the caloric density is significantly lower than deep-dish or hand-tossed varieties, making it a "lighter" high-carb option.
Dietary Swaps:
- Vegan: The recipe is naturally vegan as written. Ensure your sugar source (if using) is vegan-certified.
- Keto: Replace 00 flour with a blend of almond flour, vital wheat gluten, and oat fiber. Note that the "snap" will be harder to achieve without traditional starch.
- GF: Use a high-quality 1-to-1 gluten-free baking flour. Add 1/2 tsp of xanthan gum to mimic the structural integrity of gluten.
Meal Prep & Reheating Science:
To maintain molecular structure, never reheat in a microwave. The microwave agitates water molecules, turning your crispy masterpiece into a soggy sponge. Instead, use a dry cast-iron skillet over medium heat. This re-crisps the bottom while the ambient heat melts the cheese. For long-term storage, par-bake the crusts for 3 minutes, wrap them in foil, and freeze. They can go directly from the freezer to a hot oven.
THE KITCHEN TABLE
Why is my crust chewy instead of crispy?
You likely have too much water in your dough or your oven wasn't hot enough. High hydration creates steam, which leads to a soft, bread-like crumb. Lower your water content and crank the heat.
Can I use All-Purpose flour instead of 00?
Yes, but the texture will be slightly grainier. 00 flour is milled finer, allowing for a smoother stretch and a more delicate shatter. If using AP flour, reduce water by 5%.
What does the oil actually do in the dough?
Oil acts as a "shortening" agent. It coats the flour proteins, preventing them from forming long, stretchy gluten chains. This results in a "shorter" crumb that snaps when bent rather than stretching.
How do I prevent the middle from getting soggy?
Avoid "sauce creep." Keep your sauce thick and apply it sparingly. If your sauce is too viscous, it will release water into the dough during the bake, destroying the crispness.

