
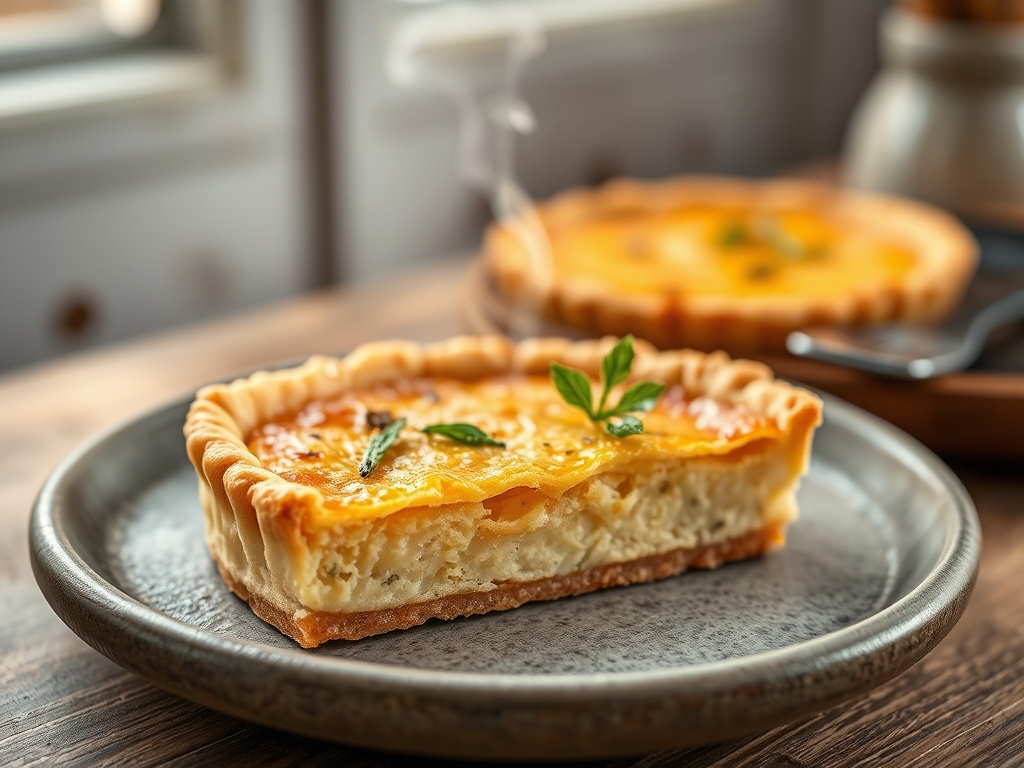
Listen to the sound of a structural failure that tastes like victory. It is the rhythmic snap of a Shortbread Tart Crust yielding to a fork; a clean, surgical fracture that releases a cloud of toasted butter aromatics and pulverized sugar. We are not interested in the soggy, structural compromises of a standard pie dough. We are here for the lipid-heavy, crumbly architecture of a true sablee base. This is a technical audit of the most essential foundation in the pastry arts. When executed with precision, this crust acts as a high-density delivery system for lemon curds, chocolate ganaches, and seasonal fruits. It requires a total rejection of gluten development in favor of a short, sandy texture that melts upon contact with the palate. We are balancing on the edge of a phase change where solid fats become liquid gold. If your current pastry game feels like chewing on a damp sponge, it is time to recalibrate your equipment and your expectations. We are building a fortress of butter.
THE DATA MATRIX
| Metric | Specification |
|---|---|
| Prep Time | 15 Minutes |
| Execution Time | 25 Minutes |
| Yield | One 9-inch (23cm) Tart |
| Complexity (1-10) | 4 |
| Estimated Cost per Serving | $0.45 |
THE GATHERS
Ingredient Protocol:
- 225g / 1 cup Unsalted European-style butter (cold, cubed)
- 65g / 0.5 cup Confectioners' sugar (sifted)
- 300g / 2.5 cups All-purpose flour (low protein preferred)
- 2g / 0.25 tsp Fine sea salt
- 5ml / 1 tsp Pure vanilla bean paste
- 1 Large egg yolk (room temperature)
Section A: Ingredient Quality Audit:
The primary failure point in a Shortbread Tart Crust is the moisture content of the butter. Standard supermarket butter often contains up to 18 percent water; this excess hydration triggers gluten formation, turning your "short" crust into a "tough" bread. To fix this, source European-style butter with at least 82 percent butterfat. If your flour is too high in protein (above 10.5 percent), the structure will become overly rigid. You can mitigate this by replacing 10 percent of the flour weight with cornstarch to interfere with the protein strands. Finally, ensure your salt is fine-grained. Large crystals will not dissolve in the fat-heavy environment, leading to "hot spots" of salinity that disrupt the flavor profile.
THE MASTERCLASS
1. The Lipid Integration Phase
Begin by placing your chilled, cubed butter and sifted confectioners' sugar into the bowl of a stand mixer. Using the paddle attachment, cream the mixture on low speed until it is just combined. We are not looking to aerate the mixture like a sponge cake; we are looking to coat the sugar in fat.
Pro Tip: Use a digital scale for these measurements. Volume-based measuring is the enemy of consistency. The science here is "shortening" the gluten strands by physically coating the flour particles in fat before they ever touch moisture.
2. The Dry Matter Incorporation
Add the flour and salt to the buttery matrix. Pulse the mixer or use a bench scraper to cut the flour into the fat until the mixture resembles coarse sand. There should be no large lumps of butter remaining, as these will melt and cause the crust to slump down the sides of the tart pan during the bake.
Pro Tip: If the friction of the mixer blades begins to render the butter into a liquid state, stop immediately and chill the bowl for ten minutes. Keeping the fat solid is the only way to ensure a crumbly texture.
3. The Emulsion Bridge
Whisk the egg yolk and vanilla bean paste together in a small saucier or bowl. Pour this liquid into the sandy flour mixture. Mix on the lowest setting until the dough just begins to clump together. It should look slightly shaggy but hold its shape when squeezed in your palm.
Pro Tip: The egg yolk acts as an emulsifier and a source of lecithin. This provides just enough structural integrity to allow the crust to be sliced without shattering into dust while maintaining the signature melt-in-the-mouth feel.
4. The Compression and Chill
Turn the dough out onto a sheet of plastic wrap. Use the heel of your hand to gently push the dough away from you in a motion known as fraisage. This finalizes the homogenization without overworking the dough. Wrap tightly and refrigerate for at least sixty minutes.
Pro Tip: Chilling allows the starch granules in the flour to fully hydrate and the fats to re-solidify. Skipping this step results in a greasy, shrinking crust that lacks the professional "snap" seen in high-end patisseries.
5. The Thermal Setting
Roll the dough to a 3mm thickness and fit it into a fluted tart tin. Prick the bottom with a fork to prevent steam pockets. Bake at 175C (350F) for 15 to 20 minutes until the edges reach a pale gold.
Pro Tip: Use a perforated silicone mat or pie weights during the first 10 minutes of baking. This ensures the base remains perfectly flat, providing a professional canvas for your fillings.
Section B: Prep & Timing Fault-Lines:
The most common human error is the "Warm Hand Syndrome." If you handle the dough too much, the heat from your palms will melt the butter, resulting in a tough, oily finished product. Use a bench scraper to move the dough instead of your fingers. If the dough becomes sticky, it is a thermal emergency; return it to the freezer for five minutes. Another timing error is under-baking. A "white" shortbread is an under-developed shortbread. You must wait for the Maillard reaction to produce those golden hues, which signal the transformation of simple starches into complex, toasted flavor compounds.
THE VISUAL SPECTRUM
Section C: Thermal & Visual Troubleshooting:
Referencing the Masterclass photo, notice the uniform, matte finish of the crust. If your crust looks shiny or "wet" after baking, you have experienced fat separation due to an overheated oven or improper mixing. If the edges are dark brown while the center is pale, your oven has hot spots; rotate the tin 180 degrees halfway through the bake. Uneven browning is often a sign of uneven rolling. Use rolling pin spacer rings to ensure a perfect 3mm thickness across the entire diameter. If the crust has pulled away significantly from the sides, you likely stretched the dough while fitting it into the tin. Always "drop" the dough into the corners rather than pulling it.
THE DEEP DIVE
Macro Nutrition Profile:
A standard serving of this Shortbread Tart Crust (approximately 1/8th of a 9-inch tart) contains roughly 280 calories. The profile is dominated by lipids (18g), followed by carbohydrates (26g), and a minimal protein count (3g). This is a high-density energy source designed for indulgence, not a meal replacement.
Dietary Swaps:
For a Vegan variant, replace the butter with a high-quality plant-based block (ensure it has a high coconut oil or cocoa butter content for stability) and swap the egg yolk for 15ml of aquafaba. For Gluten-Free requirements, a 1:1 baking flour blend works well, though you may need to add 0.5g of xanthan gum to prevent excessive crumbling. For Keto, use almond flour and a sugar alcohol sweetener; however, note that the lack of starch will result in a much softer, more fragile structure.
Meal Prep & Reheating Science:
The high fat content makes this crust an excellent candidate for advance preparation. Raw dough can be frozen for up to three months. Once baked, the crust can be stored in an airtight container at room temperature for 48 hours. To maintain the molecular structure when reheating, use a low-temperature oven (150C/300F) for five minutes. Avoid the microwave at all costs, as it will agitate the water molecules and turn the crisp lipid structure into a rubbery mess.
THE KITCHEN TABLE
Why is my crust shrinking down the sides?
This is usually caused by overworking the dough, which develops gluten "elasticity." It can also happen if you do not chill the dough properly before baking. Ensure a minimum one-hour rest to let the gluten relax.
Can I use granulated sugar instead of confectioners' sugar?
Granulated sugar creates a crunchier, more aerated texture. Confectioners' sugar contains a small amount of cornstarch and dissolves faster, resulting in the classic, tight-crumbed, sandy texture that defines a professional Shortbread Tart Crust.
My dough is too crumbly to roll out. What happened?
The dough is likely too cold or lacks sufficient moisture. Let it sit at room temperature for five minutes and gently knead it once or twice to distribute the warmth of your hands before attempting to roll it again.
Should I grease the tart pan?
No. The high butter content in this specific ratio acts as its own release agent. As the fat melts and the crust bakes, it will naturally shrink slightly and pull away from the edges of the tin.

