
Listen to the sound of a structural failure. It is the wet, apologetic thud of a soggy vegetable hitting a paper plate. This is the ultimate culinary catastrophe. We are here to prevent that collapse by engineering a superior moisture barrier. When you deal with a high-moisture botanical like a pickle, you are fighting a constant battle against internal cellular water release. The solution is a high-performance Fried Pickle Batter that functions as a pressurized seal. We are looking for a coating that provides a piquant snap while maintaining a rigid, golden exoskeleton. This is not just cooking; it is material science applied to the deep fryer. We must manage the interaction between the acidic brine of the cucumber and the alkaline properties of our leavening agents. If the batter is too thin, it sloughs off in the oil. If it is too thick, it becomes a bready, oil-soaked sponge. We demand a crisp, aerated shell that shatters upon impact, revealing the hot, succulent interior without a hint of greasiness.
THE DATA MATRIX
| Metric | Specification |
|---|---|
| Prep Time | 15 Minutes |
| Execution Time | 10 Minutes |
| Yield | 4-6 Servings |
| Complexity (1-10) | 4 |
| Estimated Cost per Serving | $1.25 |
THE GATHERS
Ingredient Protocol:
- 500g / 1 Jar: High-quality Dill Pickle Slices (drained and patted dry)
- 250g / 2 Cups: All-purpose flour
- 60g / 0.5 Cup: Cornstarch (for crystalline crunch)
- 10g / 2 Tsp: Baking powder (the aeration engine)
- 5g / 1 Tsp: Smoked paprika (for color and depth)
- 3g / 0.5 Tsp: Cayenne pepper (the piquant kick)
- 355ml / 12 oz: Ice-cold light lager or club soda
- 1 Large Egg: Beaten (for protein binding)
- 1L / 1 Quart: High-smoke point oil (Peanut or Grapeseed)
Section A: Ingredient Quality Audit:
The primary failure point in most Fried Pickle Batter applications is the moisture content of the pickle itself. If your pickles are flaccid or overly soft, the heat of the oil will turn them into mush before the batter sets. To fix this, ensure you are using "refrigerated" style pickles rather than shelf-stable ones; the former maintain better cellular integrity. If your flour feels clumped or heavy, it has likely absorbed ambient humidity. Sift it twice to aerate the particles. If your leavening agent is older than six months, discard it. A dead baking powder results in a leaden, flat coating that lacks the necessary micro-bubbles for a light mouthfeel.
THE MASTERCLASS
1. The Desiccation Protocol
Drain the pickles and spread them across a clean lint-free towel. Use a second towel to press firmly on the surface. Removing surface moisture is the only way to ensure the starch adheres to the skin.
Pro Tip: Use a digital scale to weigh your dry ingredients. Volumetric measurements are notoriously inaccurate; precision ensures the viscous nature of the batter remains consistent batch after batch.
2. The Dry-Dredge Foundation
Toss the dried pickles in a small bowl with a half-cup of plain flour. This creates a "primer" coat. Without this step, the wet batter will simply slide off the smooth, acidic surface of the pickle slice.
Pro Tip: Use a bench scraper to quickly clear your workstation of excess flour. Keeping a clean "dry hand" and "wet hand" during this process prevents the formation of "club hand" dough clumps on your fingers.
3. The Aerated Batter Synthesis
In a stainless steel saucier or mixing bowl, whisk together the remaining flour, cornstarch, baking powder, and spices. Slowly pour in the ice-cold lager while whisking gently. Do not over-mix. Small lumps are acceptable; over-mixing develops gluten, which leads to a tough, rubbery texture.
Pro Tip: The carbonation in the beer provides immediate aeration. The bubbles expand rapidly when they hit the hot oil, creating a light, honeycomb structure within the crust.
4. Thermal Immersion
Heat your oil to exactly 190C / 375F. Drop the dredged pickles into the batter, then carefully lower them into the oil one by one. Do not crowd the pot. Crowding drops the oil temperature, leading to oil absorption rather than a quick sear.
Pro Tip: Use an infrared thermometer or a clip-on probe to monitor the oil. Maintaining a steady thermal environment is the difference between a golden masterpiece and a brown, burnt failure.
5. The Drainage Phase
Once the pickles are a deep golden brown (about 2 to 3 minutes), remove them with a spider strainer. Place them immediately on a wire cooling rack set over a sheet pan. Never drain on paper towels, as the trapped steam will soften the bottom of the crust.
Pro Tip: Season with a fine dusting of sea salt the second they exit the oil. The residual surface oil will help the salt crystals adhere before the crust fully hardens.
Section B: Prep & Timing Fault-Lines:
Timing is the silent killer of the Fried Pickle Batter. If you batter the pickles and let them sit before frying, the salt in the batter will draw more water out of the pickle, liquefying the interface and causing the crust to fall off. This is known as "weeping." You must move from batter to oil in under ten seconds. Furthermore, if your oil is too cold, the batter will expand slowly and soak up fat. If it is too hot, the exterior will undergo the Maillard reaction too quickly, leaving the interior raw and the batter potentially burnt.
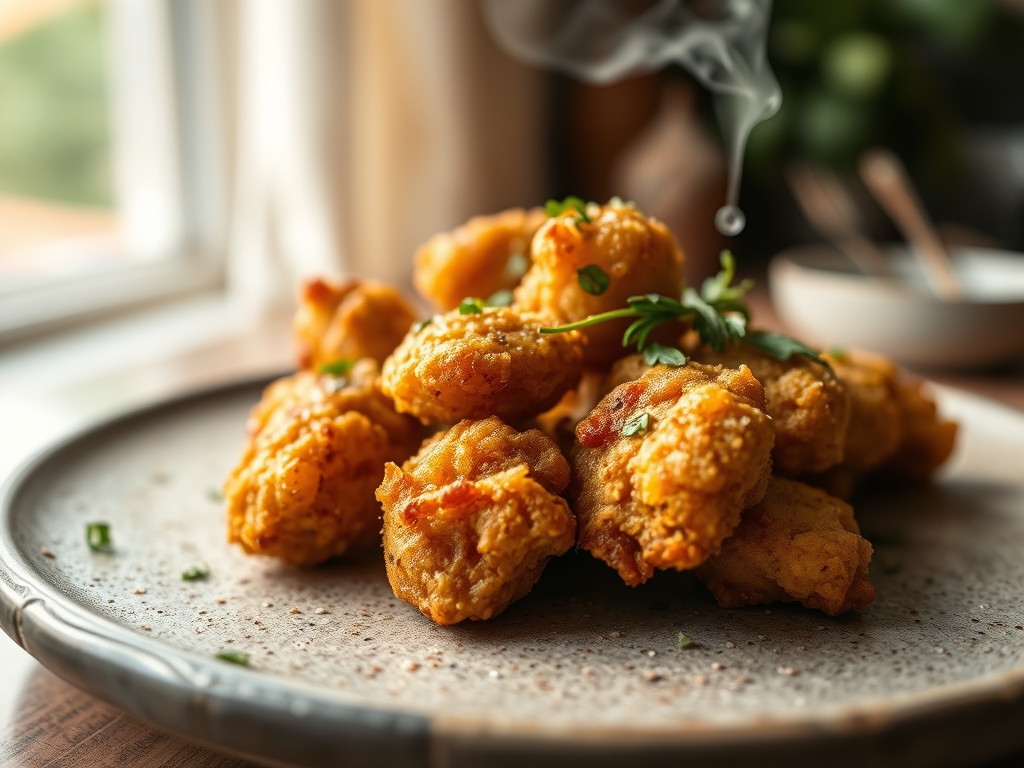
THE VISUAL SPECTRUM
Section C: Thermal & Visual Troubleshooting:
Look at the reference photo. Notice the "nooks and crannies" on the surface. This indicates a high-viscosity batter that was properly aerated. If your pickles look smooth like a corn dog, your batter was too thick or lacked carbonation. If the color is pale and ghostly, your oil temperature was too low or you lacked the sugar/protein interaction provided by the beer and egg. If you see dark "freckles" on the crust, your oil contains burnt debris from a previous batch; strain your oil through a coffee filter between sessions to maintain visual purity. The ideal specimen should have a matte-gold finish with visible crystalline structures from the cornstarch.
THE DEEP DIVE
Macro Nutrition Profile:
A standard serving (approx. 100g) contains roughly 280 calories, 14g of fat, 32g of carbohydrates, and 4g of protein. While not a health food, the high-heat frying method minimizes oil penetration if executed correctly.
Dietary Swaps:
- Vegan: Replace the egg with 15ml of aquafaba (chickpea liquid) and ensure the beer is vegan-friendly.
- Gluten-Free: Swap the all-purpose flour for a 1:1 GF blend and use a gluten-free cold sparkling water instead of beer.
- Keto: This is difficult, but a mixture of almond flour and crushed pork rinds can provide a similar, albeit denser, crunch.
Meal Prep & Reheating Science:
Fried pickles are best consumed within minutes. However, if you must reheat, do not use a microwave; it will agitate water molecules and turn the crust into mush. Use an air fryer at 200C / 400F for 3 minutes to re-crisp the exterior and render out any absorbed moisture.
THE KITCHEN TABLE
Why does my batter fall off the pickle?
Usually, this is due to surface moisture. If the pickle is wet, the batter cannot bond. Always pat them dry and use an initial dry-flour dredge to create a tactile surface for the wet batter to grip.
Can I use water instead of beer?
Yes, but use highly carbonated club soda. The bubbles are essential for the light, aerated texture. Beer also adds sugars that assist in browning; if using water, add a pinch of sugar to help the Maillard reaction.
What is the best oil for frying pickles?
Peanut oil is the gold standard due to its high smoke point and neutral flavor. If allergies are a concern, grapeseed or canola oil are excellent secondary options that won't break down at 190C.
How do I keep the pickles crunchy longer?
The secret is the cornstarch. It creates a brittle, crystalline structure that resists moisture better than wheat flour alone. Also, always cool them on a wire rack to allow steam to escape from all sides.

