
Stop settling for the cardboard frisbees and structural failures that have plagued the industry for decades. We are here to conduct a full-scale forensic audit of the Gluten Free Pizza Crust; a culinary engineering project that demands more than just a prayer and a prayer. For too long, the gluten-free landscape has been a wasteland of gritty textures and moisture-starved disasters. We are pivoting away from those catastrophic failures and toward a high-performance, elastic, and viscous dough matrix that actually behaves like its wheat-based ancestors. Imagine a crust that boasts a shattered-glass exterior and a crumb that stretches rather than snaps. This is not just a meal; it is a triumph of molecular gastronomy over the limitations of alternative starches. We are hunting for that perfect Maillard reaction on the undercarriage and a rim that can support the weight of a premium toppings payload without buckling under the pressure. Prepare your workstation. We are about to redefine the tensile strength of the modern pizza enclosure.
THE DATA MATRIX
| Metric | Specification |
|---|---|
| Prep Time | 20 Minutes |
| Execution Time | 15 Minutes |
| Yield | 2 Large Crusts |
| Complexity (1-10) | 7 |
| Estimated Cost per Serving | $2.45 |
THE GATHERS
Ingredient Protocol:
- 350g / 2.75 cups High-Protein Gluten-Free Flour Blend (containing Xanthan Gum)
- 250ml / 1.05 cups Filtered Water (heated to 43C / 110F)
- 10g / 2 tsp Active Dry Yeast
- 15g / 1 tbsp Organic Honey or Agave
- 5g / 1 tsp Fine Sea Salt
- 30ml / 2 tbsp Extra Virgin Olive Oil
- 5g / 1 tsp Garlic Powder (for aromatic infusion)
- 2g / 0.5 tsp Psyllium Husk Powder (for structural elasticity)
Section A: Ingredient Quality Audit:
The primary failure point in most Gluten Free Pizza Crust attempts is the flour blend itself. If your blend lacks a binder like xanthan gum or guar gum, your dough will lack the necessary cohesion to trap gases. To fix a "dusty" or brittle blend, you must manually introduce psyllium husk; this creates a mucilaginous gel that mimics the stretch of gluten. Another common audit finding is expired yeast. If your yeast does not aerate and foam within five minutes of hydration, discard it immediately. Using dead leavening agents results in a dense, leaden disc that no amount of heat can rescue. Finally, ensure your water is filtered; chlorine can inhibit yeast activity and sabotage your rise before the audit even begins.
THE MASTERCLASS
Step-by-Step Execution:
1. The Hydration Phase
Combine your warm water, honey, and yeast in a small saucier or glass bowl. Stir gently and allow it to sit for 7 to 10 minutes until a thick, frothy foam develops on the surface.
Pro Tip: Use a digital scale to measure your water by weight rather than volume. Precision in hydration levels is the difference between a dough that is workable and one that is a sticky, unmanageable mess.
2. The Dry Matrix Integration
In a large mixing bowl, whisk together your flour blend, salt, garlic powder, and psyllium husk. Ensure the mixture is homogenous to avoid pockets of unseasoned starch.
Pro Tip: Sifting your dry ingredients will aerate the flour, preventing clumps and ensuring that the binders are evenly distributed throughout the protein network.
3. The Emulsification Event
Create a well in the center of your dry ingredients. Pour in the yeast mixture and the olive oil. Use a heavy-duty stand mixer with a paddle attachment to combine the ingredients on medium speed for 4 minutes.
Pro Tip: Gluten-free dough does not require kneading in the traditional sense; instead, it requires high-speed agitation to fully hydrate the starches and activate the gums for maximum viscous strength.
4. The Primary Fermentation
Transfer the dough to a lightly oiled bowl. Cover it with a damp cloth and place it in a warm, draft-free environment for 60 minutes or until it has increased in volume by at least fifty percent.
Pro Tip: A professional proofing box is ideal, but a turned-off oven with the light left on creates a perfect micro-climate for yeast metabolism.
5. The Structural Shaping
Turn the dough onto a piece of parchment paper dusted with rice flour. Use a bench scraper to divide the dough. Gently press the dough outward from the center, maintaining a slightly thicker rim for the "cornicione."
Pro Tip: Do not use a rolling pin. Hand-pressing preserves the delicate air bubbles created during fermentation, leading to a lighter, more porous internal structure.
6. The Thermal Blast
Slide the parchment and dough onto a preheated pizza stone or steel at 260C / 500F. Bake for 12 to 15 minutes until the edges are golden brown and the base is rigid.
Pro Tip: Placing your pizza steel on the highest rack of the oven utilizes radiant heat to render the fats in your cheese while simultaneously crisping the crust through conduction.
Section B: Prep & Timing Fault-Lines:
The most frequent human error is rushing the proofing stage. If the dough is cold, the yeast remains dormant, resulting in zero expansion. Conversely, over-proofing leads to a structural collapse where the dough cannot support its own weight. Always monitor the internal temperature of your dough with an infrared thermometer. Another fault-line is the "wet hand" technique; if the dough is too sticky to shape, lightly dampen your hands with water instead of adding more flour. Adding excess flour during the shaping phase will destroy the hydration ratio and yield a parched, crumbly finished product.
THE VISUAL SPECTRUM
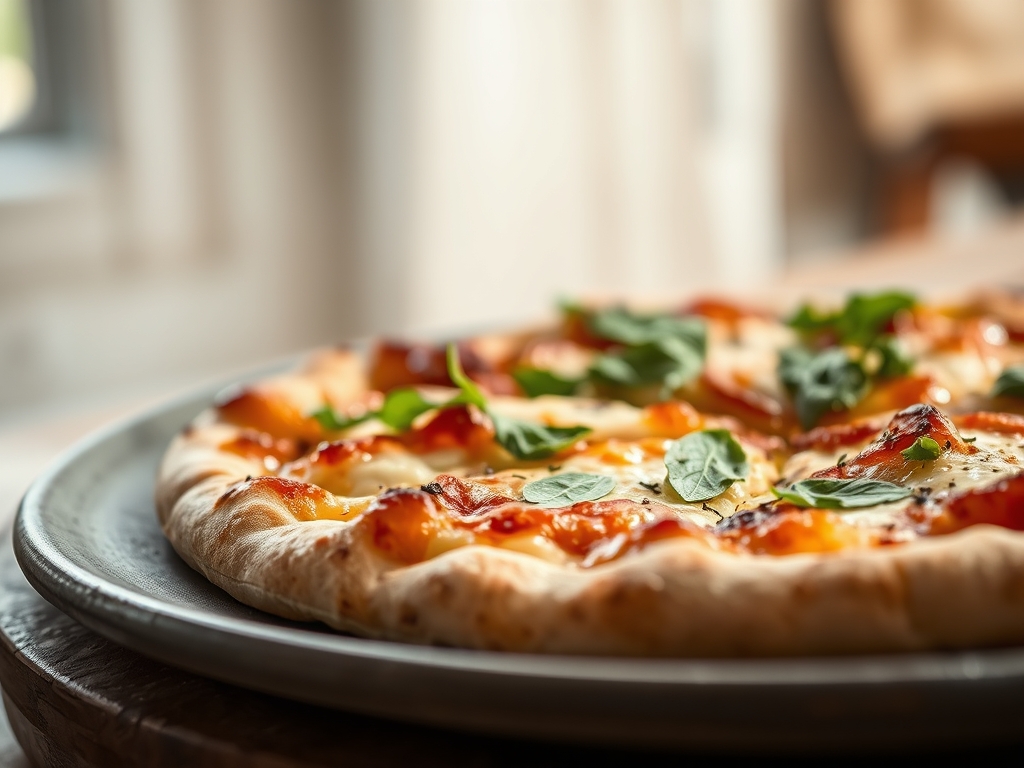
Section C: Thermal & Visual Troubleshooting:
Look closely at the reference photo above. You should see a distinct contrast between the charred "leopard spots" on the rim and the pale, creamy center of the crumb. If your crust appears monochromatic and dull, you likely skipped the honey or sugar; these are essential for the Maillard reaction to occur at high temperatures. If the crust is sagging in the middle, it indicates a moisture trap. This is solved by par-baking the crust for 5 minutes before adding wet toppings like sauce or fresh mozzarella. If the edges are cracking like dry earth, your dough was under-hydrated. Increase your water content by 5 percent in the next iteration to achieve that supple, professional sheen.
THE DEEP DIVE
Macro Nutrition Profile:
A standard serving of this Gluten Free Pizza Crust contains approximately 280 calories, 54g of carbohydrates, 6g of protein, and 5g of fat. The inclusion of psyllium husk adds 3g of dietary fiber, which also helps stabilize blood sugar responses compared to refined starch alternatives.
Dietary Swaps:
For a Vegan conversion, ensure your honey is swapped for maple syrup or organic cane sugar. For a Keto variation, the flour matrix must be entirely replaced with a blend of almond flour, coconut flour, and egg whites, though the tensile strength will shift from "bread-like" to "pastry-like."
Meal Prep & Reheating Science:
To maintain the molecular structure during storage, par-bake the crusts and freeze them individually with parchment separators. When reheating, avoid the microwave at all costs; it vibrates water molecules in a way that turns the crust into rubber. Instead, use a dry cast-iron skillet over medium heat to render the base crisp again, then finish under a broiler to re-melt the toppings.
THE KITCHEN TABLE
Why is my crust so gritty?
Grittiness is caused by large rice flour particles. Ensure your blend is "super-fine" or "stone-ground." Adding a 20-minute rest period before baking allows the starches to fully hydrate and soften.
Can I make this dough in advance?
Yes. A cold ferment in the refrigerator for 24 hours will actually improve the flavor profile through slow enzymatic activity. Bring the dough to room temperature for 60 minutes before shaping.
Why did my crust stick to the pan?
Gluten-free dough is notoriously high in moisture and sugar. Use parchment paper or a generous dusting of cornmeal on a preheated pizza steel to create a non-stick thermal barrier.
Does the type of oil matter?
Absolutely. Extra virgin olive oil provides the best flavor and helps infuse the dough with a piquant aroma. Avoid low-smoke point oils that can turn acrid at high oven temperatures.

