
Listen to the sound of the cooling loaf. It is not just a crackle; it is the rhythmic collapse of a pressurized gas chamber. This is the symphony of Sourdough Crust Tension. When you pull that boule from the oven, you are not looking at bread; you are looking at a structural masterpiece of biological engineering. The crust is the containment vessel for a wild, microbial ecosystem that has spent the last twenty four hours fighting for expansion. If your crust is flaccid, dull, or leather-tough, you have suffered a catastrophic failure in surface dehydration and gluten alignment. We are here to fix that. We are going to build a skin so taut and glass-like that it shatters upon impact, revealing the lacey, aerated crumb within. This is about the intersection of high-heat thermodynamics and the elastic limits of protein. We are going to manipulate steam, surface tension, and enzymatic activity to ensure your kitchen smells like a caramelized cathedral. Prepare for an audit of your fermentation infrastructure.
THE DATA MATRIX
| Metric | Specification |
|---|---|
| Prep Time | 45 Minutes (Active) |
| Execution Time | 24 to 30 Hours (Fermentation Dependent) |
| Yield | 2 Large Boules |
| Complexity (1-10) | 8 |
| Estimated Cost per Serving | $0.45 |
THE GATHERS
Ingredient Protocol:
- 800g / 6.25 cups High-Protein Bread Flour (12.5% protein minimum)
- 100g / 0.75 cups Whole Rye Flour (For enzymatic kick)
- 680ml / 2.85 cups Filtered Water (Target temperature: 85F)
- 180g / 0.75 cups Active Sourdough Starter (Peaked and bubbly)
- 20g / 1.25 tbsp Fine Sea Salt
Section A: Ingredient Quality Audit:
If your flour lacks the necessary protein content, your Sourdough Crust Tension will vanish as the dough fails to hold its shape during the final proof. Low-protein "all-purpose" flour often results in a viscous mess that spreads rather than springs. Fix: Incorporate 15g of Vital Wheat Gluten to reinforce the matrix. If your water is heavily chlorinated, it will inhibit microbial activity; use a charcoal filter or let the water sit out for twelve hours to dissipate the chemicals. Finally, ensure your starter is not too acidic. A "hungry" starter with a low pH will degrade the gluten structure, leading to a gummy crust that refuses to crisp.
THE MASTERCLASS
Step 1: The Autolyse Phase
Mix your flours and water until no dry streaks remain. Let this mass rest for sixty minutes before adding your starter or salt. This allows the flour to fully hydrate and initiates the protease enzymes which begin to soften the gluten for better extensibility.
Pro Tip: Use a digital scale for every gram. Volume measurements are the enemy of consistency in high-hydration baking. The autolyse ensures the dough is supple enough to stretch without tearing.
Step 2: Inoculation and Bulk Fermentation
Incorporate your active starter and salt using the "pincer method." Fold the dough every thirty minutes for the first three hours. You are looking for the dough to become smooth, aerated, and capable of holding a "windowpane" transparency.
Pro Tip: Use a bench scraper to perform "coil folds." This technique builds vertical strength in the dough, which is the foundation of future Sourdough Crust Tension.
Step 3: The Pre-Shape and Bench Rest
Gently turn the dough onto a clean surface. Divide and round into loose spheres. Let them rest for twenty minutes. This relaxes the tension just enough to allow for the final, tight shaping that will define the crust texture.
Pro Tip: Do not use excess flour here. You need a slight amount of friction against the work surface to properly render the outer skin taut.
Step 4: Final Tensioning and Cold Retard
This is the critical maneuver. Using your hands or a bench scraper, pull the dough toward you, using the friction of the table to tighten the surface skin. Place the dough upside down in a floured banneton and refrigerate for 12 to 18 hours.
Pro Tip: The cold environment slows yeast activity while allowing bacteria to produce organic acids, which infuse the crust with complex flavor and improve the Maillard reaction.
Step 5: The Score and Thermal Shock
Preheat a Dutch oven to 500F. Turn the cold dough out and use a sharp lame to score a deep, decisive cut at a 45-degree angle. This directs the expansion and prevents the crust from bursting at the seams.
Pro Tip: Drop two ice cubes into the Dutch oven before sealing the lid. The resulting steam keeps the surface viscous and elastic, allowing for maximum expansion before the crust sets.
Section B: Prep & Timing Fault-Lines:
Temperature is your most volatile variable. If your kitchen is over 80F, your bulk fermentation will accelerate, potentially over-proofing the dough before the gluten is strong enough. Use an infrared thermometer to track dough temperature; aim for a consistent 75F. If you miss your window and the dough becomes over-proofed (it fails the "poke test" by not springing back), do not attempt a long bake. Instead, shorten the final proof and bake it in a loaf pan to provide the structural support the gas bubbles can no longer maintain.
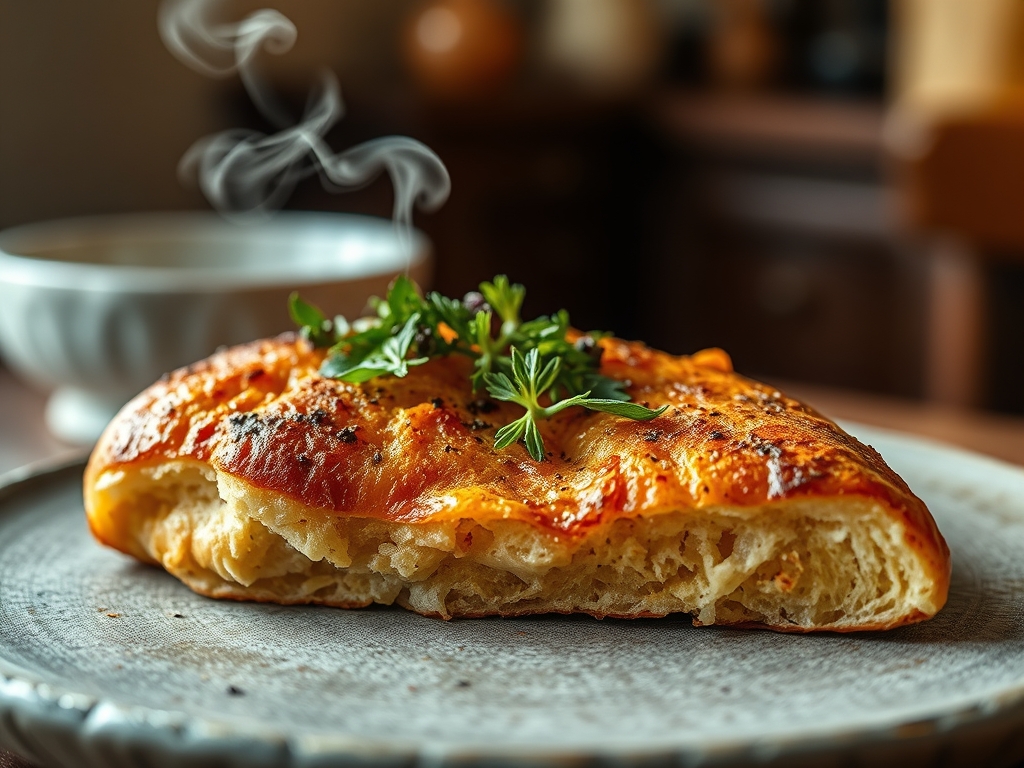
THE VISUAL SPECTRUM
Section C: Thermal & Visual Troubleshooting:
Referencing the Masterclass photo, notice the "ear" (the raised flap of crust) and the "blisters" (tiny bubbles on the surface). If your crust is matte and pale, your oven was likely too cold or your dough was under-fermented. To achieve that deep mahogany hue, you must ensure the sugars have fully converted during the cold retard. If the crust is thick and hard like a shell rather than thin and crisp, you likely lacked sufficient steam during the first fifteen minutes of baking. Steam inhibits the formation of a premature "skin," allowing the loaf to aerate fully. If you see uneven browning, rotate your Dutch oven halfway through the "lid-off" portion of the bake to account for heating element hotspots.
THE DEEP DIVE
Macro Nutrition Profile:
A standard slice (approx. 50g) contains roughly 120 calories, 4g of protein, 25g of carbohydrates, and less than 1g of fat. The long fermentation process breaks down lectins and phytates, making the nutrients more bioavailable than in commercial bread.
Dietary Swaps:
- Vegan: Naturally vegan. Ensure your flour is not enriched with animal-derived vitamins if you are a purist.
- Keto: Sourdough is inherently high-carb; however, you can substitute 30% of the flour with almond flour and flax meal, though you will sacrifice significant Sourdough Crust Tension.
- GF: Requires a dedicated gluten-free starter and a blend of sorghum, teff, and psyllium husk to mimic the protein matrix.
Meal Prep & Reheating Science:
To maintain the molecular structure, never refrigerate baked bread; it accelerates staling via starch retrogradation. Store at room temperature in a paper bag. To revive the crust, spray the loaf lightly with water and place in a 350F oven for six minutes. This re-hydrates the starch molecules and re-crisps the exterior skin.
THE KITCHEN TABLE
Why is my crust chewy instead of crispy?
This usually stems from insufficient baking time or removing the loaf before the internal temperature hits 208F. It can also happen if you wrap the bread in plastic while it is still warm, trapping steam and softening the skin.
Do I really need a Dutch oven?
While not strictly mandatory, a Dutch oven is the most effective tool for home bakers to trap steam. Without it, you must use a lava rock tray and boiling water to infuse the oven chamber with moisture.
What causes the "sour" in sourdough?
Lactic acid bacteria (LAB) produce organic acids during the long, cold fermentation. The longer the cold retard, the more piquant and tangy the flavor profile becomes as the bacteria outpace the yeast.
Can I use bleached flour?
Avoid it. The bleaching process damages the enzymes necessary for a healthy fermentation. Always opt for unbleached, organic flour to ensure your microbial colony has the best possible fuel for gas production and retention.

